Supplies
1 tube of choice – I used the wonderful artwork of Anna Marine which
can be purchased from CDO. You must have a license to use.
Font of choice - I used Cardinal Regular here
Weescotlass Mask 297 here
Divine Intentionz Template 293 here
“New Beginnings” is full size FTU scrap kit created by Cindy of Puddicat
Creations and can be downloaded from her blog here. Please leave a thank you after
downloading as it’s a small gesture for hard work given freely.
Thank you Cindy for a fantastic kit.
This tutorial was written assuming you have a working knowledge of PSP.
~♥~ Let’s get started ~♥~
Open up the template.
Shift + D.
Close out the original.
Resize all layers 85%
Image/Canvas Size:
700 x 550
OK
Highlight and open Background layer.
Flood fill white.
Delete the top 6 layers and Rectangle 1 layer.
Highlight Glittered Oval Half 2 layer.
Merge Down.
Both glittered oval halves should be on one layer now.
Click anywhere outside of it with your Magic Wand.
Selections/Invert
New Raster layer.
Copy and paste Paper 5 Into Selection.
Adjust/Add Remove Noise/Add Noise:
Gaussian and Monochrome checked
Noise: 35%
OK
Deselect.
Delete the template layer.
Highlight Oval layer.
Click anywhere outside of it with your Magic Wand.
Selections/Invert
New Raster layer.
Copy and paste Paper 3 Into Selection.
Deselect.
Delete the template layer.
Highlight Rectangle 2 layer.
Click anywhere outside of it with your Magic Wand.
Selections/Invert
New Raster layer.
Copy and paste Paper 5 Into Selection.
Apply the same Noise effect.
Selectons/Modify/Contract by 3.
New Raster layer.
Copy and paste Paper 1 Into Selection.
Deselect.
Delete the template layer.
Highlight Circle 1 layer.
Click anywhere outside of it with your Magic Wand.
Selections/Invert
New Raster layer.
Copy and paste 4 Into Selection.
Adjust/Add Remove Noise/Add Noise:
Gaussian and Monochrome checked
Noise: 10%
OK
Deselect.
Delete the template layer.
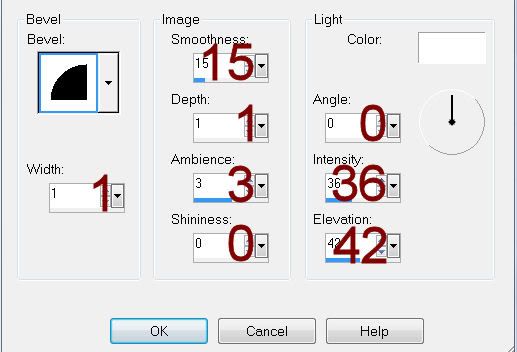
Give it a slight Inner Bevel:

Highlight Circle 2 layer.
Repeat the above step.
Copy and paste your tube as a new layer.
Position it over either the right or left circle paper layer.
Change the Properties to Soft Light.
Duplicate/Mirror/Position over the opposite circle paper layer.
Highlight the left circle paper layer.
Click anywhere outside of it with your Magic Wand.
Highlight the tube layer just above the paper.
Tap the delete key.
Deselect.
Repeat the above step with the other tube layer.
Highlight Circle 3 layer.
Click anywhere outside of it with your Magic Wand.
Selections/Invert
Selections/Modify/Contract by 5.
New Raster layer.
Copy and paste Paper 5 Into Selection.
Adjust/Add Remove Noise/Add Noise:
Monochrome and Gaussian checked
Noise: 35%
OK
Deselect.
Delete the template layer.
Give it the same slight Inner Bevel.
Highlight Circle 4 layer.
Click on it with your Magic Wand.
New Raster layer.
Copy and paste Paper 3 Into Selection.
Deselect.
Delete the template layer.
Copy and paste your tube as a new layer.
Add your elements. I used:
Pysalis 1: Resize
10%/Duplicate/Mirror
Flower 3: Resize 33%/Duplicate/Mirror/Flip
Ribbon 2: Resize 15%
Swirly Ivy: Resize 15%/Use Pick
Tool to adjust height to match rectangle
Bow 1: Resize 10% and
50%/Duplicate/Mirror
Highlight your white canvas.
New Raster layer.
Select All.
Copy and paste Paper 5 Into Selection.
Deselect.
Apply the mask.
Merge Group.
Add your name.
Color Pallet:
Foreground: #000000
Background: Pattern/Paper 1
Stroke Width: 0.8
Type your name
Convert to Raster layer.
Select All/Float/Defloat
Selections/Modify/Contract by 1
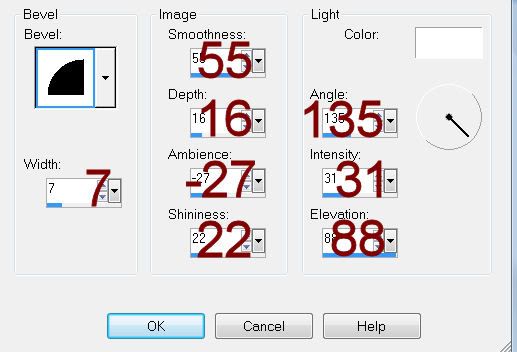
Give it a slight Inner Bevel:

Resize all layers 80%


Awesome tag Hun and wow thanks so much for the tag too that was really nice of you to send me one I really do appreciate getting them woo hoo.
ReplyDeleteHugs Cindy
Oh yes Happy New Year to you and your family and wishing you all the best in the new year.