

Supplies
1 tube of choice – I used the wonderful artwork of Dean Yeagle which
can be purchased from CDO. You must have a license to use.
Font of choice - I used Cinnamon Cake here
Becky Mask 22 here
Plug Ins:
Eyecandy 3.1 – Glow
“Spicy Womanity” is tagger size FTU scrap kit created by Dominique of Bubble’s
Dream and can be downloaded from her blog here. Please leave a thank you after
downloading as it’s a small gesture for hard work given freely.
Thank you Dominique for an awesome kit.
This tutorial was written assuming you have a working knowledge of PSP.
~♥~ Let’s get started ~♥~
Open up a 700 x 700 blank canvas.
Flood fill white.
New Raster layer.
Make your Selection Tool active set on Rectangle.
Create a rectangle approximately 375 x 475 pixels.
Copy and paste Paper 2 Into Selection.
Deselect.
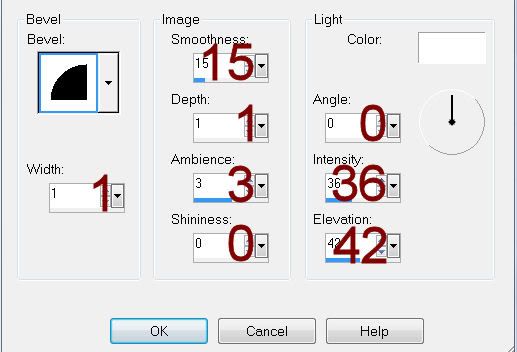
Give it a slight Inner Bevel:
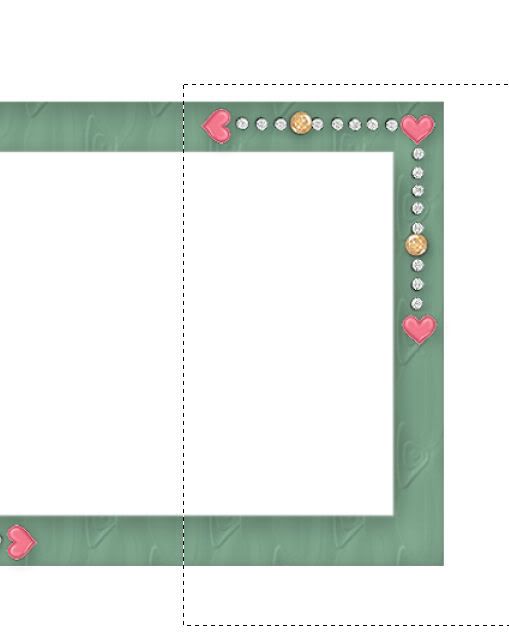
Copy and paste Element 26 as a new layer.
Use your Selection Tool and section off the right side of the frame:
Edit/Cut
Deselect.
Edit/Paste as New Layer
Match the frame pieces to create more of a square frame.
Merge Visible both frame piece layers.
Resize 65%
Free rotate Right 10 degrees
Duplicate/Mirror
Move both frames and the rectangle in position – see my tag for reference.
Highlight the top frame.
Click inside of it with your Magic Wand.
Selections/Modify/Expand by 6.
New Raster layer below the frame.
Copy and paste Paper 6 Into Selection.
Deselect.
Highlight the bottom frame.
Repeat the above step.
Copy and paste Element 6 as a new layer.
Move this to the top in your layers pallet.
Make your Selection Tool active set on Circle.
Starting at the center of the circle frame move outward with your mouse
until the edges run along the center of the hearts. It’s alright if the circle isn’t exactly
centered. We can fix that in a bit.
New Raster layer below the frame.
Copy and paste Paper 3 Into Selection.
Deselect.
You can now move the circle to center it more below the frame. If you find the paper is a bit too big then resize
to make smaller.
Give the frame a drop shadow.
Merge Visible the frame and paper.
Duplicate
Move both merged layers into position – see my tag for reference.
Copy and paste your tube as a new layer.
Move into position on the left side of the frames.
Duplicate/Mirror
Position below the top frame.
Change the Properties to Luminance (Legacy)
Change the Properties to Luminance (Legacy)
Duplicate/Move this layer below the bottom frame in your layers pallet.
Highlight the paper layer.
Click anywhere outside of it with your Magic Wand.
Highlight the tube layer above the paper.
Tap the delete key.
Deselect.
Highlight the paper below the top frame.
Click anywhere outside of it with your Magic Wand.
Highlight the tube layer above the paper.
Tap the delete key.
Deselect.
Add your elements. I used:
El 2: Resize 65%/Duplicate/Flip
El 11: Resize 30%/Duplicate
El 3: Resize 40%/Free rotate
Right 10 degrees
El 4: Resize 40%/Free rotate
Left 10 degrees
Highlight your white canvas.
New Raster layer.
Select All.
Copy and paste Paper 1 Into Selection.
Deselect.
Apply the mask.
Merge Group.
Add your name.
Type your name.
Convert to Raster layer.
Apply Eyecandy 3.1 – Glow
Width: 3
Opacity: 100
Opacity Drop off: Fat
Color: White
OK
Resize all layers 80%
No comments:
Post a Comment