Supplies
1 tube of choice – I used the wonderful artwork of Sue Miller which can
be purchased from Up Your Art. You must have
a license to use.
Font of choice - I used Scrap Snow which is a pay font. Christmas Snow here will work just as
nice.
Weescotlass Mask 297 here
Toxic Desirez Template 158 here
Plug Ins:
Eyecandy 3.1 – Glow
“Peppermint Twist” is a tagger size scrap kit created by Krissy of Krissy’s
Scraps & Imaging and can be purchased from her store Exquisite Scraps. You can visit her blog here.
Thank you Krissy for such a wonderful holiday kit.
This tutorial was written assuming you have a working knowledge of PSP.
~♥~ Let’s get started ~♥~
Open up the template.
Shift + D.
Close out the original.
Resize all layers 85%
Image/Canvas Size:
650 x 550
OK
Highlight Raster 1 layer.
Flood fill white.
Delete the following layers:
Credits
Small snow flakes
Words
Pixel Words
Snow Flakes
Highlight Left Rectangle layer.
Click on it with your Magic Wand.
New Raster layer.
Copy and paste Paper 8 Into Selection.
Deselect.
Delete the template layer.
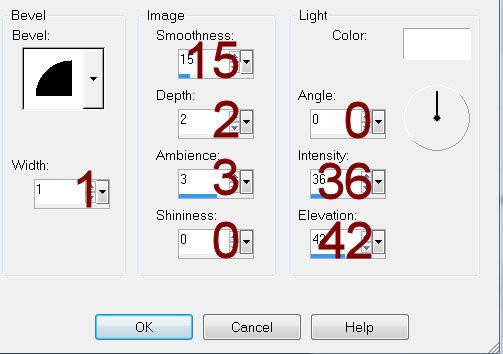
Give it a slight Inner Bevel:

Highlight Right Rectangle layer.
Repeat the above step.
Highlight Left Circle 1 layer.
Click on it with your Magic Wand.
New Raster layer.
Copy and paste Paper 5 Into Selection.
Deselect.
Delete the template layer.
Give it the same Inner Bevel.
Highlight Right Circle 1 layer.
Repeat the above step.
Highlight Rectangle layer.
Click on it with your Magic Wand.
New Raster layer.
Copy and paste Paper 11 Into Selection.
Deselect.
Delete the template layer.
Give it the same Inner Bevel.
Highlight Left Circle 2 layer.
Click on it with your Magic Wand.
New Raster layer.
Copy and paste Funky Flower 5 Into Selection.
Deselect.
Delete the template layer.
Highlight Right Circle 2 layer.
Repeat the above step.
Highlight Right Square layer.
Click on it with your Magic Wand.
New Raster layer.
Copy and paste Paper 9 Into Selection.
Deselect.
Delete the template layer.
Give it the same slight Inner Bevel.
Give it the same Inner Bevel.
Highlight Left Square layer.
Repeat the above step.
Highlight Circle 1 layer.
Click on it with your Magic Wand.
New Raster layer.
Copy and paste Paper 6 Into Selection.
Deselect.
Delete the template layer.
Give it the same Inner Bevel.
Highlight Glitter Circle layer.
Use your Target Tool and change the color of the glitter circle to
#800000.
Highlight Circle 2 layer.
Click on it with your Magic Wand.
New Raster layer.
Copy and paste Paper 8 Into Selection.
Copy and paste your tube as a new layer.
Selections/Invert
Use your Eraser Tool and erase whatever you don’t want hanging outside
of the circle.
Deselect.
Delete the template layer.
Highlight Thin Glitter Rectangle layer.
Click anywhere outside of it with your Magic Wand.
Selections/Invert
New Raster layer.
Copy and paste Paper 9 Into Selection.
Deselect.
Delete the template layer.
Adjust/Add Remove Noise/Add Noise:
Gaussian and Monochrome checked
Noise: 35%
OK
Highlight Thin Rectangle layer.
Click on it with your Magic Wand.
New Raster layer.
Copy and paste Paper 6 Into Selection.
Deselect.
Delete the template layer.
Add your elements. I used:
Snowflake 5: Resize 10% and
70%/Duplicate 4x’s
Flower 4: Resize 30%/Duplicate
Flower 3: Resize 30%/Duplicate
Twigs 4: Resize 70%
Stocking 1: Resize 45%
Candy Cane 4: Resize 40%/Free
rotate Left 10 degrees/Duplicate/Mirror
Snowflake 4: Resize
15%/Duplicate
Highlight your white canvas.
New Raster layer.
Select All.
Copy and paste the 6 Into Selection.
Deselect.
Apply the mask.
Resize 105%
Merge Group.
Add your name.
Apply Gradient Glow:
Width: 3
Opacity: 100%
Opacity Drop off: Fat
Color: White
OK
Resize all layers 80%


No comments:
Post a Comment