

Supplies
1 tube of choice – I used the wonderful artwork of Tony Tzanoukaks
which can be purchased from PSP Tubes Emporium. You must have a license to use.
Font of choice - I used Nadall here
BeckyMask 23 here
Plugs Ins:
Eyecandy 3.1 – Glow
“Auld Lang Syne” is tagger size scrap kit created by Pixie of Kissed
by Pix and can be purchased from her store TKO Scraps. You can visit her blog here.
Thank you Pixie for a really wonderful kit!
This tutorial was written assuming you have a working knowledge of PSP.
~♥~ Let’s get started ~♥~
Open up a 700 x 700 blank canvas.
Flood fill white.
Copy and paste Jewel Frame 4 as a new layer.
Resize 50%
Duplicate twice for a total of 3 frames.
Move the frames into position – see my tag for reference.
In your layers pallet, be sure the middle frame is on the top of your
layers pallet.
To each frame:
Click inside of it with your Magic Wand.
Selections/Modify/Expand by 2.
New Raster layer below the frame.
Copy and paste Solid 3 (paper) Into Selection.
Deselect.
Once you have the paper in each frame...
Copy and paste Sky Scrape 5 as a new layer at the top of your layers
pallet.
Resize 120% 2 times.
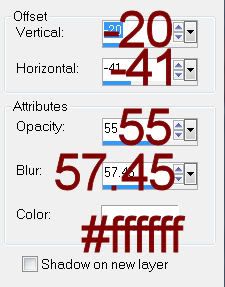
Give it a Drop Shadow -
Match your settings to mine:
Position the Sky Scrape so that it’ll look good in all 3 frames
Highlight the paper below the center frame.
Click anywhere outside of it with your Magic Wand.
Selections/Invert
Highlight the Sky Scrape element layer.
Right Click/Promote Section to layer.
Deselect
Move this promoted layer just below the middle frame in your layers
pallet.
Highlight the left frame.
Highlight the paper below the center frame.
Click anywhere outside of it with your Magic Wand.
Selections/Invert
Highlight the Sky Scrape element layer.
Right Click/Promote Section to layer.
Deselect.
Move this promoted layer just below the Left frame in your layers
pallet.
Highlight the right frame.
Highlight the paper below the center frame.
Click anywhere outside of it with your Magic Wand.
Selections/Invert
Highlight the Sky Scrape element layer.
Right Click/Promote Section to layer.
Deselect.
Move this promoted layer just below the right frame in your layers
pallet.
Delete the original Sky Scrape layer.
Close out your white background.
Merge Visible.
Reopen your white background.
Copy and paste your tube as a new layer.
Copy and paste your tube as a new layer.
Add your elements. I used:
Fireworks 2: Resize 40%
Bubbly 3: Resize 55%
Cone Hat 1: Resize 50%/Mirror
Hour Glass 1: Resize 45%
Bow 8: Resize 25%
HNY 2: Resize 65%
Highlight your white canvas.
New Raster layer.
Select All.
Copy and paste Bokeh 2 Into Selection.
Deselect.
Apply the mask.
Merge Group.
Add your name.
Apply Eyecandy 3.1 – Glow:
Width: 3
Opacity: 100%
Opacity Drop off: Fat
Color: White
OK
Resize all layers 80%
No comments:
Post a Comment