

Supplies
1 tube of choice - I used the stunning artwork of Camilla Drakenborg which can be purchased from Up Your Art. You must have a license to use.
Font of choice - I used Aquarelle here
Weescotlass Mask 362 here
Artmama’s template 23 here
“Steamy Kind of Love” is a scrap kit created by Jo of A Taggers Scrap and can be purchased from Twilight Scraps. You can visit her blog here.
Thank you Jo for such a classy and elegant kit!
This tutorial was written assuming you have a working knowledge of PSP.
~♥~ Let’s get started ~♥~
Open up the template
Shift + D.
Close out the original.
Delete top 6 layers and Dots layer.
Image/Canvas Size:
700 x 600
OK
Highlight Background layer and flood fill white.
Highlight Left Rectangle layer.
Click on it with your Magic Wand.
New Raster layer.
Copy and paste Paper 2 Into Selection.
Deselect.
Delete the template layer.
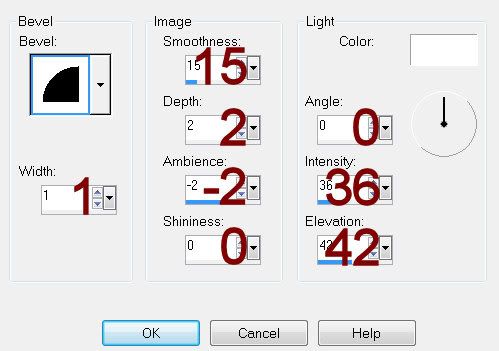
Give it a slight Inner Bevel:
Highlight Right Rectangle layer.
Click on it with your Magic Wand.
New Raster layer.
Copy and paste Paper 1 Into Selection.
Deselect.
Delete the template layer.
Give it the same slight Inner Bevel
Highlight Top Rectangle layer.
Click on it with your Magic Wand.
New Raster layer.
Copy and paste Paper 12 Into Selection.
Deselect.
Delete the template layer.
Give it the same slight Inner Bevel.
Highlight Bottom Rectangle layer.
Repeat the above step.
Highlight Left Glitter layer.
Click anywhere outside of it with your Magic Wand.
Selections/Invert
New Raster layer.
Copy and paste Paper 11 Into Selection.
Deselect.
Delete the template layer.
Adjust/Add Remove Noise/Add Noise
Monochrome and Gaussian checked
Noise: 43%
OK
Repeat the above step with:
Right Glitter layer
Center Glitter layer.
Highlight Left Circle layer.
Click anywhere outside of it with your Magic Wand.
Copy and paste Paper 8 as a new layer.
Move into a position you like.
Tap the delete key.
Copy and paste your tube as a new layer.
Move into position over the circle - see my tag for reference.
Tap the delete key.
Deselect.
Delete the template layer.
Change the Properties to Overlay.
Highlight Right Circle layer.
Click anywhere outside of it with your Magic Wand.
Copy and paste Paper 8 as a new layer.
Tap the delete key.
Copy and paste your tube.
Move into position over the circle.
Tap the delete key.
Deselect.
Delete the template layer.
Lower the Opacity of the tube to about 48.
Highlight Center Circle layer.
Click on it with your Magic Wand.
New Raster layer.
Copy and paste Paper 3 Into Selection.
Deselect.
Delete the template layer.
Copy and paste your tube as a new layer.
Position in front of the Center Circle.
Add your elements. I used:
Bow 5: Resize 30%/Duplicate/Mirror
Winged Heart: Resize 50%
Leather Tie 5: Resize 40%/Use your Pick Tool to stretch the length of the rectangle.
Rose 1: Resize 50%/Free rotate Left 85 degrees/Duplicate/Duplicate and mirror both rose layers.
Wire: Resize 65%
Flower 4: Resize 40%/Duplciate/Resize 80%
Flower 2: Resize 30%/Duplciate/Resize 80%
Candelabra 2; Resize 60%
Butterfly 2: Resize 30%/Free rotate Right 30 degrees
Highlight your white canvas.
New Raster layer.
Select All.
Copy and paste Paper 14 Into Selection.
Deselect.
Apply the mask.
Use your Pick Tool to pull the top and bottom out
Merge Group.
Add your copyrights.
Add your name.
Free rotate Left 10 degrees
Resize all layers 80%.
I hope you enjoyed this tutorial.
I’d love to see your results and show it off in my gallery.
Email me!
Hugs,
Bev
No comments:
Post a Comment