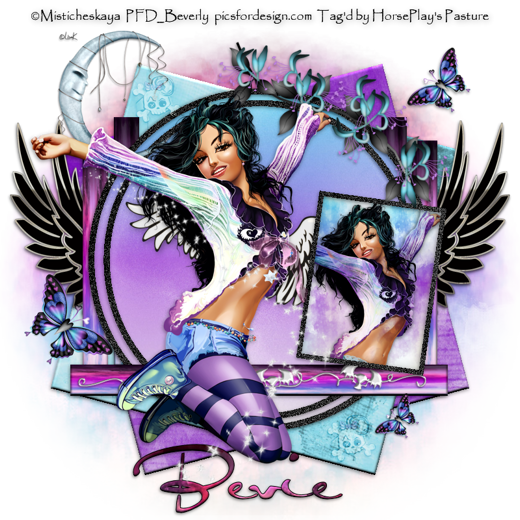
Supplies
1 tube of choice - I used the artwork of Misticheskaya which can be purchased from Pics for Design. You must generate a license to use.
Font of choice - I used Al Sandra here
Weescotlass Mask 208 here
Deb & Alisha template 4 here at Creative Misfits. The group of templates can be found under “Collab Templates” dated Sept. 13, 2011.
“Emo Angel” is a scrap kit created by Dianna of Digicats (& Dogs) and can be purchased from Butterfly Blush Designs. You can visit her blog here.
Thank you Dianna for a really awesome Emo kit!
This tutorial was written assuming you have a working knowledge of PSP.
~♥~ Let’s get started ~♥~
Open up the template
Shift + D.
Close out the original.
Delete the top layer, Raster 7, and Raster 6.
New Raster layer.
Send to bottom.
Flood fill white.
Highlight Raster 9 layer.
Click on it with your Magic Wand.
New Raster layer.
Copy and paste Paper 2 Into Selection.
Deselect.
Delete the template layer.
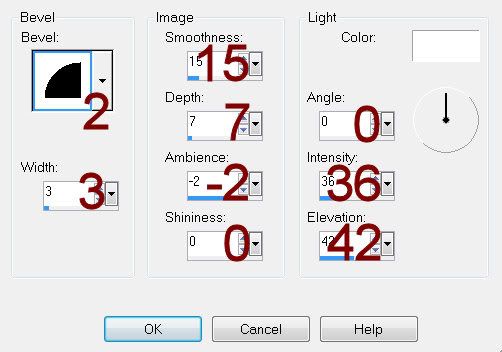
Give it a slight Inner Bevel:

Highlight Copy of Raster 9 layer.
Click on it with your Magic Wand.
New Raster layer.
Copy and paste Paper 1 Into Selection.
Deselect.
Delete the template layer.
Give it the same slight Inner Bevel
Highlight Raster 5 layer.
Click on it with your Magic Wand.
New Raster layer.
Copy and paste Paper 15 Into Selection.
Deselect.
Delete the template layer.
Give it the same slight Inner Bevel.
Repeat the above step with the following layers:
Both Copy of Raster 5 layers and Copy (2) of Raster 5 layer.
Highlight Raster 2 layer.
Click on it with your Magic Wand.
New Raster layer.
Copy and paste Paper 19 Into Selection.
Deselect.
Delete the template layer.
Highlight Raster 3 layer.
Click on it with your Magic Wand.
New Raster layer.
Copy and paste Paper 4 Into Selection.
Deselect.
Delete the template layer.
Adjust/Add Remove Noise/Add Noise
Monochrome and Gaussian checked
Noise: 53%
OK
Highlight Raster 1 layer and Copy of Vector 1 layer.
Repeat the above step.
Highlight Raster 4 layer.
Click on it with your Magic Wand.
New Raster layer.
Copy and paste Paper 15 Into Selection.
Deselect.
Delete the template layer.
Give it the same slight Inner Bevel.
Highlight Raster 8 layer.
Click on it with your Magic Wand.
New Raster layer.
Copy and paste Paper 14 Into Selection.
Copy and paste your tube as a new layer.
Position over the paper.
Selections/Invert
Tap the delete key.
Deselect.
Delete the template layer.
Change the Properties of the tube layer to Multiply.
Copy and paste your tube as a new layer.
Position in front of the large Circle.
Add your elements. I used:
Heart Wings
Dark Wings: Resize 60%/Duplicate/Mirror
Flower 1: Resize 60%
Fairy Moon: Resize 50%
Butterfly 1: Resize 35%/Duplicate/Mirror/Resize 70%/Duplicate/Resize 70%
Glitter Trail 1: Resize 90%
Skull Ring: Resize 25%/Change the Properties to Soft Light/Duplicate
Skull Doodle: Resize 90%
Highlight your white canvas.
New Raster layer.
Select All.
Copy and paste Paper 13 Into Selection.
Deselect.
Apply the mask.
Use your Pick Tool to pull the sides out
Merge Group.
Duplicate
Add your copyrights.
Add your name.
Give it the same slight Inner Bevel.
Resize all layers 65%.
I hope you enjoyed this tutorial.
I’d love to see your results and show it off in my gallery.
Email me!
Hugs,
Bev

No comments:
Post a Comment