Supplies
1 tube of your choice - I used the beautiful artwork of Jennifer Janesko at CILM
Font of Choice - I used Chocolate Box here
Linda’s template #58 - can be found at Creative Misfits here - scroll down the blog. You’ll find it under the name of Linda.
Designs by Vab’s Mask 111 here
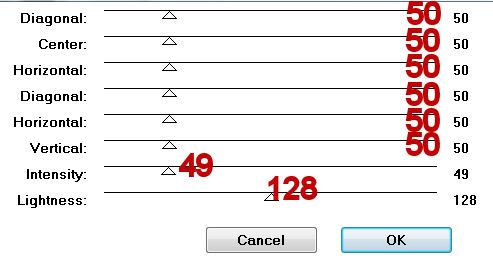
Greg’s Factory Output - Vol II: Pool Shadow
“Late Summer Days” is a PTU full size scrap kit created by Dana of Danas Creative Studio and can be purchased at Twilight Scraps. You can visit her blog here.
Thank you Dana for a very beautiful summer kit.
This tutorial was written assuming you have a working knowledge of PSP.
~♥~ Let’s get started ~♥~
Open up the template.
Shift + D.
Close out the original.
Open up the Background layer.
Delete the following layers:
Credit, Text, Splat Brush, Pixel Text, and Shape.
Highlight Oval layer.
Select All/Float/Defloat
Copy and paste Paper 6 as a new layer.
Resize 25% and 60%
Move into the position you like.
Selections/Invert
Tap the delete key.
DO NOT DESELECT.
Copy and paste your tube as a new layer.
Move into position.
Tap the delete key.
Deselect.
Delete the template layer.
In your color pallet:
Foreground: #5f5f3d
Background: #f2f3b7
Set to Gradient:
Style: Linear
Angle: 45
Repeats: 1
Highlight Glitter Squares layer.
Make your Target Tool active and color the glitter layer with the foreground color.
Repeat the above step with the following layers:
Glitter Oval
Feather Brush
Feather Brush 2
Glitter Rectangles
Glitter Circle
Highlight Rectangles layer.
Select All/Float/Defloat
New Raster layer.
Flood fill the layer with your foreground color.
DO NOT DESELECT.
Apply Greg’s Factory Output - Vol II: Pool Shadow

Deselect.
Delete the template layer.
Highlight Circle layer.
Select All/Float/Defloat
New Raster layer.
Flood fill with your gradient.
DO NOT DESELECT.
Copy and paste your tube again.
Move into position over the gradient circle.
Resize as needed.
Selections/Invert
Tap the delete key.
Deselect.
Delete the template layer.
Change the Properties to Overlay.
Add your embellishments. I used:
Bow 2: Resize 25% Free rotate right 45 degrees
Ribbon 1: Resize 25% and 70%/Mirror
Fastner 2: Resize 25% and 04% Free rotate right 90 degrees
Leaves 4: Resize 25% and 70% Free rotate left 25 degrees - duplicate as many times as you like - you can mirror some if you like etc.
Glitter 1: Resize 25% Duplicate/Mirror
Butterfly 1: Resize 25% and 25%
Butterfly 2: Resize 25% and 25% and 70%/Mirror
Highlight your white background.
Select All
New Raster layer.
Copy and paste a paper of choice Into Selection.
Deselect.
Apply the mask.
Merge Group.
Add your credits.
Add your name.
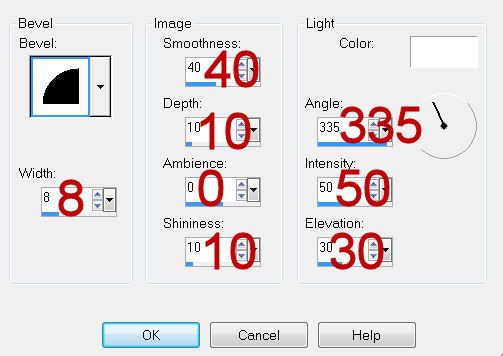
Give it a slight inner bevel:

Resize all layers 85%.
I hope you enjoyed this tutorial.
I’d love to see your results and show it off in my gallery.
Email me!
Hugs,
Bev
Resize as needed.
Selections/Invert
Tap the delete key.
Deselect.
Delete the template layer.
Change the Properties to Overlay.
Add your embellishments. I used:
Bow 2: Resize 25% Free rotate right 45 degrees
Ribbon 1: Resize 25% and 70%/Mirror
Fastner 2: Resize 25% and 04% Free rotate right 90 degrees
Leaves 4: Resize 25% and 70% Free rotate left 25 degrees - duplicate as many times as you like - you can mirror some if you like etc.
Glitter 1: Resize 25% Duplicate/Mirror
Butterfly 1: Resize 25% and 25%
Butterfly 2: Resize 25% and 25% and 70%/Mirror
Highlight your white background.
Select All
New Raster layer.
Copy and paste a paper of choice Into Selection.
Deselect.
Apply the mask.
Merge Group.
Add your credits.
Add your name.
Give it a slight inner bevel:

Resize all layers 85%.
I hope you enjoyed this tutorial.
I’d love to see your results and show it off in my gallery.
Email me!
Hugs,
Bev

This comment has been removed by a blog administrator.
ReplyDeleteThis comment has been removed by a blog administrator.
ReplyDelete