

Clicking on the image will enlarge to full view.
Supplies
3 tubes of choice - I used the wonderful artwork of PinUpToons at CILM
Font of Choice - I used Ma Sexy
Weescotlass Mask 297 here
Scrapity Scrap and More here.
“Mint to Be” is a PTU tagger size scrap kit created by Kristi of oOohLaLa Scraps and can be purchased at her store I Got Lucky Skraps. You can visit her blog here.
Thank you Kristi for such a delicious kit!
This tutorial was written assuming you have a working knowledge of PSP.
~♥~ Let’s get started ~♥~
Open up the template.
Shift + D.
Close out the original.
Delete the credit layer.
Highlight Bottom Gray Rect layer.
Click on it with your Magic Wand.
New Raster layer.
Copy and paste paper 10 as a new layer.
Resize 75%
Move into position over the rectangle.
Selections/Invert
Tap the delete key.
Deselect.
Delete the template layer.
Highlight Top Gray Rect layer.
Repeat the above step.
Highlight Border Bottom Gray layer.
Select All/Float/Defloat
New Raster layer.
Copy and paste one of the dark brown papers of choice Into Selection.
Deselect.
Delete the template layer.
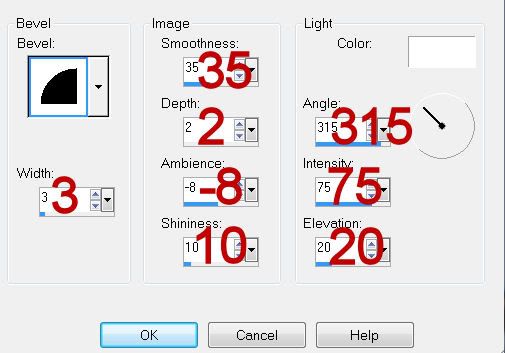
Give it a slight Inner Bevel:
Highlight Border Top Gray layer.
Repeat the above step.
Highlight Top Small Rect layer.
Click on it with your Magic Wand.
Copy and paste Paper 21 as a new layer.
Resize 68%
Move into position by lining up the top of the paper with the top of the rectangle.
Selections/Invert
Tap the delete key.
Deselect.
Delete the template layer.
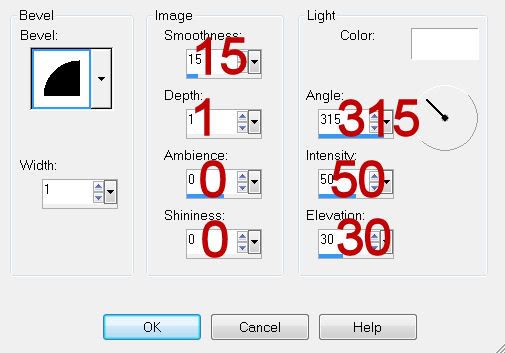
Give it the same Inner BEvel.
Highlight Bottom Small Rect layer.
Repeat the above step.
Highlight Line Top Small layer.
Select All/Float/Defloat
Copy and paste a Paper 1 Into Selection.
Deselect.
Delete the template layer.
Give it an inner bevel:
Highlight Line Bottom Small layer.
Repeat the above step.
Highlight Circle layer.
Click on it with your Magic Wand.
New Raster layer.
Copy and paste Paper 15 Into Selection.
Modify/Contract by 5.
Tap the delete key.
Selections/Modify/Expand by 3.
New Raster layer below the “round frame” you just made.
Copy and paste Paper 17 Into Selection.
New Raster layer.
Copy and paste Frame 6 Into Selection.
Copy and paste Hearts just above the paper.
Resize 30%
Move into position.
Selections/Invert
Tap the delete key.
Change the Properties to Soft Light.
Deselect.
Delete the template layer.
Highlight Diamonds layer.
Click on them with your Magic Wand.
New Raster layer.
Copy and paste Paper 15 Into Selection.
Modify/Contract by 8.
Tap the delete key.
Selections/Modify/Expand by 3.
New Raster layer just below the new diamond frames you just made.
Copy and paste Paper 1 Into Selection.
Copy and paste a tube below each of the frames.
Selections/Invert
Highlight each tube layer and tap the delete key.
Deselect.
Delete the template layer.
Highlight the diamond frames layer.
Give it a slight inner bevel.
Highlight Dotted Lines layer.
Select All/Float/Defloat
New Raster layer.
Copy and paste a dark brown paper of choice Into Selection.
Deselect.
Delete the template layer.
Copy and paste your 3rd tube as a new layer.
Add your embellishments. I used:
Bow 3: Resize 30% Free rotate right 5 degrees
Charm 4: Resize 30%
Bow 2: Resize 30%
Flower 2: Resize 35% Free rotate left 10 degrees Duplicate/Mirror
Flower 1: Resize 40%/Mirror/Free rotate right 5 degrees
Doodle 4: Resize 30%
Highlight your white background.
New Raster layer.
Select All.
Copy and paste a paper of choice Into Selection.
Deselect.
Apply the mask.
Merge Group.
Add your credits.
Add your name.
Give it the same Inner Bevel.
Resize all layers 85%.
I hope you enjoyed this tutorial.
I’d love to see your results and show it off in my gallery.
Email me!
Hugs,
Bev
No comments:
Post a Comment