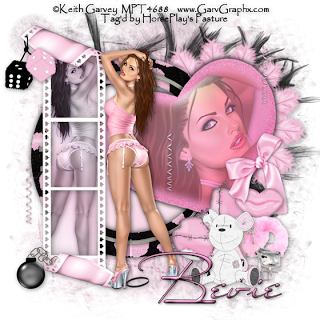
Clicking on the image will enlarge to full view.
Supplies
1 tube of choice and 1 close up image - I’m using the awesome artwork of Keith Garvey at MPT
Font of Choice - I’m using Miss Stanford here
Scrap Dimentions Mask 6 here
Xerox - Porcelain
DSB Flux - Bright Noise
“Playtoy” is a PTU scrap kit created by Michelle of Scraps with Attitude and can be purchased from her store Scraps with Attitude. You can visit her blog here.
Thank you Missy for such a fun kit!
This tutorial was written assuming you have a working knowledge of PSP.
~♥~ Let’s get started ~♥~
Open up a 700 X 700 blank canvas.
Flood fill white.
Copy and paste Round Frame 1 a new layer.
Resize 55%
Click inside with your Magic Wand.
Selections/Modify/Expand by 6.
New Raster layer below the frame.
Flood fill with a gradient of choice.
Deselect.
Close out your white layer.
Merge Visible.
Reopen your white canvas.
Copy and paste Film Strip 2 as a new layer.
Resize 75%
Free rotate left 90 degrees
Click inside each of the squares with your Magic Wand.
Selections/Modify/Expand by 3.
New Raster layer below the film strip.
Flood fill with the same gradient.
Copy and paste your tube below the strip.
Selections/Invert
Tap the delete key.
Deselect.
Change the Properties to Luminance Legacy.
Merge Down with the gradient layer.
Apply Xerox - Porcelain
Default Settings.
Close out your round merged layer and your white background.
Merge Visible.
Reopen all layers.
Move your merged film strip layer and merged circle layers into position.
See my tag for reference.
Copy and paste Glass Heart 1 as a new layer.
Resize 50%
Free rotate left 20 degrees
Duplicate the heart.
Highlight the duplicated heart layer.
Select All/Float/Defloat
Copy and paste your close up image as a new layer.
Move into position over the heart.
Selections/Modify/Feather
Number of Pixels:
43
OK
Tap the delete key until you have a nice feathered look.
Deselect.
Change the Properties to Multiply and lower the Opacity to about 59 or so.
Highlight the original Glass Heart layer.
Select All/Float/Defloat
Apply DSB Flux - Bright Noise:
Intensity: 25
Mix: checked
OK
Selections/Modify/Feather
Number of Pixels:
45
OK
DO NOT DESELECT
Highlight the Duplicated Heart layer.
Selections/Invert
Tap the delete key a couple of times just to give the edges of the heart a glittered effect.
Deselect.
Copy and paste your other tube as a new layer.
Add your embellishments. I used:
Feather Fan 1: Resize 50% Free rotate right 45 degrees
Feathers 2
Barbed Wire Heart 1: Resize 25% Free rotate left 45 degrees
Bear: Resize 25%
Fuzzy Hand Cuffs: Resize 25% and 80%
Lip Sucker 1: Resize 30%
Ball n Chain 2: Resize 25%
Fuzzy Dice: Resize 25% and 60%
Satin Bow 1: Resize 25%
Streamer 1: Resize 25% and 70%
Highlight your white background.
New Raster layer.
Select All.
Copy and paste a paper of choice Into Selection.
Deselect.
Apply the mask.
Merge Group.
Duplicate/Merge Down
Duplicate/Merge Down
Duplicate/Merge Down
Add your credits.
Add your name.
Resize all layers 80%.
I hope you enjoyed this tutorial.
I’d love to see your results and show it off in my gallery.
Email me!
Hugs,
Bev

Another great tut, Thank you.
ReplyDelete