Supplies
Font of Choice - I used Oh Lara
Insatiable Dreams Mask 177 here
Scraps of Enchantment Template 40 here
DSB Flux - Bright Noise - Optional
“Easter‘s Dawn” is a PTU scrap kit created by Susan of Tootypup Scraps and can be purchased from Aussie Scrap Designs. You can visit Susan’s blog here.
Thank you so much Susan for this breathtakingly beautiful kit. Anyone who purchases your kit will not be disappointed!
This tutorial was written assuming you have a working knowledge of PSP.
~♥~ Let’s get started ~♥~
Open up the template.
Shift + D.
Close out the original.
Resize all layers 85%.
Image/Canvas size
700 X 600
Flood fill the background white.
Delete the following layers:
Info, Brush Top, Brush Bottom, Small Heart, Large Heart
Highlight Black Square layer.
Use your Magic Wand and click on it.
New Raster layer.
Copy and paste a paper of choice Into Seletion.
Deselect.
Delete the template layer.
Highlight Rounded Rectangle layer.
Use your Magic Wand and click on it.
New Raster layer.
Flood fill with a gradient of your choice.
DO NOT DESELECT.
Copy and paste StarShine 1 as a new layer just above the gradient layer.
Resize 40%
Move into position toward the top right corner of the rectangle.
See my tag for reference.
Selections/Invert
Tap the delete key.
DO NOT DESELECT.
Copy and paste Angel 3 as a new layer.
Resize 35%
Move into position just below the StarShine layer.
Tap the delete key.
Change the Properties to Luminance Legacy.
Deselect.
Delete the template layer.
Highlight Grey Square.
Use your Magic Wand and click on it.
New Raster layer.
Copy and paste a paper of choice Into Selection.
Deselect.
Delete the template layer.
Highlight White Frame layer.
Use your Magic Wand and click on it.
New Raster layer.
Copy and paste a paper of choice Into Selection.
Adjust/Blur/Gaussian Blur
Radius: 1
OK
Deselect.
Delete the template layer.
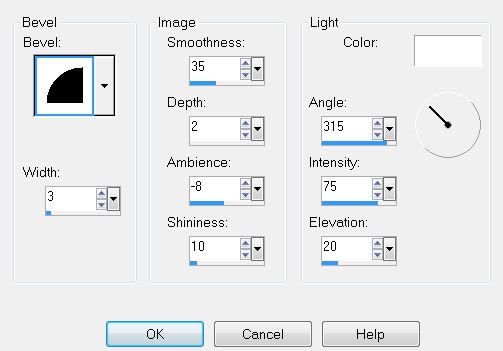
Give it a slight inner bevel:

Highlight Scallop Strip layer.
Use your Magic Wand and click on it.
New Raster layer.
Copy and paste the same paper you used for your frame Into Selection.
Aply the same Gaussian blur.
Deselect.
Delete the template layer.
Add your embellishments. I used:
Vine 1: Resize 40%
Fern 9: Resize 40%
Cross 2: Resize 30%
Dove 1: Resize 30%
Angel 3: Resize 50%
Butterfly 1: Resize 25% and 50% Free rotate 15 degrees
Butterfly 4: Resize 25% and 40% Free rotate 15 degrees
Highlight your white background.
New Raster layer.
Select All
Copy and paste a paper of choice Into Selection.
Deselect.
Apply the mask.
Merge Group.
Add your copyrights.
Add your name.
Give it the same inner bevel.
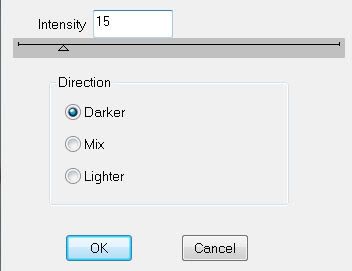
Apply DSB Flux Bright Noise:

Resize all layers 80%.
I hope you enjoyed this tutorial.
I’d love to see your results and show it off in my gallery.
Email me!
Hugs,
Bev


No comments:
Post a Comment