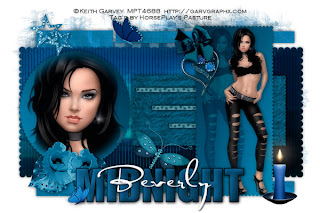
Clicking on the image will enlarge to full view.
Supplies
1 tube of choice and 1 close-up Image - I’m using the awesome artwork of Keith Garvey which you can purchase here.
Font of Choice - I used Al Sandra here and Impact which came with my pc
Weescotlass Mask 297 here
Scraps of Enchantment Template 28 here : Scroll down the blog and look in the right column for Template and Word Art Links.
Greg’s Factory Output Vol. II - Pool Shadow
Tramage: Tow the Line here
Xero: Porcelain
“Midnight Hour” is a FTU size scrap kit created by ©Tina Bug Creations and can be downloaded from her blog here.
Please leave a thank you when downloading as it’s a small gesture for hard work given freely.
This tutorial was written assuming you have a working knowledge of PSP.
~♥~ Let’s get started ~♥~
Open up the template.
Image/Canvas size
750 X 500.
Highlight the background layer and flood fill white.
Delete the info layer.
Highlight Light Grey Rectangle layer.
Select All/Float/Defloat
New Raster layer.
Copy and paste Paper 15 Into Selection.
Deselect.
Delete the template layer.
Highlight Black Scalloped Rectangle.
Select All/Float/Defloat
New Raster layer.
Copy and paste Paper 20 Into Selection.
Deselect.
Duplicate
Adjust/Blur/Gaussian Blur
15
Ok
Apply Tramages: Tow the Line

Apply Greg’s Factory Output Vol. II - Pool Shadow
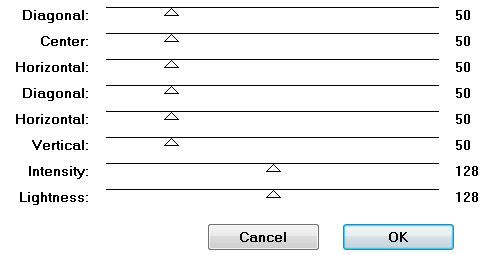

Highlight Black Scalloped Rectangle layer again.
Select All/Float/Defloat
Selections/Invert
Highlight the paper layer you just added all the filters to.
Tap the delete key.
Deselect.
Change the Properties to Soft Light.
Delete the template layer.
Highlight Thin Rectangle 2 layer.
Merge Down.
It should be on the same layer now with Thing Rectangle 1.
Select All/Float/Defloat
Copy and paste Paper 15 as a new layer.
Selections/Invert
Tap the delete key.
Deselect.
Highlight Small White Scallop layer.
Select All/Float/Defloat
Copy and paste Paper 17 as a new layer.
Resize 50%
Selections/Invert
Tap the delete key.
Deselect.
Highlight Gray Scallop layer.
Select All/Float/Defloat
New Raster layer.
Mirror Paper 17 - Copy and paste Into Selection.
Deselect.
Copy and paste your tube as a new layer over the rectangle.
Position it to the left side of it.
See my tag for reference.
Duplicate and move to the right side.
Apply Xerox - Porcelain:
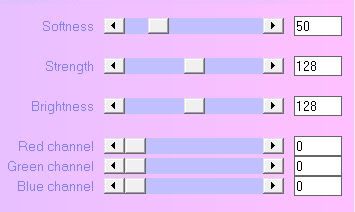
Select All/Float/Defloat
Selections/Invert
Highlight the paper layer you just added all the filters to.
Tap the delete key.
Deselect.
Change the Properties to Soft Light.
Delete the template layer.
Highlight Thin Rectangle 2 layer.
Merge Down.
It should be on the same layer now with Thing Rectangle 1.
Select All/Float/Defloat
Copy and paste Paper 15 as a new layer.
Selections/Invert
Tap the delete key.
Deselect.
Highlight Small White Scallop layer.
Select All/Float/Defloat
Copy and paste Paper 17 as a new layer.
Resize 50%
Selections/Invert
Tap the delete key.
Deselect.
Highlight Gray Scallop layer.
Select All/Float/Defloat
New Raster layer.
Mirror Paper 17 - Copy and paste Into Selection.
Deselect.
Copy and paste your tube as a new layer over the rectangle.
Position it to the left side of it.
See my tag for reference.
Duplicate and move to the right side.
Apply Xerox - Porcelain:

Highlight the tube that’s on the left and change the Properties to Soft Light. Lower the Opacity to 51.
Highlight Circle Scallop.
Select All/Float/Defloat
New Raster layer.
Highlight Paper 7 again and hit the Undo button so that the paper isn’t mirrored any more.
Copy and paste Into Selection.
DO NOT DESELECT.
Copy and paste your close-up image as a new layer.
Position it over the circle.
Selections/Modify/Feather
Number of Pixels: 35
OK
Selections/Invert
Tap the delete key until you have a nice feathered effect.
Deselect.
Apply the same Porcelain effect as before.
Add your embellishments. I used:
Border 2: Resize 40% Duplicate 2 times
Bow 1: Resize 25% and 60% Free rotate left 30 degrees
Gem Heart 3: Resize 50%
Leaf 4: Resize 25% and 70%
Flower 2: Resize 25% and 70% Mirror.
Flower 2 again: Resize 25% and 60%
Bling 4: Resize 30% Duplicate/Resize 80%
Dragonfly 1: Resize 25% Free rotate right 30 degrees
Butterfly 3: Resize 25% and 50%
Candle 1: Resize 25% and 30%
Butterfly 1: Resize 25% and 30%
Using the Impact Font Type out the word “Midnight”.
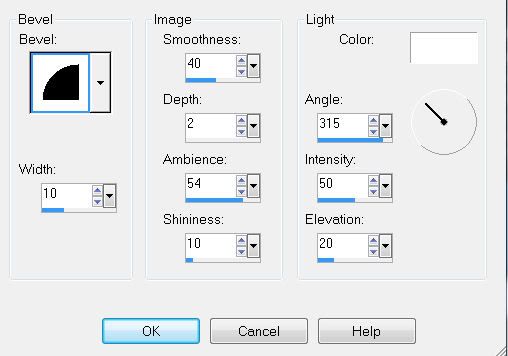
Give it a slight inner bevel:

Highlight your white background.
New Raster layer.
Select All
Copy and paste a paper of choice Into Selection.
Deselect.
Apply the mask.
Merge Group.
Add your copyrights.
Add your name using AL Sandra font.
Give it the same inner bevel.
Resize all layers 80%.
I hope you enjoyed this tutorial.
New Raster layer.
Select All
Copy and paste a paper of choice Into Selection.
Deselect.
Apply the mask.
Merge Group.
Add your copyrights.
Add your name using AL Sandra font.
Give it the same inner bevel.
Resize all layers 80%.
I hope you enjoyed this tutorial.

No comments:
Post a Comment