Supplies
1 tube and 1 close-up of choice - I’m using the wonderful artwork of Elias Chatzoudis which you can purchase here.
Font of Choice - I used Bonheur Royale
Weescotlass Mask 249 here
“Dreams” is a FTU size scrap kit created by Heike of Fantasy Dreams Designz and can be downloaded from her blog here.
Please leave a thank you when downloading as it’s a small gesture for hard work given freely.
This tutorial was written assuming you have a working knowledge of PSP.
~♥~ Let’s get started ~♥~
Open up a 700 X 700 blank canvas.
Flood fill white.
Copy and paste Element 17 as a new layer.
Resize 85%
Use your Magic wand and click inside each circle.
Selections/Modify/Expand by 6
New Raster layer below the frame.
Copy and paste a paper of choice Into Selection.
DO NOT DESELECT.
Copy and paste your close up image as a new layer below the frame.
Selections/Invert
Tap the delete key.
Deselect.
Change the Properties to Multiply.
Copy and paste Element 22 as a new layer.
Position it near the lower part of the frame.
Highlight your frame.
Select All/Float/Defloat
Selections/Invert
Highlight Element 22 layer.
Use your eraser tool and erase any of the ribbon that’s hanging over the frame edge.
Deselect.
Copy and paste your tube as a new layer.
Add your embellishments. I used:
Element 34: Resize 85% Duplicate/Mirror
Element 55: Resize 85%
Element 72
Highlight your white background.
New Raster layer.
Select All
Copy and paste a paper of choice Into Selection.
Deselect.
Apply the mask.
Merge Group.
Add your copyrights.
Add your name.
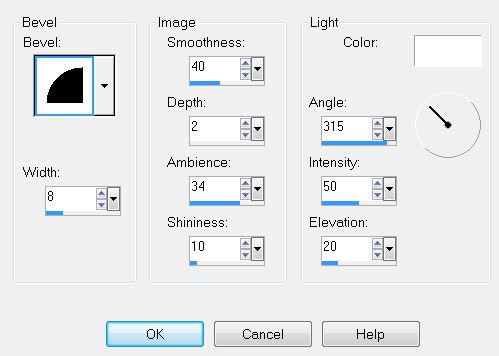
Give it an inner bevel:

Crop your image.
Resize all layers 85%.
I hope you enjoyed this tutorial.
I’d love to see your results and show it off in my gallery.
Email me!
Hugs,
Bev


No comments:
Post a Comment