

Supplies
1 tube of choice - I used the artwork of Anna Marine at CILM
Font of Choice - I used Yiggivoo here and Oh Lara (pay font)
Gems Mask 204 here
DSB Flux - Bright Noise
Greg's Factory Output Vol. II - Pool Shadow
“Autumn has Arrived” is a PTU tagger size scrap kit created by Wilma of Wilma4ever and can be purchased from her store Wilma4ever. You can visit her blog here.
Thank you Wilma for a really wonderful autumn kit!
This tutorial was written assuming you have a working knowledge of PSP.
~♥~ Let’s get started ~♥~
Open up a 700 x 700 blank canvas.
Flood fill white.
Make your Selection Tool active.
Set to Rectangle.
Make a rectangle about the size of 290 x 450.
Don’t worry about it being centered…you can do that in a bit.
New Raster layer.
Copy and paste Paper 1 Into Selection.
Selections/Modify/Contract by 15
New Raster layer.
Copy and paste Paper 2 Into Selection.
Copy and paste your tube as a new layer over the paper.
Move into position.
Selections/Invert
Tap the delete key.
Deselect.
Change the Properties to Multiply.
Give the green paper a drop shadow.
Close out your white background.
Merge Visible.
Reopen the merged layer.
Go ahead and center the merged layer.
I positioned my ever so slightly off center, but it’s up to you.
Copy and paste your tube as a new layer.
Color Pallet:
Foreground: Pattern/Paper 1
Background: Pattern/Paper 4
Stroke: 2
Make your Text tool active and type out the word “Autumn”.
Free rotate left 90%
Pull the top and bottom in to align with your merged rectangle.
Convert to Raster layer.
Select All/Float/Defloat
Selection/Modify/Contract by 1
Give it a slight inner bevel:
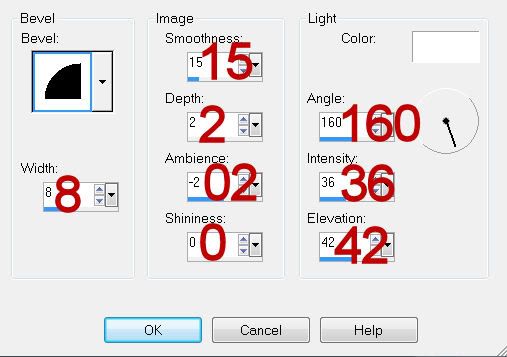
Repeat the bevel 2 more times.
Apply DSB Flux - Bright Noise:
Intensity: 26
Mix checked
OK
Deselect.
Apply Greg's Factory Output Vol. II - Pool Shadow.
Use the default settings accept move the Intensity bar to get the effect you want.
I didn't show the one I used as I was truly undecided - so many different looks I found were terrific. So you decide what you like on your tag.
Add your embellishments. I used:
Bow 2: Resize 40%
Leave 6: Resize 70%/Mirror
Leave 5: Resize 60%/Free rotate right 30 degrees/Duplicate/Resize 70%
Butterfly 2: Resize 25%
Butterfly 3: Resize 35%
Crop your image.
Highlight your white background.
Select All.
Copy and paste Paper 7 Into Selection.
Deselect.
Apply the mask.
Merge Group.
Copy and paste Owl as a new layer.
Move it just above the mask layer and position it so it looks as if it’s peeking out through the word Autumn.
Apply the mask.
Merge Group.
Change the Properties to Overlay.
Add your credits.
Add your name.
Give it the same slight inner bevel 3 times.
Resize all layers 90%.
I hope you enjoyed this tutorial.
I’d love to see your results and show it off in my gallery.
Email me!
Hugs,
Bev
No comments:
Post a Comment