
 Clicking on the image will allow you to enlarge for bigger view.
Supplies
Font of Choice - I used Luna Bar here
Weescotlass Mask 138 here
Scrap Rebellion Template 27 here
DSB Flux - Bright Noise
“Past and Present” is a PTU tagger size scrap kit created by Funky of WishingonaStarr and can be purchased from Butterfly Blush Designs. You can visit her blog here.
Thank you Funky for such a lovely winter kit!
This tutorial was written assuming you have a working knowledge of PSP.
~♥~ Let’s get started ~♥~
Open up the template.
Shift + D.
Close out the original.
Delete the top 5 layers and the Blue Strip layer.
Image/Canvas Size
700 x 650
OK
Flood fill the background layer white.
Highlight Blue Oval layer.
Click on it with your Magic Wand.
New Raster layer.
Copy and paste Paper 14 Into Selection.
Deselect.
Delete the template layer.
Highlight Top Square layer.
Click on it with your Magic Wand.
New Raster layer.
Copy and paste Paper 10 Into Selection.
Deselect.
Delete the template layer.
Highlight Bottom Square layer.
Repeat the above step using the same paper.
Highlight Circle layer.
Copy and paste Paper 8 Into Selection.
Deselect.
Open up Paper 11.
Adjust/Blur/Gaussian Blur
Radius: 10
OK
Copy
Highlight Frame layer.
Click on it with your magic Wand.
New Raster layer.
Paste
Deselect.
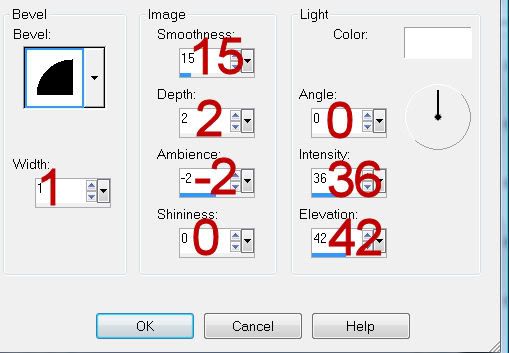
Give it a slight Inner Bevel:
Apply DSB Flux - Bright Noise:
Mix checked
Intensity: 20
OK
Paste and move into position the following elements:
(Don’t worry about what overhangs the frame. We’ll take care of that in a bit)
79
61: Resize 70%/Lower the Opacity to 16
70: Change the Properties to Soft Light
45: Resize 70%
Highlight the circle paper layer.
Click anywhere outside of it with your Magic Wand.
Highlight each of the element layers below the frame and tap the delete key.
Deselect.
Add your embellishments. I used:
46: Resize 70%/Mirror/Duplicate/Mirror/Flip
36: Duplicate
89: Resize 80%
77
8: Mirror/Erase the loop (otherwise it’ll look like you’re trying to snare the penguins’ feet…lol)
18: Resize 50%
57: Resize 25%
24: Resize 50%
5
Highlight your white background.
Select All.
Copy and paste a paper of choice Into Selection.
Deselect
Apply the mask.
Resize 130%
Merge Group.
Add your credits if you used a tube that requires it.
If you only used the scrap kit the designer would really appreciate credit for the kit but it is not required.
Add your name.
Apply the same inner bevel twice.
Resize all layers 80%.
I hope you enjoyed this tutorial.
I’d love to see your results and show it off in my gallery.
Email me!
Hugs,
Bev
Thanks soooo much for using my kit in this tutorial sweetheart.....I love it.
ReplyDelete((huggles)) Funky xx