Supplies
Font of Choice - I used Rolina here
JWY_mask010 which I’ve supplied here. If you know who this belongs to please email me so that I can give proper credit or remove.
Tracy F. Designs Template 31 here. Scroll down the blog, right hand side you’ll see all of her templates in bulk loads.
Filters Unlimited 2.0 - Optional
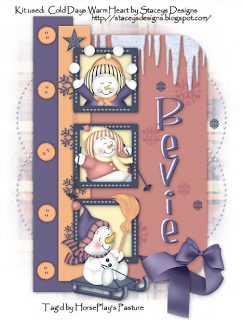
“Cold Days Warm heart” is a PTU tagger size scrap kit created by Staceys Designs and can be purchased from Scraps with Attitude. You can visit her blog here.
Thank you Stacey for a really super cute kit!!
This tutorial was written assuming you have a working knowledge of PSP.
~♥~ Let’s get started ~♥~
Open up the template.
Shift + D.
Close out the original.
Delete the top 2 layers.
Resize all layers 120%
Image/Canvas Size
550 x 725
OK
New Raster layer.
Send to bottom.
Flood fill white.
Open up Icicles 1.
Scroll your mouse wheel to enlarge it.
Find the biggest area of the icicles and using your Selection Tool set on Rectangle and section it out.
Set your Foreground to pattern and find the icicles.
Angle: 0
Scale: 60
OK
Make your template active.
Highlight Circles layer.
Select All/Float/Defloat
New Raster layer.
Flood fill with your icicle pattern.
Deselect.
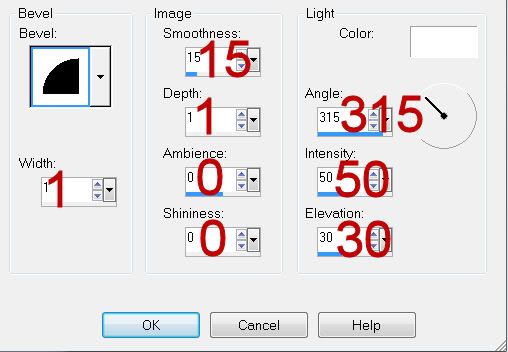
Give it a slight inner bevel:

Adjust/Add Remove Noise/Add Noise:
Gaussian and Monochrome checked
Noise: 30%
OK
Deselect.
Delete the template layer.
Highlight Rectangle layer.
Click on it with your Magic Wand.
New Raster layer.
Copy and paste Paper 10 Into Selection.
Deselect.
Delete the template layer.
Apply a texture of your choice. I used Filters Unlimited 2.0 -
Paper Textures - Rag Paper
Intensity: 13
Lightness: 47
Apply
Give it the same slight inner bevel.
Highlight Strip 1 layer.
Click on it with your Magic Wand.
New Raster layer.
Copy and paste Paper 9 Into Selection.
Deselect.
Delete the template layer.
Effect/Texture Effect/Blinds:
Width: 4
Opacity 3
Color: efefef
Light from left top checked
OK
Highlight Strip 2 layer.
Click on it with your Magic Wand.
New Raster layer.
Copy and paste Paper 11 Into Selection.
Deselect.
Delete the template layer.
Give it the same texture effect you did on the Rectangle layer.
Highlight Squares layer.
Click on each square with your Magic Wand.
New Raster layer.
Copy and paste Paper 12 Into Selection.
Deselect.
Delete the template layer.
Highlight Frames layer.
Click on each one with your Magic Wand.
New Raster layer.
Copy and paste Paper 8 Into Selection.
Deselect.
Delete the template layer.
Give it the same slight inner bevel.
Click on the squares layer.
Use your Magic Wand and click on the top square.
Copy and paste Juggling Snowman as a new layer just above the square paper.
Resize 40% - Move into position over the top square.
Selections/Invert
Tap the delete key.
Deselect.
Highlight the squares layer again.
Click on the middle square with your Magic Wand.
Copy and paste Skiing Snowman as a new layer just above the square paper.
Resize 40% - Move into position over the middle square.
Selections/Invert
Tap the delete key.
Deselect.
Copy and paste Snowman on Sleigh as a new layer.
Resize 50%
Move into position in front of the bottom frame.
Highlight Rectangle layer.
Click on it with your Magic Wand.
Make Icicle 1 active.
Deselect.
Copy.
Make your working canvas active.
Paste just above the rectangle layer.
Resize 80%.
Alight it with the top of the rectangle.
Selections/Invert
Tap the delete key.
Deselect.
Add your embellishments. I used:
Snowflake Chain: Resize 50%/I applied Noise
Button 1: Resize 25% and 60%/Duplicate as many times as you like
Bow 1: Resize 30%
Snowflake 1: Resize 25% and 70%/Duplciate and resize as you like. I changed the Properties of all of them to Soft Light.
Choose another flake of your choice and resize as small as you like/Duplicate/Resize as you like and splash a few around.
Highlight the white background.
New Raster layer.
Select All
Copy and paste a paper of choice Into Selection.
Deselect.
Apply the mask.
Use your Pick Tool to pull the sides out slightly.
Merge Group.
Add your credits.
If you didn’t use a tube that requires credit then the kit designer would sure appreciate credit on the tag - but is not required.
Add your name.
I changed the direction to go up and down and typed mine out using the icicle pattern/Gave it the same inner bevel.
Typed it out again using the purple paper/Gave it the same inner bevel.
Move one slightly off.
Merge Down.
Resize all layers 85%.
I hope you enjoyed this tutorial.
I’d love to see your results and show it off in my gallery.
Email me!
Hugs,
Bev

No comments:
Post a Comment