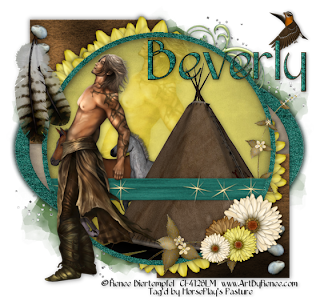
Clicking on the image will allow you to enlarge for bigger view.
Supplies
1 tube of your choice - I used the artwork of Renee Biertempfel at CILM
Font of Choice - I used Epittazio here
Scrap Rebellion Template 27 here
Weescotlass Mask 220 here
Greg’s Factory Output Vol. II - Pool Shadow
“Indian Summer” is a PTU tagger size scrap kit created by BabyV Dezign and can be purchased at Twilight Scraps.You can visit her blog here.
Thank you Valerie for such a beautiful kit!
This tutorial was written assuming you have a working knowledge of PSP.
~♥~ Let’s get started ~♥~
Open up the template.
Shift + D.
Close out the original.
Delete the top 5 layers.
Highlight the Background layer.
Image/Canvas Size
700 x 600
OK
Flood fill white.
Highlight White Oval layer.
Click on it with your Magic Wand.
New Raster layer.
Copy and paste Paper 6 Into Selection.
Adjust/Add Remove Noise/Add Noise:
Gaussian and Monochrome checked
Noise: 33%
Deselect.
Delete the template layer.
Highlight Frame layer.
Repeat the above step.
Highlight Blue Oval layer.
Click on it with your Magic Wand.
New Raster layer.
Copy and paste Paper 3 Into Selection.
Deselect.
Delete the template layer.
Highlight Top Square layer.
Click on it with your Magic Wand.
New Raster layer.
Copy and paste Paper 2 Into Selection.
Apply Greg’s Factory Output Vol. II - Pool Shadow:
Default Settings.
Deselect.
Delete the template layer.
Highlight Bottom Square layer.
Repeat the above step.
Highlight Circle layer.
Click on it with your Magic Wand.
New Raster layer.
Copy and paste Paper 4 Into Selection.
Copy and paste Tent as a new layer - move into position:
See my tag for reference.
Copy and Paste Foal 1 and 2 as new layers.
Resize both: 40%
Move them into position - see my tag for reference.
Copy and patse your tube as a new layer just above the circle paper layer.
Resize larger - Change the Properties to Soft Light.
Selections/Invert
Highlight each of the embellishment layers and tube layer and tap the delete key.
Deselect.
Delete the template layer.
Highlight Blue Strip layer.
Click on it with your Magic Wand.
New Raster layer.
Copy and paste Paper 6 Into Selection.
Deselect.
Delete the template layer.
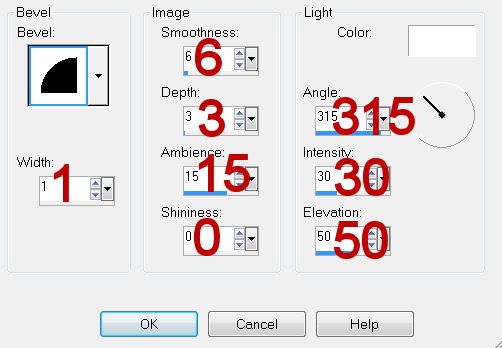
Give it a slight Inner Bevel:

Add your embellishments. I used:
Ele 4: Free rotate left 45 degrees
Song Bird: Resize 25% and 60%
Star: Resize 25% and 85%/Duplicate and Free Rotate as you like
Ivy 3
Feathers: Resize 50%/Free rotate left 60 degrees
Flower 1: Resize 40%/Duplciate/Resize 50%
Flower 2; Resize 30%
Flower 6: Resize 25%
Stones: Choose the smallest stone/Resize 25%/Duplicate 5 times and use your Pick tool to rotate them as you like - see my tag for reference of placement.
Highlight your white background.
Select All.
Copy and paste a paper of choice Into Selection.
Deselect.
Apply the mask.
Merge Group.
Add your credits.
Add your name.
Give it the same Inner bevel.
Apply the same Noise effect.
Resize all layers 80%.
I hope you enjoyed this tutorial.
I’d love to see your results and show it off in my gallery.
Email me!
Hugs,
Bev

No comments:
Post a Comment