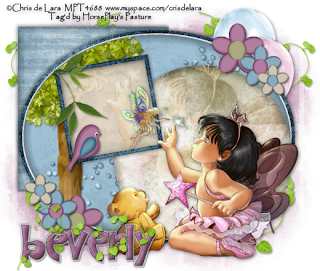
Clicking on the image will allow you to enlarge for bigger view.
Supplies
1 tube of your choice - I used the artwork of Chris de Lara that can now be purchased at CILM
Font of Choice - I used Andrea Karime here
Vix Mask 452 here
Divine Intentionz Template 288 here
Eyecandy 4000 - Gradient Glow
“Fall Tints” is a PTU tagger size scrap kit created by Lady Saphira and can be purchased at Scraps with Attitude. You can visit her site here.
Thank you Saphira for such a beautiful pastel side to fall!
This tutorial was written assuming you have a working knowledge of PSP.
~♥~ Let’s get started ~♥~
Open up my template.
Shift + D.
Close out the original.
Delete the top 5 layers and Glittered Rectangle layer.
Image/Canvas size:
650 x 550
OK
Highlight the background layer.
Flood fill white.
Highlight Square layer.
Click on it with your Magic Wand.
New Raster layer.
Copy and paste Paper 18 Into Selection.
Deselect.
Delete the template layer.
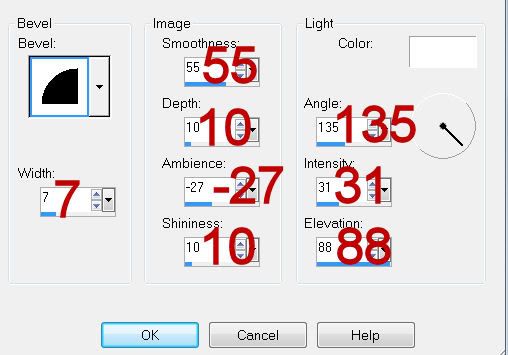
Give it a slight Inner Bevel:

Highlight Glittered Oval 1 layer.
Click on it with your Magic Wand.
New Raster layer.
Copy and paste Paper 21 Into Selection.
Adjust/Add Remove Noise/Add Noise:
Gaussian and Monochrome checked
Noise:
33%
OK
Deselect.
Delete the template layer.
Highlight Glittered Frame layer.
Repeat the above step using the same paper.
Highlight Oval layer.
Click on it with your Magic Wand.
New Raster layer.
Copy and paste Paper 15 Into Selection.
Copy and paste Tree as a new layer.
Move into position - see my tag for reference.
Copy and paste Bubbles 2 just above Oval paper.
Selections/Invert
Highlight each element layer and tap the delete key.
Deselect.
Delete the template layer.
Give the Oval paper layer the same Inner Bevel.
Highlight Circle layer.
Click on it with your Magic Wand.
New Raster layer.
Copy and paste Paper 17 Into Selection.
Deselect.
Close out the template layer.
Highlight Frame Background layer.
Click on it with your Magic Wand.
New Raster layer.
Copy and paste Paper 14 Into Selection.
Deselect.
Close out the template layer.
Copy and paste your tube as a new layer.
Resize as needed and move into exact position.
Paste your tube again as a new layer keeping it much larger than the other.
Move it into position above the circle paper layer.
Change the Properties to Soft Light.
Duplicate/Move it into position above the Frame Background paper layer.
Highlight Frame Background template layer.
Click anywhere outside of the template.
Highlight the tube layer just above the paper.
Tap the delete key.
Deselect.
Delete the template layer.
Highlight the Circle template layer.
Click anywhere outside of the template.
Highlight the tube layer just above the circle paper layer.
Tap the delete key.
Deselect.
Delete the template layer.
Add your embellishments. I used:
Flower 5: Resize 25%
Flower 6: Resize 25% and 80%
Flower 7: Resize 25% and 60%
Bird 1: Resize 25%
Balloons 1 & 2: Resize 70%
Leaves 10: Resize 50%
Leaves 4: Resize 70%/Duplicate/Mirror
Highlight your white background.
Select All.
Copy and paste a paper of choice Into Selection.
Deselect.
Apply the mask.
Resize 105%
Merge Group.
Move to the right side of your canvas.
Duplicate/Mirror/Flip
Add your credits.
Add your name.
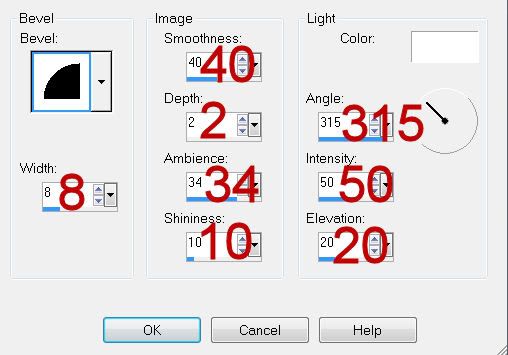
Give it a slight inner bevel:

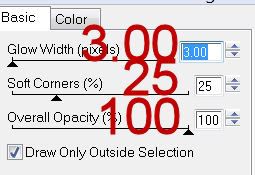
Apply Eyecandy 4000 - Gradient Glow:

Color Tab:
Change to white
Resize all layers 90%.
I hope you enjoyed this tutorial.
I’d love to see your results and show it off in my gallery.
Email me!
Hugs,
Bev

Thank you for this beautiful tutorial!
ReplyDeleteTina
You're very welcome Saphira!! It's a gorgeous kit!
ReplyDelete