
 Clicking on the image will enlarge to full view.
Supplies
1 or 2 tubes of choice - I’m using the wonderful artwork of Cris de Lara which can purchased at MPT
Font of Choice - I’m Daly Hand
Gem’s Mask 161 here
“Sunflower Kisses” is a FTU scrap kit created by Tootypup Scraps and can be downloaded here.
Please leave a thank you when downloading as it‘s a small gesture for hard work given freely.
This tutorial was written assuming you have a working knowledge of PSP.
~♥~ Let’s get started ~♥~
Open up a 700 X 700 blank canvas.
Flood fill white.
Copy and paste Frame 6 as a new layer.
Resize 75%
Using your Selection Tool, outline the frame that’s inside the upper frame:
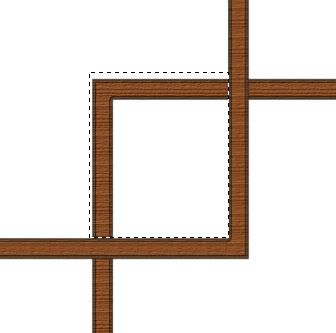
Tap the delete key.
Use your Magic Wand and click inside both of the frames.
Selections/Modify/Expand by 6.
New Raster layer below the frame.
Copy and paste a paper of choice Into Selection.
Deselect.
Copy and paste Bar 2 as a new layer.
Resize 50%
Using your Selection Tool, section out 4 beads on the end.
Tap the delete key.
Deselect.
Position the bar at the bottom of the top frame.
Duplicate/move to the top of the frame.
Duplicate/Free rotate 90 degrees
Position at the right side of the frame.
Duplicate/Move to the left side of the frame.
Merge Visible all 4 bar layers.
Duplicate the merged bar layer.
Move it into position over the bottom frame.
Using either your Eraser or Selection Tool - whichever is easier for you…
Section out the portion of the bar that overlaps the top frame.
Tap the delete key.
Deselect.
Merge Visible the frame and bar layers.
Copy and paste Picket Fence 2 as a new layer.
Resize 50%
Move into position inside the top frame.
Duplicate
Move below the lower frame - position it so that the end of the fence is in the middle of the frame.
Duplicate/Mirror
Overlap the ends up in the center of the frame.
Merge down.
Highlight the frame.
Click inside with your Magic Wand.
Selection/Modify/Expand by 6.
Selection/Invert
Highlight the merged picket fence layer.
Tap the delete key.
Deselect.
Copy and paste Grass 2 as a new layer below the frame.
Position it inside the top frame.
Duplicate
Position it inside the bottom frame.
Copy and paste your tube(s) as new layers.
Position them within the frames.
Copy and paste Leaf 1 as a new layer.
Move into position.
See my tag for reference.
Duplicate/Move behind the frames and let it peek out at the top of the bottom frame.
Copy and paste Petals 1 as a new layer.
Position where you like.
Highlight your white background.
New Raster layer.
Select All.
Copy and paste a paper of choice Into Selection.
Deselect.
Apply the mask.
Merge Group.
Add your copyrights.
Add your name.
Resize all layers 80%.
I hope you enjoyed this tutorial.
I’d love to see your results and show it off in my gallery.
Email me!
Hugs,
Bev
This is just so cute!! I had to try it :) Thank you for all these fantastic tuts to try :)
ReplyDelete