Supplies
1 tube of choice - I used the wonderful artwork of Dean Yeagle at CILM
Font of Choice - I used Rebel Caps here
Weescotlass Mask 249 here
My Template 90 here
“Summer Sprite” is a PTU tagger size scrap kit created by Jane of JT’s Designs and can be purchased at Lollipops n Gumdrops. You can visit her blog here.
Thank you Jane for yet another beautiful kit. Your talent is amazing!
This tutorial was written assuming you have a working knowledge of PSP.
~♥~ Let’s get started ~♥~
Open up the template.
Shift + D.
Close out the original.
Delete the credit layer.
Image/Canvas Size
700 X 600
OK
Flood fill the background layer white.
Highlight Rectangle 1 layer.
Click on it with your Magic Wand.
New Raster layer.
Copy and paste Paper 1 Into Selection.
Deselect.
Delete the template layer.
Highlight Rectangle 2 layer.
Click on it with your Magic Wand.
New Raster layer.
Flood will with a gradient of choice.
(I used two colors from one of the butterflies)
Deselect.
Delete the template layer.
Highlight Stitching layer.
Select All/Float/Defloat
New Raster layer.
Flood fill with a slightly darker color than what you’re using.
Deselect.
Delete the template layer.
Copy and paste Frame 4 as a new layer.
Rename the layer Frame 1
Resize 50%
Move into position over Circle 3 layer.
Delete the following template layers:
Circle 3 and Circle 3 back.
Paste Frame 4 again.
Rename the layer Frame 2
Resize 40%
Move into position over Circle 1 layer.
Delete the following template layers:
Circle 1 and Circle 1 back.
Paste Frame 4 again.
Rename the layer Frame 3.
Resize 35%
Move into position over Circle 2 layer.
Delete the following template layers:
Circle 2 and Circle 2 back.
Highlight Frame 1 layer.
Click inside with your Magic Wand.
Selections/Modify/Expand by 6.
New Raster layer below the frame.
Flood fill with a gradient of choice changing one of the colors in the last gradient you used. I made my new gradient using the light shade of blue and an off white.
Deselect.
Repeat the above step with Frames 2 and 3.
Copy and paste your tube as a new layer.
Move it into exact position in front of all the frames.
Duplicate.
Move the duplicate below Frame 1.
Resize 120% and move slightly to the right.
Change the Properties to Soft Light.
Duplicate twice. Close the duplicate layers out.
Highlight Frame 1 layer.
Click inside with your Magic Wand.
Selections/Modify/Expand by 6.
Selections/Invert
Highlight the tube layer.
Tap the delete key.
Deselect.
Open up one of the other duplicated layers.
Move it just below Frame 2 in your layers pallet.
Highlight Frame 2 and click inside of it with your Magic Wand.
Selections/Modify/Expand by 6.
Selections/Invert
Highlight the tube layer.
Tap the delete key.
Deselect.
Move the last duplicated layer just below Frame 3.
Repeat the above step.
Add your embellishments. I used:
Branch 1: Move behind all the frames.
Branch 1 again: Resize 80%
Pansies 2: Resize 35% Duplicate/Flip/Mirror
Bubble 1: Resize 70%
Butterfly 4: Resize 40%
Butterfly 5: Resize 30%
Ribbon 3 & 4: Resize 25% and 60%
Bow 8: Resize 50%
Highlight your white background.
New Raster layer.
Select All.
Copy and paste a paper of choice Into Selection.
Deselect.
Apply the mask.
Use your Pick Tool and pull the sides out slightly.
Merge Group.
Add your credits.
Add your name.
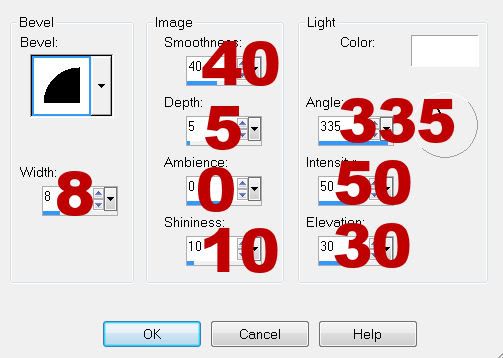
Give it a slight Inner Bevel:

Resize all layers 80%.
I hope you enjoyed this tutorial.
I’d love to see your results and show it off in my gallery.
Email me!
Hugs,
Bev


No comments:
Post a Comment