
 Clicking on the above image will enlarge to full view.
The image below shows the animation.
Supplies
1 tube of choice - I’m using the artwork of Jay Trembly which you can purchase here
Font of Choice - I’m using Annabelle here
Weescotlass Mask 220 here
VanDerLee Snowflakes here
Dsb Flux - Bright Noise
Animation Shop
“So Delicate” is a FTU size scrap kit by KatNKDA and can be downloaded from Kat’s blog here. Please leave a thank you when downloading. It’s a small gesture for hard work given freely.
Thank you Kat for such a pretty kit!
“So Delicate” is a FTU size scrap kit by KatNKDA and can be downloaded from Kat’s blog here. Please leave a thank you when downloading. It’s a small gesture for hard work given freely.
Thank you Kat for such a pretty kit!
This tutorial was written assuming you have a working knowledge of PSP.
~♥~ Let’s get started ~♥~
Open up a 700 X 700 transparent image.
Flood Fill white.
Copy and paste Element 3 as a new layer.
Resize 65%.
Use your Magic Wand and click inside of it.
Selections/Modify/Expand by 4.
New Raster layer below frame.
Copy and paste a paper of choice Into Selection.
Copy and paste your tube above the paper layer.
Deselect.
Copy and paste Element 13 as a new layer behind your tube.
Resize 50%
Duplicate/Mirror/Flip
Resize 50%
Duplicate/Mirror/Flip
Now we’re going to create the rain effect and get the layers ready for animating later on….
Use your Magic Wand and click inside the frame again.
Selections/Modify/Expand by 4.
Create 4 new raster layers below the frame.
Rename each Rain 1, 2, 3, and 4.
Highlight Rain 1 layer.
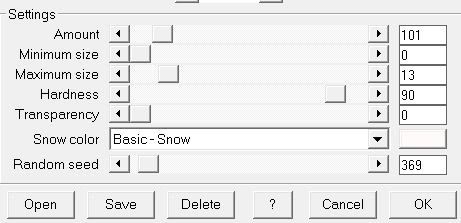
Apply the Vanderlee Snowflakes with the following settings:
Repeat the plugin on the remaining 3 Rain layers accept on each layer move the Random Seed bar a bit.
DO NOT DESELECT YET.
Go back and highlight Rain 1 layer.
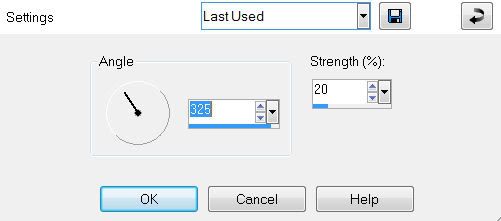
Adjust/Blur/Motion Blur.
Repeat the above effect with the other 3 rain layers.
DO NOT DESELECT YET.
Highlight Rain 1 layer again.
Adjust/Sharpness/Sharpen.
Repeat.
Repeat the above step to the other 3 rain layers.
Deselect.
Once you’ve done that, close out Rain layers 2, 3, and 4.
Add your embellishments. I used:
Element 1 & 2: Resize 35%
Element 15: Resize 45% Free rotate right 30 degrees
Element 14: Resize 50%
Element 5: Resize 75%. Make your Pick Tool Active and hold down on the control button while you pull the lower right corner out just a tad to line up with the edge of the frame.
Element 12: Resize 80%
Element 9 & 10: Resize 35%
Highlight your white canvas.
New Raster Layer.
Select All.
Copy and paste a paper of choice Into Selection.
Apply the mask.
Merge Group.
Deselect.
Resize 110%
Add your copyrights.
Add your name.
Duplicate 3 times to have a total of 4 names layers.
Rename them Name 1, 2, 3, & 4
Highlight Name 1 and apply DSB Flux Bright Noise
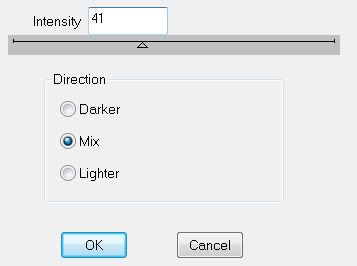
Repeat the above step accept for Name 2 hit the mix button twice. For Name 3 hit the mix button 3 times. For Name 4 hit the mix button 4 times.
Close out name layers 2, 3, and 4. Only keep Name 1 open.
Resize all layers 85%.
Time to Animate:
Copy Merge and carry into Animation Shop.
Edit/Paste/As New Animation
Go back into PSP
Close out Name 1. Open up Name 2
Close our Rain 1. Open up Name 2.
Copy Merge and Carry into AS.
Edit/Paste/After Current Frame.
Go back into PSP
Close out Name 2. Open up Name 3
Close our Rain 2. Open up Name 3.
Copy Merge and Carry into AS.
Edit/Paste/After Current Frame.
Go back into PSP
Close out Name 3. Open up Name 4
Close our Rain 3 Open up Name 4.
Copy Merge and Carry into AS.
Edit/Paste/After Current Frame.
View your animation.
If you’re happy with it then save.
I hope you enjoyed this tutorial.
I’d love to see your results and show it off in my Show Arena.
Email me!
Hugs,
Bev
No comments:
Post a Comment