Clicking on the image will enlarge to full view.
Supplies
1 tube of choice - I’m using the artwork of KatNKDA here. You must have a license to use her work.
Font of Choice - I’m using Aquarelle here
Becky Mask 22 here
Alien Skin - Xenofex 2: Burnt Edges
“Shape Shifter” is a PTU full size scrap kit created by KatNKDA. It can be downloaded from her store NK Art Shop. You can visit Kat’s blog here.
Thank you Kat for a most stunning kit! You definitely have an artistic gift!
This tutorial was written assuming you have a working knowledge of PSP.
VERY IMPORTANT:
This kit includes a wolf tube. You must have a license issued through KatNKDA in order to use it!!
Special Note:
The elements in this kit are also offered as “shadowed“.
If you choose to use the shadowed elements then you’ll have to adjust on your own the figures I give to expanding. Also, do not drop shadow anything unless you want the extra shadowing.
~♥~ Let’s get started ~♥~
Open up a transparent 700 X 700 canvas.
Flood Fill white.
Copy and paste Element 10 as a new layer.
Resize 25%
Free rotate 90 degrees.
Use your Magic Wand and click inside of it.
Selections/Modify/Expand by 4.
Copy and paste Element 20 below the frame.
Resize 30%.
Move into position.
Selections/Invert
Tap the delete button.
DO NOT DESELECT YET.
New Raster layer below the frame.
Selections/Invert
Effect/3D Effects/Cutout

Repeat the above step accept change the Horizontal and Vertical numbers to 10.
Deselect.
Deselect.
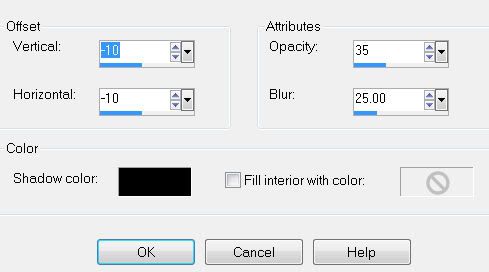
Give your frame a drop shadow.
I used:

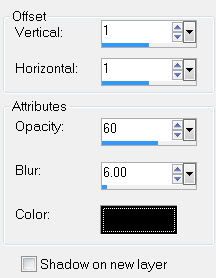
Repeat the drop shadow accept change the vertical and horizontal numbers to -1.
Type out the words
“How lonely is the night without the howl of a wolf. `Unknown”
Or whatever you want to type.
Or you don’t have to type anything at all!
Move them into position.
Give them the same drop shadow accept don‘t repeat using the negative 1 numbers.
Close out your white canvas.
Merge Visible.
Rename Merged Frame
Free rotate right 8 degrees.
Reopen your white canvas.
Now close out your merged layer so you can have a plain white canvas to work with.
New Raster layer.
Select All.
Copy and paste Paper 18 Into Selection.
Deselect.
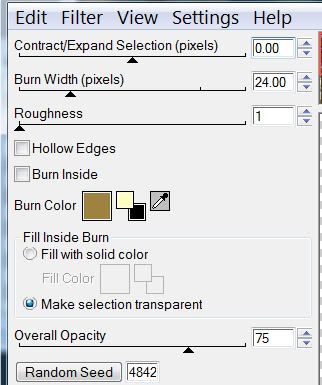
Apply Xenofex 2 - Burnt Edges

Resize 50%.
Type the words
“The gaze of the wolf reaches in our soul. ~Gary Lopez”
Move them into position and give them the same drop shadow.
Close out your white canvas and Merge Visible.
Rename Burnt Image
Free Rotate Left 8 degrees.
Apply the same drop shadow as you did for the frame.
Then you’ll want to apply the same drop shadow again but changing the horizontal and vertical numbers to 1 and changing the color to #ffffc0.
Reopen all your layers.
You should now have 3 layers:
Your white canvas
Merged Frame layer
Merged Burnt layer.
So we can figure out where to move these into position and to add the wolf tube lets go ahead and apply the mask by doing the following:
Highlight your white canvas.
New Raster layer.
Select All
Copy and paste Paper 17 Into Selection.
Deselect.
Apply the Mask.
Merge Group.
Now move your Burnt image and your Frame image into approximate position.
See mine for reference.
Copy and paste Element 37 (the Wolf tube) as a new layer.
Resize 80%
Lower the opacity down to 71.
Now move your layers into their exact positioning where you want them.
Add your elements using the same drop shadow as you‘ve been. (be sure the color is changed back to black). I used:
Element 12: Resize 30%
Element 13: Resize 30%
Element 11: Resize 30%. Free rotate left 15 degrees
Add your copyrights.
Add your name.
Resize all layers 85%.
I hope you enjoyed this tutorial.I’d love to see your results and show it off in my Show Arena.
Email me!
Hugs,
Bev


No comments:
Post a Comment