Supplies
Font of Choice - I’m using Angelo DB here
Weescotlass Mask 119 here
My Template 31 here
“Tennin Fairy” is a PTU tagger size scrap kit created by Nikki of Creative Intentionz and can be purchased from Twilight Scraps.
Thank you Nikki for such an amazing kit!
This tutorial was written assuming you have a working knowledge of PSP.
~♥~ Let’s get started ~♥~
Open up the template.
Shift + D.
Close out the original.
Delete my copyright layer.
Highlight Large Rectangel layer.
Select All/Float/Defloat
Copy and paste a paper of choice as a new layer.
Selection/Invert
Tap the delete layer.
Deselect.
Delete the template layer.
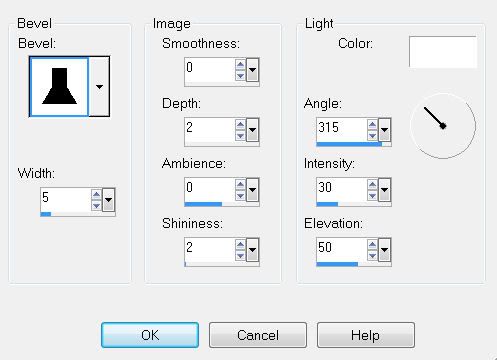
Give it a slight inner bevel:

Repeat the above steps with Small Rectangle layer.
Merge Visible the two oval layers.
Select All/Float/Defloat
Make a gradient and flood fill.
DO NOT DESELECT
Copy and paste Papillion Fairy 2 as a new layer.
Resize 50% and position over one of the ovals.
Selection/Invert
Tap the delete key.
Deselect
Image/Mirror
Move into better position over the other oval if need be by using the arrow key on your keyboard.
Merge Down.
Change the opacity to 51
Highlight the Stitches layer and give a drop shadow.
Highlight the Bow layer.
Select All/Float/Defloat
Copy and paste a paper of choice as a new layer.
Selections/Invert
Tap the delete key.
Deselect.
Delete the template layer.
Add your embellishments. I used:
Stone Path
Leaves 2: Resize 70%
Tree 1: Resize 70%
Vines 1: Resize 70%
Copy and paste Papillion Fairy 1 as a new layer.
Highlight your white canvas.
New Raster Layer.
Select All.
Copy and paste a paper of choice Into Selection.
Deselect.
Apply the mask.
Merge Group.
Add your copyrights.
Add your name.
I gave mine the same inner bevel as before.
Crop your image.
I hope you enjoyed this tutorial.
I’d love to see your results and show it off in my Show Arena.
Email me!
Hugs,
Bev


No comments:
Post a Comment