Supplies
1 tube of choice - I’m using the artwork of Jay Trembly which you can purchase here
Font of Choice - Black Chancery here
Weescotlass Mask 348 here
Dezings by Ali Template #79 here
Eyecandy 5: Impact - Gradient Glow here Optional
Xenofex 1.0 - Shower Door (This plugin is to create the “mask“. You don’t have to have it. Instead, you can use any mask of your choice.)
Greg’s Output Factory Vol II - Pool Shadow (Optional)
“Rainbow Island” is a PTU tagger size scrap kit created by Patty of Honored Scraps and can be purchased here. You can visit her blog here.
Thank you Patty for this fabulous kit!
This tutorial was written assuming you have working knowledge of PSP.
~♥~ Let’s get started ~♥~
Open up the template.
Shift + D and close out the original.
Delete the copyright layer.
New Raster Layer/Send to Bottom
Image/Canvas size
700 X 700
Flood Fill white.
Highlight the Circle layer.
Select All/Float/Defloat
New Raster layer.
Flood Fill Black.
DO NOT DESELECT YET!
Copy and paste the Rainbow as a new layer.
Position over the circle.
Selections/Invert
Hit the delete key.
Deselect.
Delete the template layer.
Highlight the black circle layer.
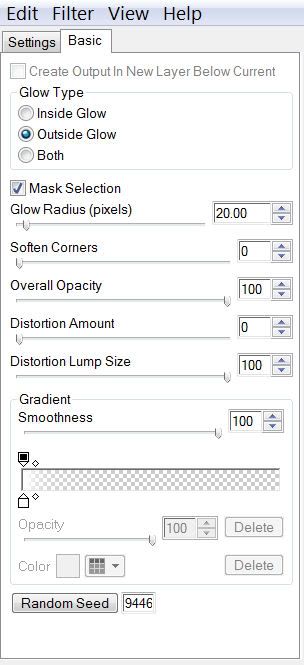
Apply the Eyecandy 5 Impact - Gradient Glow:

Give it a heavy drop shadow.
Merge visible Shape 2, 3, and 4 Layers.
Select All/Float/Defloat
Copy and paste a paper of choice as a new layer.
Selections/Invert
Hit the delete key.
Deselect.
Delete the template layer.
Apply the Gradient Glow the same as before.
Give it a heavy drop shadow.
Highlight Shape 1 layer.
Select All/Float/Defloat
Copy and paste a paper of choice as a new layer.
Selections/Invert
Hit the delete key.
Deselect.
Delete the template layer.
Highlight the frame layer.
Select All/Float/Defloat
New Raster Layer.
Flood Fill Black
Deselect.
Give it the same Gradient Glow as before.
Give it a heavy drop shadow.
Add your embellishments. I used:
Bow 1: Resize 25%. Free rotate left 25 degrees. Duplicate/Mirror
Flower 1 & 3: Resize 25% and 90%
Close out your white background and Merge Visible.
Duplicate.
Reopen your white canvas.
Highlight the Original.
Adjust/Blur/Gaussian blur:
Radius: 20
Apply the Xenofex 1.0 - Shower Door using the default settings.
IF YOU DON'T HAVE THE PLUG IN then don’t duplicate.
Instead create a new Raster layer.
Select All
Copy and paste a paper of choice Into Selection.
Deselect.
Aply a mask of your choice.
Merge Group.
Now we’re going to apply WSL Mask 348.
New Raster Layer.
Copy and paste a paper of choice Into Selection.
Deselect.
Apply the mask.
Merge Group.
Resize 97%.
Copy and paste Butterfly 1 as a new layer.
Resize 25%
Copy and paste Butterfly 2 as a new layer.
Resize 25% and 90%.
Add your copyrights.
Add your name.
For mine I did the following:
After I typed my name (stroke set at 1, created a gradient for the fill) and turned it into a Raster Layer:
Select All/Float/Defloat
Selections/Modify/Contract by 2.
Applied Greg’s Factory Outlet Vol. II - Pool Shadow using default settings.
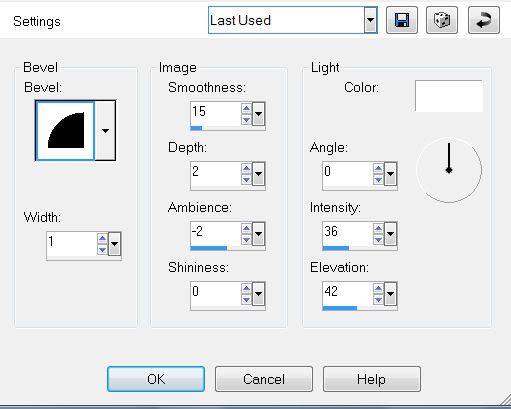
Gave it a slight inner bevel:

Deselect.
Give it the same Gradient Glow as before.
Gave it a drop shadow.
Crop your image.
Resize all layers 85%.
Hugs,
Bev


No comments:
Post a Comment