Supplies
8 tubes of choice - I’m using the artwork of PinUpToons which you can purchase here
Font of Choice - Atlantis Medium here
Weescotlass Mask 133 here
Chica’s Template 7 here
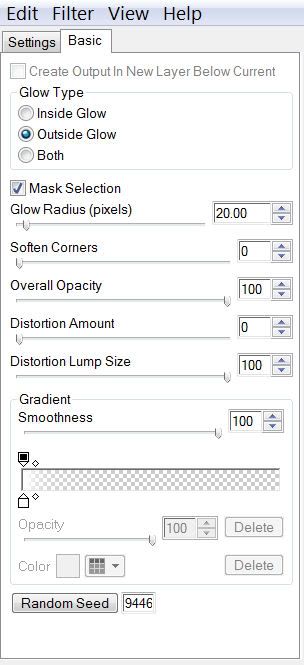
Eyecandy 5: Impact - Gradient Glow
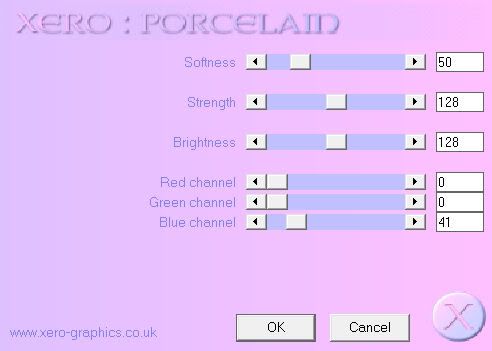
Xerox - Porcelain here
“Sailboats” is a tagger size scrap kit created by Julie of Bits ’n Bobs and can be purchased here. You can visit her blog here.
Thank you Julie for this amazing kit! I fell in love with the rich colors in it!
This tutorial was written assuming you have working knowledge of PSP.
~♥~ Let’s get started ~♥~
Open up the template.
Shift + D and close out the original.
New Raster layer. Send to bottom.
Flood fill white.
Delete the copyright layer, all heart layers, and the doodle layer.
Highlight the Circle Frame layer.
Select All/Float/Defloat
Copy and paste a paper of choice.
Selections/Invert.
Hit the delete key.
Delete the template layer.
.
Repeat the above step with the following layers:
Frames 1, 2, and 3
Squares 1, 2, and 3
Be sure to rename each layer the same as the template before you delete the template layer.
Highlight Frame 3.
Click inside with your Magic Wand.
Selections/Modify/Expand by 3
Copy and paste a tube below the frame.
Selections/Invert
Hit the delete key.
Repeat the above step with the other 2 frames.
Highlight the Film Back layer.
Select All/Float/Defloat
Copy and paste a paper of choice as a new layer.
Selections/Invert
Hit the delete key.
Delete the template layer.
Highlight the Film Strip layer.
Using your Magic Wand, click inside the top square.
Selections/Modify/Expand by 2
Copy and paste a tube of choice blow the strip.
Selections/Invert
Hit the delete key.
Repeat the above step with the remaining squares. Once you’ve got a tube in each strip square then close out all layers accept for the tubdes you have in the strip.
Merge Visible.
Apply Xero-Porcelain with the following settings:

Reopen all the layers.
Add your embellishments. I used:
Bead Dangles 2: Resize 60%
Cherry Blosson 2: Resize 90%
Cherry Blossom 3: Resize 70%
Cherry Blossom 1: Resize 80%
Flower 2: Resize 30%
Flower 1: Resize 20%
Leaves: Free rotate left 35 degrees
Element 2
Highlight Wordart 1 layer.
Select All/Float/Defloat
Copy and paste a paper of choice as a new layer.
Selections/Invert
Hit the delete key.
Deselect.
Delete the template layer.
Add a Gradient Glow as follows:

Highlight your white canvas.
New Raster Layer.
Select All.
Copy and paste a paper of choice Into Selection.
Deselect.
Apply the mask.
Merge Group.
Use your Pick Tool to enlarge the mask just a little.
Add your copyrights.
Add your name.
Resize all layers 85%.
I hope you enjoyed this tutorial.
I’d love to see your results.
Email me!
Hugs,
Bev


No comments:
Post a Comment