
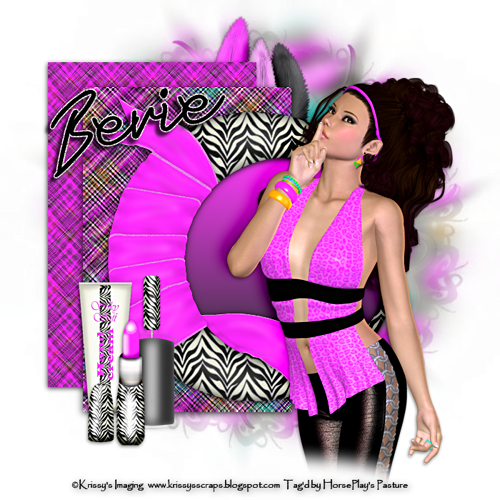
Supplies Needed
1 tube of choice – I
used a fantastic poser created by Krissy of Krissy’s Imaging. Her poser is in the CU portion of TKO’s
Jersey Girl collab which can be purchased here. You can visit Krissy’s site here.
“Jersey Girl’s” is a tagger size scrap kit
created by Tezza of Tezza’s Dezignz. It is
part of the TKO Collaboration and can be purchased here. You can visit her blog here. Thank you Tezza for your portion!
This tutorial was
written assuming you have working knowledge of PSP.
~♥~ Let’s get started ~♥~
Open a 700 x 700 blank canvas.
Flood fill white.
Color Pallet:
Foreground: #ff3cfb
Background: #000000
Set to Gradient
Style: Linear
Angle: 0
Repeats: 0
Invert checked
OK
Copy and paste Frame as a new layer.
Click inside of it with your Magic
Wand.
Selections/Modify/Expand by 4.
New Raster layer below the frame.
Flood fill with the gradient.
Deselect.
Copy and paste your tube (Or Poser
#4 from Krissy’s folder in the CU section of the collab) as a new layer as a
new layer. If you’re using the same poser
as I did, resize 60%
New Raster layer.
Make your Selection Tool active set
on Rectangle.
Create a rectangle approximately 300
x 450 pixels.
Copy and paste Paper 2 Into
Selection.
Apply Brush Strokes – Crosshatch:
Stroke Length: 48
Sharpness: 6
Strength: 1
OK
New Raster layer.
Copy and paste Paper 1 Into
Selection.
Apply the same Brush Stroke effect
using the same settings.
Deselect.
Move both paper layers into position
– see my tag for reference.
Add your elements. I used:
Nail Polish: Resize 50%
Lipstick: Resize 40%
Cream: Resize 50%
Hat 2: Mirror (Place behind the papers)
Highlight your white background.
Select All.
Copy and paste Paper 1 Into
Selection.
Deselect.
Adjust/Blur/Gaussian Blur:
Radius: 10
OK
Apply the mask.
Merge Group.
Duplicate
Change the Properties to Screen
Add your copyrights.
Add your name:
Color Pallet:
Foreground and Background: #000000
Stroke 1
Type your name.
Convert to Raster layer.
Select All/Float/Defloat
Selections/Modify/Expand by 2.
New Raster layer below the name.
Flood fill with #f9f9ed
Adjust/Add Remove Noise/Add Noise:
Monochrome and Gaussian checked
Noise: 83%
OK
Deselect.
Merge Visible both name layers.
Resize all layers 80%.
I’d love to see your results.
Hugs,
Bev
No comments:
Post a Comment