
Supplies Needed
Plug Ins used:
Mura’s Meister - Copies
“Jersey Girl’s” is a tagger
size scrap kit created by Pixie of Kissed by Pix. It is part of the TKO Collaboration and can
be purchased here. You can visit her blog here. Thank you Pixie for your portion!
This tutorial was
written assuming you have working knowledge of PSP.
~♥~ Let’s get started ~♥~
Open up the template.
Shift + D.
Close out the original.
Delete the credit layer.
Image/Canvas Size
600 x 550
OK
Highlight the Background layer.
Flood fill white.
Highlight Rec 1 Frame layer.
Click anywhere outside of it with
your Magic Wand.
Selections/Invert
New Raster layer.
Copy and paste Paper 9d Into
Selection.
Deselect.
Delete the template layer.
Adjust/Add Remove Noise/Add Noise:
Gaussian and Monochrome checked
Noise: 83%
OK
Repeat the above steps with
Circle 1 Frame, Circle 2 Frame, Rec
2 Frame, Circle 3 Frame, Rec 3 Frame, and Circle 4 Frame.
Highlight Rec 1 layer.
Click anywhere outside of it with
your Magic Wand.
Copy and paste Paper 8a as a new
layer.
Resize 70%
Selections/Invert
Tap the delete key.
Deselect.
Delete the template layer.
Highlight Circle 1 layer.
Click on it with your Magic Wand.
New Raster layer.
Copy and paste Paper 9 Into
Selection
Deselect.
Delete the template layer.
Repeat the above step with
Circle 4 layer.
Highlight Circle 2 layer.
Click on it with your Magic Wand.
New Raster layer.
Copy and paste Paper 9b Into
Selection.
Deselect.
Delete the template layer.
Highlight Rec 2 layer.
Click anywhere outside of it with
your Magic Wand.
Copy and paste Paper 7a as a new
layer.
Resize 60%
Tap the delete key.
Deselect.
Delete the template layer.
Highlight Circle 3 layer.
Click on it with your Magic Wand.
New Raster layer.
Copy and paste Paper 9e Into
Selection.
Deselect.
Delete the template layer.
Highlight Rec 3 layer.
Click on it with your Magic Wand.
New Raster layer.
Copy and paste Paper 8a Into
Selection.
Deselect.
Delete the template layer.
Copy and paste Button as a new
layer.
Resize 5% and 60%
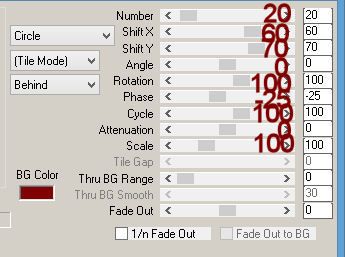
Apply Mura’s Mesiter – Copies
Set on Encircle match your settings
to mine:
Move the circle of buttons into
position over the large pink circle.
Duplicate the circle of buttons.
Resize 85% and move into position
over the green circle.
Duplicate the circle of buttons.
Resize 90% and move into position over the
small Orange circle.
Copy and paste Nat Flower as a new
layer.
Resize15%
Apply Mura’s Mesiter – Copies:
Use Same settings.
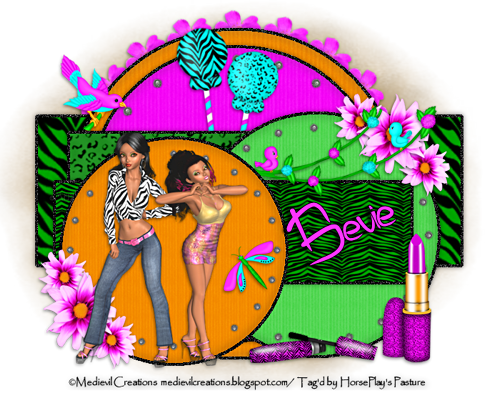
See my tag for placement of the
circle of flowers.
Copy and paste your tube as a new
layer. If you’re using the posers from
the kit, resize 75%
Move into position – see my tag for
reference.
Add your elements. I used:
Nat Flower 2: Resize 25%/Duplicate/Resize
70%/Duplicate/Duplicate all 3 flower layers.
Bird 1: Resize 25%
Bird Branch: Resize 60%
Bug:
Resize 25% and 70%
Lolly 2: Resize 60%/Free rotate Left 7 degrees
Lolly 4: Resize 60%/Free rotate Right 10 degrees
Lipstick 4: Resize 40%
Mascara: Resize 40%
Highlight your white background.
Select All.
Copy and paste Paper 3 Into
Selection.
Deselect.
Adjust/Blur/Gaussian Blur:
Radius: 10%
OK
Apply the mask.
Make your Pick Tool active and pull
the sides out just a little.
Merge Group.
Add your copyrights.
Add your name:
Color Pallet:
Foreground: #000000
Background: #f736fc
Stroke 1
Type your name.
Tilt it slightly.
Give it a drop shadow.
Resize all layers 80%.
I’d love to see your results.
Hugs,
Bev
No comments:
Post a Comment