Supplies
“Steampunk Valentine” is a tagger size scrap kit created by Lorenzen
Design Scrap and can be purchased from Scrappin’with Friends. You can visit her blog here.
Thank you Lorenzen for a really beautiful kit.
This tutorial was written assuming you have a working knowledge of PSP.
~♥~ Let’s get started ~♥~
Open the template.
Shift + D.
Close out the original.
Image/Canvas size:
700 x 600
OK
New Raster layer.
Send to bottom.
Flood fill white.
Delete the top 2 layers.
Highlight Glitter Rectangle layer.
Click anywhere outside of it with your Magic Wand.
New Raster layer.
Flood fill with #713b15
Adjust/Add Remove Noise/Add Noise:
Uniform and Monochrome checked:
Noise: 41
OK
Deselect.
Repeat the above step with:
Glitter Circle 1
Glitter Circle 2
Open up a blank canvs – any size.
Flood fill with the same color you were just using.
Copy.
Close this image out.
Make your working canvas active.
Highlight Dotted Line layer.
Click anywhere outside of it with your Magic Wand.
Selections/Invert
New Raster layer.
Paste the color Into Selection.
Deselect.
Delete the template layer.
Highlight Rectangle layer.
Click on it with your Magic Wand.
New Raster layer.
Copy and paste Paper 3 Into Selection (don’t close this paper out as
you’ll be using it again)
Copy and paste Wire Cogs as a new layer.
Position over the paper.
Selections/Invert
Tap the delete key.
Deselect.
Highlight Circle 1 layer.
Click anywhere outside of it with your Magic Wand.
Selections/Invert
New Raster layer.
Mirror Paper 3 and copy Into Selection.
Deselect.
Delete the template layer.
Highlight Circle 2 layer.
Click on it with your Magic Wand.
New Raster layer.
Copy and paste Paper 19 Into Selection.
Deselect.
Delete the template layer.
Repeat the above step with Stripes layer.
Highlight Half Circle layer.
Click anywhere outside of it with your Magic Wand.
Copy and paste Paper 5 as a new layer.
Move into a position you like.
Selections/Invert
Tap the delete key.
Copy and paste Tower as a new layer.
Position over the paper.
Selections/Invert
Tap the delete key.
Deselect.
Delete the template layer.
Add your elements. I used:
Poser 2: Resize 90%
Old Paper: Resize 60%
Ivy 1
Rose: Resizes 60%/Mirror
Deco 2: Resize 40%
Cogwheel 3: Resize 30%
Coin: Resize 25%
Highlight your white background.
New Raster layer.
Select All.
Copy and paste Paper 15 Into Selection.
Deselect.
Apply the mask.
Resize 105%
Merge Group.
Add your credits.
Add your name.
Color Pallet:
Foreground: #000000
Background: #c6011b
Stroke: 1
Type your name.
Convert to a Raster layer.
Select All/Float/Defloat
Selections/Modify/Contract by 1
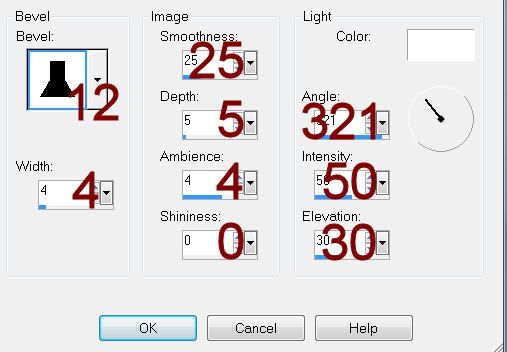
Give it an Inner Bevel.

Resize all layers 80%.


Bev I love the tut!! Thank you SO much!!
ReplyDeleteHugs
Anita
Thanks Anita and you're welcome!! Loved the kit!!
ReplyDelete