

Supplies
1 tube and 1 image of choice – I used the awesome artwork of Misticheskaya
which can be purchased from Pics for Design. You must
generate a license to use.
Dee’s Sign Post “Life” Template here
You can find it under Monday, March 25, 2012
“On the Go” is a tagger size scrap kit created by Jen of Jen’s Sweet
Temptations and can be purchased from ButterflyBlush Designs. You can visit her blog here.
Thank you Jen for such a
terrific kit!
This tutorial was written assuming you have a working knowledge of PSP.
~♥~ Let’s get started ~♥~
Open up the template.
Shift + D.
Close out the original.
Delete the top 12 layers and Spare Glitter Sheet layer.
Highlight and open Bg layer.
Highlight Top Striped Circle layer.
Copy and paste Frame 1 as a new layer.
Resize 130%
Move into position over the template layer.
Delete the template.
Duplicate the frame layer.
Move into position over Bottom Striped Template layer.
Delete the template layer.
Highlight White Square layer.
Click on it with your Magic Wand.
New Raster layer.
Copy and paste Paper 8 Into Selection.
Deselect.
Delete the template layer.
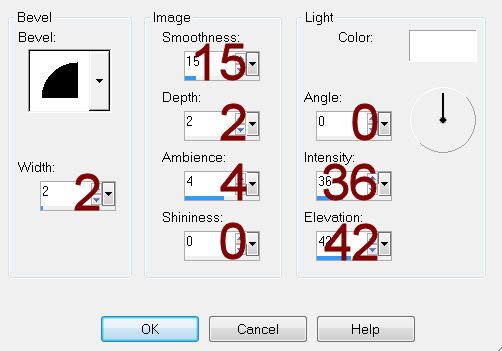
Give it a slight Inner Bevel:
Highlight Bottom Gray Strip layer.
Click on it with your Magic Wand.
New Raster layer.
Flood fill with #79c3d4.
Deselect.
Delete the template layer.
Give it the same slight Inner Bevel.
Highlight Gray Oval layer.
Click on it with your Magic Wand.
New Raster layer.
Copy and paste Paper 8 Into Selection.
Duplicate
Adjust/Blur/Gaussian Blur:
Radius: 7
Effects/Texture Effects/Mosaic Glass:
Use Default Settings.
Deselect.
Merge down.
Delete the template layer.
Give it the same slight Inner Bevel.
Open up Glitter 2.
In your Color Pallet set the Background to Pattern:
Look for Glitter 2 – click on it.
Angle: 114
Scale: 10
Highlight White Oval Frame layer.
Select All/Float/Defloat
New Raster layer.
Flood fill with the pattern.
Deselect.
Delete the template layer.
Highlight Top Black Circle layer.
Click on it with your Magic Wand.
New Raster layer.
Flood fill with #765141.
Deselect.
Delete the template layer.
Highlight Bottom Black Circle layer.
Repeat the above step.
Color Pallet:
Background: #765141
Foreground: #f2ccd7
Set the background to Gradient:
Look for your gradient – click on it.
Style: Linear
Angle: 90
Repeats: 0
Highlight Large Square layer.
Click on it with your Magic Wand.
New Raster layer.
Flood fill with the gradient.
Copy and paste your image as a new layer over the gradient.
Resize the image as needed and move into a position you like.
Selections/Invert
Tap the delete key
Deselect.
Delete the template layer.
Change the image Properties to Overlay.
Copy and paste your tube as a new layer.
Add your elements. I used:
Ticket: Resize 80%/Free rotate
Left 70 degrees/Duplicate/Free rotate Left 25 degrees
Lights: Free rotate Right 7
degrees
Bow 3: Resize 30%
BFly 1: Resize 35%
Flower 3
Kitty 1: Resize 40%
Kitty: Resize 70%
Bottle: Resize 50%
Highlight your white background.
New Raster layer.
Select All.
Copy and paste Paper 5 Into Selection.
Deselect.
Adjust/Blur/Gaussian Blur:
Radius: 15
OK
Apply the mask.
Resize 105%
Merge Group.
Move to the left just a little.
Use your Pick Tool and pull the right side out just a bit.
Add your credits.
Add your name.
Color Pallet:
Foreground: #000000
Background: #ef7ec2
Stroke: 1
Type your name.
Give it the same Inner Bevel 3x’s.
Resize all layers 80%.
No comments:
Post a Comment