Supplies
1 tube of choice – I used the artwork of The Vintage Angel by Jessica
Galbreth which can be purchased from CDO. You must have
a license to use.
Font of choice - I used Sverige Script here
Vix Mask 431 here
Divine Intentionz template 386 here
Plugs Ins used:
Eyecandy 3.1 – Glow
DSB Flux – Bright Noise
“Vintage Romance” is a full size scrap kit created by Anita of LorenzenDesign
Scrap and can be purchased from ExquisiteScraps. You can visit her blog here.
Thank you Anita for such a wonderful vintage kit….just beautiful!
This tutorial was written assuming you have a working knowledge of PSP.
~♥~ Let’s get started ~♥~
Open up the template.
Shift + D.
Close out the original.
Shift + D.
Close out the original.
Image/Canvas Size
700 x 550
OK
Open up the background layer and flood fill white.
Delete the top 4 layers and Circle 2 layer.
Highlight Oval layer.
Click on it with your Magic Wand.
New Raster layer.
Copy and paste Paper 15 Into Selection.
Deselect.
Delete the template layer.
Apply Eyecandy 3.1 – Glow:
Width: 3
Opacity: 100%
OpacityDrop Off: Fat
Color: #645b37
OK
Highlight Rectangle layer.
Click on it with your Magic Wand.
New Raster layer.
Copy and paste Paper 6 Into Selection.
Deselect.
Delete the template layer.
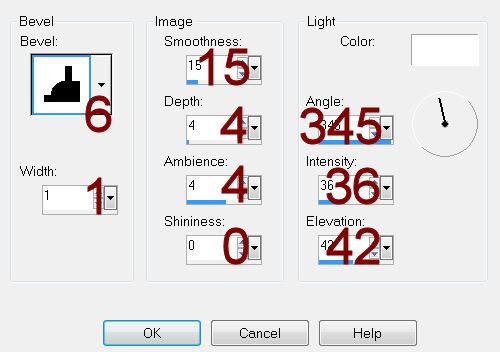
Give it a slight Inner Bevel:

Highlight Frame layer.
Click on it with your Magic Wand.
New Raster layer.
Copy and paste Paper 3 Into Selection.
Deselect.
Delete the template layer.
Apply the same slight Inner Bevel.
Apply DSB Flux – Bright Noise:
Intensity: 29
Mix checked
OK
Repeat the above step with Circle Back layer and Frame layer.
Color Pallet:
Foreground: #de338e
Background: #413b1a
Highlight Dotted Rec layer.
Make your Color Replacer Tool active.
Zoom in and double right click on one of the dots.
Highlight Circle 1 layer.
Click on it with your Magic Wand.
New Raster layer.
Copy and paste Paper 5 Into Selection – Rename this layer “Circle”.
Deselect.
Delete the template layer.
Highlight Frame Back layer.
Click on both squares with your Magic Wand.
New Raster layer.
Copy and paste Paper 7 Into Selection – Rename this layer “Double
Squares”.
Deselect.
Delete the template layer.
Copy and paste your tube as a new layer.
Move it into a position where it will look good over both the Circle
and Double Squares.
Duplicate – move one tube layer just above the “Circle” layer and the
other tube layer just above the “Double Squares” layer.
Highlight the double squares layer.
Click anywhere outside of it with your Magic Wand.
Highlight the tube above it in your layers pallet.
Tap the delete key.
Deselect.
Change the Properties of the tube to Luminance (Legacy).
Highlight Circle layer.
Click anywhere outside of it with your Magic Wand.
Highlight the tube above it in your layers pallet.
Tap the delete key.
Deselect.
Change the Properties of the tube to Overlay.
Add your elements. I used:
Frame 5 (Elements 3 Folder):
Resize 10%/Duplicate
Heart Key Ring (Elements 3 Folder):
Resize 15%
Bow 2 (Elements 2 Folder):
Resize 10% and 80%
Butterfly (Elements 2 Folder):
Resize 10%
Highlight your white background.
Select All.
New Raster layer.
Copy and paste Paper 4 Into Selection.
Deselect.
Apply the mask.
Merge Group.
Add your credits.
Add your name.
Forground: #202020
Background: #877c60
Stroke: 1
Type your name.
Apply a slight Inner Bevel:

Resize all layers 80%


It's a beautiful tag!! Thank you very much Bev!!
ReplyDeleteYou're very welcome Anita!
ReplyDelete