Supplies
1 tube of choice – I used the artwork of Meg Baker which can be
purchased from PSP TubeStop. You must have a license to use.
Font of choice - I used Penshurt Bold here
Weescotlass Mask 362 here
Tracy’s Easter Template #6 here
I have supplied the papers and elements for this tutorial which can be
downloaded here. These are to be used only for this tutorial.
This tutorial was written assuming you have a working knowledge of PSP.
~♥~ Let’s get started ~♥~
Open up the template.
Shift + D.
Close out the original.
Image/Canvas Size
700 x 600
OK
New Raster layer.
Send to bottom.
Flood fill white.
Delete the top 2 layers, Stars, Strip 2, and Strip 1 layers.
Highlight Circle 1 layer.
Click anywhere outside of it with your Magic Wand.
Selections/Invert
New Raster layer.
Copy and paste Paper 1 Into Selection.
Deselect.
Delete the template layer.
Highlight Oval layer.
Click anywhere outside of it with your Magic Wand.
Selections/Invert
Copy and paste Paper 2 Into Seletion.
Deselect.
Delete the template layer.
Highlight Circle 2 layer.
Click anywhere outside of it with your Magic Wand.
Selections/Invert
New Raster layer.
Copy and paste Paper 4 Into Selection.
Deselect.
Delete the template layer.
Highlight Square layer.
Click anywhere outside of it with your Magic Wand.
Selections/Invert
New Raster layer.
Copy and paste Paper 1 Into Selection.
Copy and paste your tube as a new layer.
Move into position.
Selections/Invert
Tap the delete key.
Deselect.
Delete the template layer.
Change the Properties of the tube to Burn.
Copy and paste your tube as a new layer.
Add the elements I supplied – they have already been resized:
Duplicate the daisy 5 times for a total of 6 and position behind the
large oval – see my tag for reference.
Highlight your white background.
Select All.
New Raster layer.
Copy and paste Paper 3 Into Selection.
Deselect.
Apply the mask.
Use your Pick Tool to pull all side out just a little.
Merge Group.
Add your credits.
Add your name.
Color Pallet:
Foreground: #000000
Background: #50a9bb
Stroke: 1
Type your name.
Convert to Raster layer.
Select All/Float/Defloat
Selections/Modify/Contract by 1
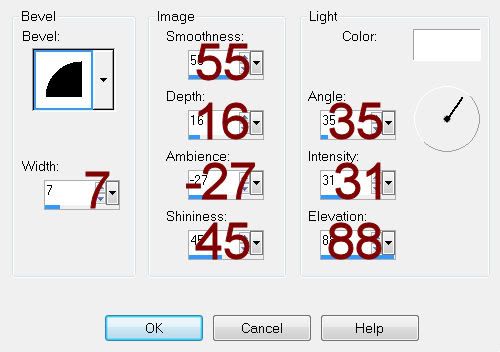
Give it a slight Inner Bevel:

Deselect.
Resize all layers 80%


No comments:
Post a Comment