Supplies
1 tube of choice - I used the artwork of Sue Runde-Hughes which can be purchased from CDO. You must have a license to use.
Font of choice - I used One Starry Night here
Becky Mask 22 here
Divine Intentionz Template 321 here
Plug Ins:
Xerox - Porcelain
Eyecandy 3.1 - Glow
Brush Strokes - Cross Hatch Stroke
“Christmas Past” is a tagger size scrap kit created by Dianna of Digicats (and Dogs) and can be purchased from Butterfly Blush Designs. You can visit her blog here.
Thank you Dianna for a fantastic Christmas kit.
This tutorial was written assuming you have a working knowledge of PSP.
~♥~ Let’s get started ~♥~
Open up the template.
Shift + D.
Close out the original.
Image/Canvas Size:
700 x 650
OK
Open up the background layer.
Flood fill white.
Delete the following layers:
By Missy
Word Art by Missy
Dotted Line 2
Highlight Circle 1 layer.
Click on it with your Magic Wand.
New Raster layer.
Flood fill with #efefef
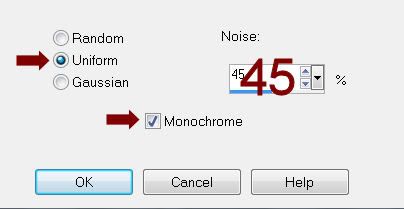
Adjust/Add Remove Noise/Add Noise:
Match your settings to mine -

Deselect.
Delete the template layer.
Create a new canvas - any size - 500 x 500 pixels will work just fine.
Flood fill with #893834
Copy
Close it out as you won’t be needing it any longer.
Highlight your working canvas.
Highlight Dotted Circle layer.
Click anywhere outside of it with your Magic Wand.
Selections/Invert
New Raster layer.
Paste Into Selection.
Deselect.
Delete the template layer.
Give it the same Noise Effect.
Highlight Small Circle layer.
Click on it with your Magic Wand.
New Raster layer.
Copy and pate Paper 10 Into Selection.
Duplicate
Adjust/Blur/Gaussian blur:
Radius: 10
OK
Merge Down.
Deselect
Apply Eyecandy 3.1 - Glow:
Width: 3
Opacity: 100%
Opacity Drop off: 100%
Color: #893834
OK
Highlight Large Rectangle layer.
Click on it with your Magic Wand.
New Raster layer.
Copy and paste Paper 6 Into Selection.
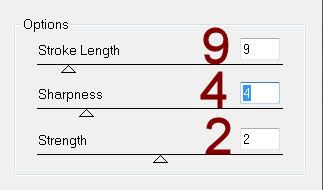
Apply Brush Strokes - Cross Hatch -
Match your settings to mine:

Deselect.
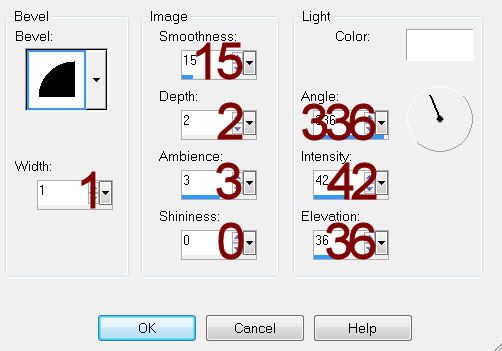
Give it a slight Inner Bevel:

Highlight Circle 5 layer.
Click on it with your Magic Wand.
New Raster layer.
Copy and paste Paper 22 Into Selection.
Deselect.
Delete the template layer.
Give it the same Inner Bevel.
Highlight Circle 2 layer.
Click anywhere outside of it with your Magic Wand.
Selections/Invert
New Raster layer.
Flood fill with #893834
Give it the same Noise effect.
Deselect.
Delete the template layer.
Highlight Circle 4 layer.
Click on it with your Magic Wand.
New Raster layer.
Copy and paste Paper 24 Into Selection.
Deselect.
Delete the template layer.
Highlight Rectangle layer.
Click on it with your Magic Wand.
New Raster layer.
Flood fill with #893834
Apply the Noise effect accept change the Noise % to 15.
OK
New canvas size - any size - 500 x 500 pixels will work.
Flood fill with #efefef
Copy
Close it out as you won’t be needing it any longer.
Highlight Dotted Line layer.
Click anywhere outside of it with your Magic Wand.
Selections/Invert
New Raster layer.
Paste Into Selection.
Deselect.
Give it the same Noise effect accept change the Noise % back up to 45.
OK
Highlight Frame Background 2.
Click anywhere outside of it with your Magic Wand.
Copy and paste Paper 17 as a new layer.
Resize 70% - DON’T MOVE THE PAPER!
Duplicate/Move this paper just above Frame Background 1 layer in your Layer’s Pallet. Close the paper layer out.
Highlight the original paper.
Tap the delete key.
Deselect.
Highlight Frame Background 1 layer.
Click anywhere outside of it with your Magic Wand.
Highlight and open up the paper that’s just above it in the layers pallet.
Tap the delete key.
Deselect.
Highlight Frame layer.
Select All/Float/Defloat
New Raster layer.
Flood fill with #893834
Give it the same Noise effect.
Deselect.
Repeat the above step with 3 Frame layer.
Apply Xerox - Porcelain to the tube layer:
Use Default settings accept move the Blue channel button to 0.
Copy and paste your tube as a new layer.
Position over the large Square paper layer.
Duplicate the tube layer - move just below the square frame.
Highlight the square paper layer.
Click anywhere outside of it with your Magic Wand.
Highlight the tube layer just above it.
Tap the delete key.
Deselect.
Highlight the tube just above the frame.
Use your Eraser Tool and erase what you don’t want to be seen hanging over the frame.
Copy and paste your tube again.
Repeat the above step accept have the tube facing in the opposite direction of the other tube.
Copy and paste Winter Fence as a new layer.
Duplicate
Match both ends of the fence to create one long fence across your canvas. Don’t worry if the pattern of the fence doesn’t match because you won’t see that area on your tag.
Merge Visible both fence layer.
Resize 90%
Move into position over the rectangle at the bottom of your tag.
Click anywhere outside of the rectangle with your Magic Wand.
Selections/Invert
Tap the delete key.
Selections/Invert
Selections/Modify/Inside Outside Feather
Both checked
Feather Amount: 25%
OK
Tap the delete key until you have a slightly feathered look to the fence.
Deselect.
Add your elements. I used:
Cardinal: Resize 30%
Snowmen: Resize 40%
Evergreen: Resize 50%
Evergreen Garland: Resize 90%
Bow 3: Resize 50%/Free Rotate Right 75 degrees
Drum: Resize 40%
Open up Paper 22
Use your Selection Tool set on Rectangle and section out the top half of the paper.
Copy.
Close the paper out.
Highlight your white canvas.
New Raster layer.
Select All.
Paste Into Selection.
Deselect.
Apply the mask.
Merge Group.
Duplicate
Change the Properties to Burn.
Add your copyrights.
Add your name.
Convert to Raster layer.
Use your Pick Tool and screw it slightly.
Apply Eyecandy 4.1 - Glow:
Use same settings accept change the color to #ffffff.
Resize all layers 80%.
I’d love to see your results.
Email me!
Hugs,
Bev


No comments:
Post a Comment