

Supplies
1 tube of choice - I used the artwork of Michael Calandra which can be purchased from PSP Tubes Emporium. You must have a license to use.
Font of choice - I used Aquarelle here
Becky Mask 22 here
Creative by Nature Template 42 here
Plug Ins:
Greg’s Factory Output Vol. II - Pool Shadow
Brush Strokes - Cross Hatch
Mura’s Meister - Copies
“Home for the Holidays” is a tagger size scrap kit created by Lou of Desingz by Lou and is part of a collaboration that can be purchased from Exquisite Scraps. You can visit Lou’s blog here.
Thank you Lou for gorgeous portion.
This tutorial was written assuming you have a working knowledge of PSP.
~♥~ Let’s get started ~♥~
Open up the template.
Shift + D.
Close out the original.
Image/Canvas Size
650 x 450
OK
Highlight Raster 1 layer.
Flood fill white.
Delete the top 4 layers, Raster 4, and Copy of Raster 4.
Color Pallet:
Foreground: #b89c52
Background: #762428
Highlight Raster 2 layer.
Click on it with your Magic Wand.
New Raster layer.
Copy and paste Paper 4 Into Selection.
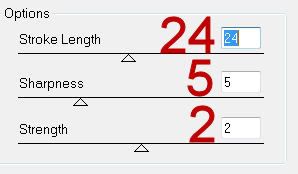
Apply Brush Stroke - Cross Hatch -
Match your settings to mine
Deselect.
Delete the template layer.
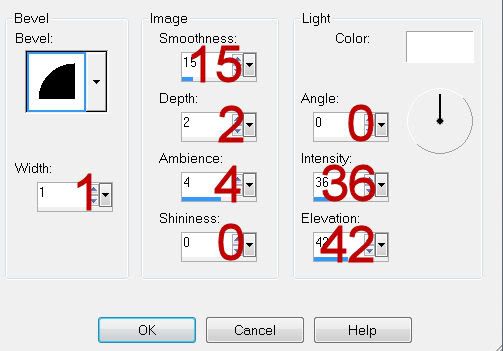
Give it a slight Inner Bevel:
Highlight Raster 3 layer.
Click anywhere outside of it with your Magic Wand.
Selections/Invert
New Raster layer.
Flood fill with your background color.
Deselect.
Delete the template layer.
Adjust/Add Remove Noise/Add Noise:
Uniform and Monochrome checked
Noise: 75%
OK
Highlight Copy of Vector 1 layer.
Click on it with your Magic Wand.
New Raster layer.
Flood fill with your foreground color.
Apply Greg’s Factory Output Vol. II - Pool Shadow:
Use Default settings accept move the Intensity bar down to 21.
Copy and paste Christmas Tree 5 as a new layer.
Move into position.
Selections/Invert
Tap the delete key.
Copy and paste your tube as a new layer.
Move into position.
Selections/Invert
Tap the delete key.
Deselect.
Delete the template layer.
Copy and paste bjalla-1
Resize 25% and 30%
Apply Mura’s Meister - Copies:
Set on Line Rotate
Change the top Number to 11.
OK
Place it over the top of the rectangle.
Erase what overhangs each side.
Duplicate/Position at the bottom.
Add your elements. I used:
Berry 5: Resize 50%/Mirror
Berry 5 again: Resize 70%/Place behind the rectangle.
Bell 21-4: Resize 50%
Bell 21-3: Resize 50% and 70%
Highlight your white canvas.
New Raster layer.
Select All.
Copy and paste Paper 2 Into Selection.
Deselect.
Apply the mask.
Merge Group.
Add your copyrights.
Add your name.
Foreground: Gradient/Metal Brass
Style: Linear
Angle: 25
Repeats: 0
Background: Pattern/Section out area of Bell-21-3
Angle: 90
Scale: 43
Stroke: 1.0
Type your name.
Give it the same slight Inner Bevel.
Use your Pick Tool and slant it slightly.
Resize all layers 80%.
I’d love to see your results.
Email me!
Hugs,
Bev
No comments:
Post a Comment