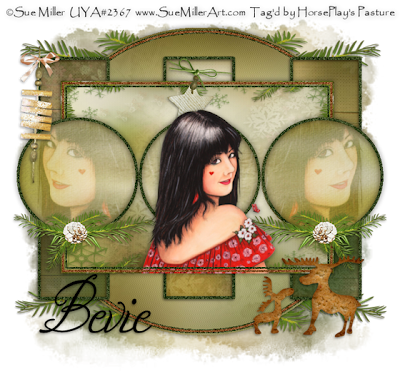
Supplies
1 tube of choice - I used the adorable artwork of Sue Miller which can be purchased from Up Your Art. You must have a license to use.
Font of choice - I used Nadine Script Extra here
Becky Mask 22 here
Dee’s Sign Post template 1 of her Kandy Christmas Collab Set here
“Christmas Citrus” is a tagger size scrap kit created by Kesha of KnC Scrapz and can be purchased from her store Lollipops n Gumdrops. You can visit her blog here.
Thank you Kesha for another fantabulous kit!
This tutorial was written assuming you have a working knowledge of PSP.
~♥~ Let’s get started ~♥~
Open up the template.
Shift + D.
Close out the original.
Image/Canvas Size
700 x 650
OK
Highlight the Background layer.
Flood fill white.
Delete the top 6 layers.
Open up Paper 9.
Using your Selection Tool set on Rectangle section off a small area of the darkest green you can find on the paper.
In your Materials pallet set your foreground to Pattern and look for the green portion of the paper you sectioned off.
Angle: 0
Scale: 250
Highlight Gradient Circle layer.
Click anywhere outside of it with your Magic Wand.
Selections/Invert
Copy and paste Paper 7 Into Selection.
Deselect.
Delete the template layer.
Highlight White Circle Frame layer.
Select All/Float/Defloat
New Raster layer.
Flood fill with your pattern.
Adjust/Add Remove Noise/Add Noise:
Uniform and Monochrome checked
Noise: 45%
OK
Deselect.
Delete the template layer.
Repeat the above step with:
Rectangle Frames
Green Frame
Circle Frames
Highlight Red Circle Frame layer.
Click on it with your Magic Wand.
New Raster layer.
Flood fill with #854e24
Apply the same Noise effect.
Deselect.
Delete the template layer.
Highlight Red Frame layer.
Repeat the above step.
Highlight Long Rectangle layers.
Click outside of them with your Magic Wand.
Copy and paste Paper 9 as a new layer.
Resize 80%
Selections/Invert
Tap the delete key.
Deselect.
Highlight Gold Rectangle layer.
Click anywhere outside of it with your Magic Wand.
Selections/Invert
New Raster layer.
Copy and paste Paper 3 Into Selection.
New Raster layer.
Copy and paste Element 11 Into Selection.
Deselect.
Delete the template layer.
Highlight Small Circles layer.
Click on each one with your Magic Wand.
New Raster layer.
Copy and paste Paper 1 Into Selection.
Deselect.
Copy and paste your tube as a new layer.
Position it over one of the end circles paper.
Change the Properties to Soft Light.
Duplicate/Mirror/Tube should be over the opposite end circle.
Highlight the Small Circles template layer.
Click anywhere outside of it with your Magic Wand.
Highlight each tube layer and tap the delete key.
Deselect.
Delete the template layer.
Copy and paste your tube as a new layer.
Position it in front of the center circle.
Add your elements. I used:
Branch (this one is positioned behind the large circle layer): Resize 40%/Duplicate/Mirror/Duplicate and flip both branch layers.
Branch (again): Resize 25%/Duplicate/Mirror
Star String: Resize 50%
Element 10: Resize 30%
Cookie: Resize 50%
Highlight your white canvas.
New Raster layer.
Select All.
Copy and paste Paper 9 (be sure to Deselect the section) Into Selection.
Deselect.
Apply the mask.
Merge Group.
Duplicate
Add your copyrights.
Add your name.
Resize all layers 80%.
I hope you enjoyed this tutorial.
I’d love to see your results.
Email me!
Hugs,
Bev

No comments:
Post a Comment