

Supplies
1 tube of choice - I used the wonderful artwork of Lori Karels which can be purchased from Up Your Art. You must have a license to use.
Font of choice - I used FP Third Hand here
Weescotlass Mask 208 here
Scrap Rebellion Template 48 here
Plug Ins:
Eyecandy 3.1 - Glow
“Autumn Harvest” is a tagger size scrap kit created by Kesha of KnC Scrapz and can be purchased from her store Lollipops n Gumdrops. You can visit her blog here.
Thank you Kesha for another beautiful kit!
This tutorial was written assuming you have a working knowledge of PSP.
~♥~ Let’s get started ~♥~
Open up the template.
Shift + D.
Close out the original.
Resize all layers 85%
Image/Canvas Size:
700 x 550
OK
Highlight Raster 1 layer.
Flood fill white.
Delete Raster 7 layer.
Highlight Raster 6 layer.
Click anywhere outside of it with your Magic Wand.
Selections/Invert
New Rater layer.
Copy and paste Paper 1 Into Selection.
Adjust/Add Remove Noise/Add Noise:
Gaussian and Monochrome checked
Noise: 43%
OK
Deselect.
Delete the template layer.
Highlight Copy of Raster 6 layer.
Click on it with your Magic Wand.
New Raster layer.
Copy and paste Paper 2 Into Selection.
Deselect.
Delete the template layer.
Highlight Raster 3 layer.
Click anywhere outside of it with your Magic Wand.
Selections/Invert
New Raster layer.
Copy and paste Paper 7 Into Selection.
Apply the same Noise effect.
Deselect.
Delete the template layer.
Highlight Copy of Raster 3 layer.
Repeat the above step.
Highlight Raster 5 layer.
Select All/Float/Defloat
New Raster layer.
Paste Paper 7 Into Selection.
Deselect.
Delete the template layer.
Highlight Copy of Raster 5 layer.
Repeat the above step.
Highlight Raster 4 layer.
Click on it with your Magic Wand.
New Raster layer.
Copy and paste Paper 8 Into Selection.
Deselect.
Delete the template layer.
Highlight Raster 2 layer.
Click on it with your Magic Wand.
New Raster layer.
Copy and paste Paper 1 Into Selection.
Deselect.
Delete the template layer.
Highlight Copy of Raster 4 layer.
Click on it with your Magic Wand.
New Raster layer.
Copy and paste Paper 9 Into Selection.
Deselect.
Delete the template layer.
Copy and paste your tube as a new layer.
Add your elements. I used:
Wreath: Resize 60%
Branch: Resize 25%
Bow 1: Resize 25%
Doodle 2: Resize 35%/Mirror
Flower 1: Resize 25% and 40%/Duplicate
Flower 1 again: Resize 25%, 40%, and 70%/Duplicate twice for a total of 3 flowers
Highlight your white background.
New Raster layer.
Select All.
Copy and paste Paper 8 Into Selection.
Deselect.
Apply the mask.
Resize 110%
Merge Group.
Add your copyrights.
Add your name:
Foreground: #000000
Background: #e29100
Stroke: 0.8
Type your name.
Convert to Raster layer.
Select All/Float/Defloat
Selections/Modify/Contract by 1
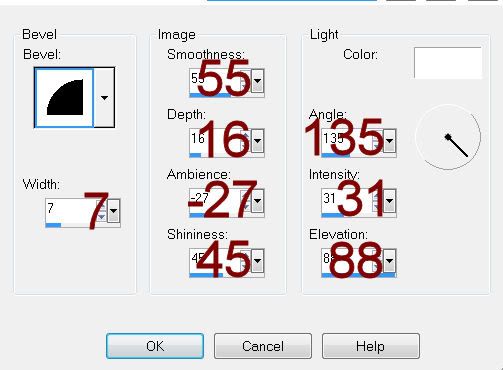
Give it a slight Inner Bevel:
Deselect.
Resize all layers 80%.
I hope you enjoyed this tutorial.
I’d love to see your results.
Email me!
Hugs,
Bev
No comments:
Post a Comment