Supplies
Font of choice - I used LDGregarious - a pay font. Childish should work just as well here. Clive Barker here.
Animation Shop
Plug Ins:
Mura’s Meister - Cloud
Mura’s Meister - Copies
Eyecandy 5 Nature - Snow Drift
Dsb Flux - Bright Noise
“A Christmas Wish” is a tagger size scrap kit created by Edna of Vermont Angel Eyes. This portion is part of a huge mega collab to help a fellow designer in her time of need. It can be purchased from TKO Scraps. You can visit Edna’s blog here.
Thank you Edna for your fantastic portion.
This tutorial was written assuming you have a working knowledge of PSP.
~♥~ Let’s get started ~♥~
Color Pallet:
Foreground: #acadb1
Background: #ffffe7
Open up a 650 x 250 canvas.
Apply Mura’s Meister - Cloud
Copy and paste Snowman as a new layer.
Resize 70%
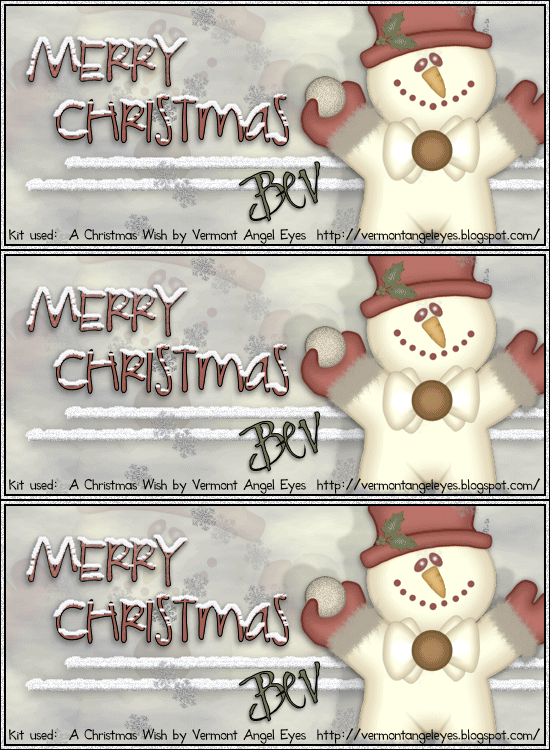
Position to the right of your canvas - see my tag for reference.
Paste the Snowman again.
In your layers pallet move it just above the cloud layer.
Mirror
Position to the left of the canvas.
Low the opacity to about 28.
Highlight the Snowman that’s positioned on the right side.
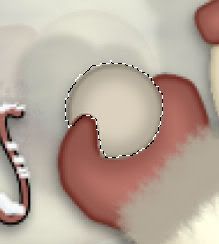
Use your Freehand Selection Tool set on Point to Point and trace around the snowball.

In your layers pallet right click and choose “Promote Section to Layer”
Duplicate twice for a total of 3 snowball layers.
Rename them Snowball 1, Snowball 2, and Snowball 3.
Highlight Snowball 1.
Apply DSB Flux - Bright Noise:
Intensity: 15
Mix checked
OK
Highlight Snowball 2.
Apply same Bright Noise accept hit mix button twice.
OK
Highlight Snowball 3.
Apply same Bright Noise accept hit mix button 3 times.
OK
Close out Snowball 2 and 3.
Leave Snowball 1 layer open.
Color Pallet:
Change the foreground to #efefef
Make your Selection Tool active set on rectangle.
New Raster layer.
Make a rectangle approximately 500 x 10 pixels.
Flood fill with the foreground color.
Deselect.
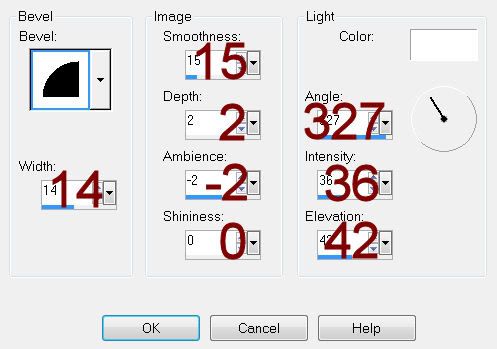
Give it a slight Inner Bevel:

Duplicate
To each rectangle layer apply Eyecandy 5: Nature - Snow Drift.
Settings Tab:
Small, First Flakes
Use default settings on all other tabs.
OK
Move both snow covered rectangle into position - see my tag for reference.
Merge visible both rectangle layers.
Duplicate twice for a total of 3 layers.
Rename them Bar 1, Bar 2, and Bar 3.
Highlight Bar 1
Apply same Bright Noise:
OK
Highlight Bar 2
Apply same Bright Noise accept hit mix button twice.
OK
Highlight Bar 3
Apply same Bright Noise accept hit mix button 3 times.
OK
Close out Bar 2 and 3.
Keep Bar 1 open.
Type the words Merry Christmas - each word on it’s own layer. I used LDGregarious font for this.
Move them into position - see my tag for reference.
Merge Visible both word layers.
Apply Eyecandy 5: Nature - Snowdrift:
Use same settings as before accept on the Basic Tab change:
Drift Height: 3.21
And you can move “Dust on all Features” tab to one you like.
OK
Copy Snowflake 3 as a new layer.
Resize 10% and 70%
Apply Mura’s Meister - Copiers: Wallpaper (Perspective)
Use Default settings accept change scale to 116
OK
Highlight the top layer in your layers pallet.
New Raster layer.
Flood fill with #000000
Select All
Selections/Modify/Contract by 1
OK
Tap the delete key.
DO NOT DESELECT.
New Raster layer.
Flood fill with #e6e6e6
Selections/Modify/Contract by 3
Tap the delete key.
Rename Noise Frame.
DO NOT DESELECT.
New Raster layer.
Flood fill with #000000
Selections/Modify/Contract by 2
Tap the delete key.
Deselect.
Highlight Noise Frame layer.
Duplicate twice for a total of 3.
Name each Noise Frame 1, Noise Frame 2, Noise Frame 3.
Highlight Noise Frame 1.
Apply DSB Flux - Bright Noise:
Intensity 32
Mix checked
OK
Highlight Noise Frame 2.
Apply same Bright Noise accept hit mix button twice.
OK
Highlight Noise Frame 3.
Apply same Bright Noise accept hit mix button three times.
OK
Close out Noise Frame 2 and 3.
Keep open Noise Frame 1.
Add your credit.
Add your name.
Copy Merge.
~Time to Animate~
Open up Animation Shop.
Edit/Paste/As New animation
Back in PSP.
Close out Noise Frame 1.
Open up Noise Frame 2.
Close out Snowball 1.
Open up Snowball 2.
Close out Bar 1.
Open up Bar 2.
Copy Merge.
Carry into AS.
Edit/Paste/After Current Frame.
Back in PSP
Close out Noise Frame 2.
Open up Noise Frame 3.
Close out Snowball 2.
Open up Snowball 3.
Close out Bar 2.
Open up Bar 3.
Copy Merge.
Carry into AS.
Edit/Paste/After Current Frame.
View your animation.
If you’re happy then save.
I hope you enjoyed this tutorial.
I’d love to see your results.
Email me!
Hugs,
Bev

No comments:
Post a Comment