Supplies
1 tube of choice - I used the gorgeous artwork of Steve Baier which can be purchased from Up Your Art. You must have a license to use.
Font of choice - I used Aquarelle here
Weescotlass Mask 236 here
Dee’s Sign Post Template “Dirty” here. You’ll find it under Thursday, July 8, 2010.
Plug Ins:
Eyecandy 3.1 - Glow
Xerox - Porcelain
“Rustic Holiday” is a tagger size scrap kit created by Kesha of KnC Scrapz and can be purchased from her store Lollipops n Gumdrops. You can visit her blog here.
Thank you Kesha….I totally loved this kit!!
This tutorial was written assuming you have a working knowledge of PSP.
~♥~ Let’s get started ~♥~
Open up the template.
Shift + D.
Close out the original.
Image/Canvas size:
700 x 700
OK
Highlight Raster 1 layer.
Flood fill white.
Delete the top 4 layers.
Highlight Top Square layer.
Copy and paste Paper 4 as a new layer.
Resize 70%
Free rotate Right 10 degrees.
Copy
Delete the paper layer.
Highlight Top Square layer.
Click on it with your Magic Wand.
New Raster layer.
Paste paper Into Selection.
Deselect.
Delete the template layer.
Highlight Bottom Square layer.
Repeat the above step accept Free rotate the paper Left 10 degrees.
Highlight Pink Strip layer.
Click on it with your Magic Wand.
New Raster layer.
Copy and paste Paper 9 Into Selection.
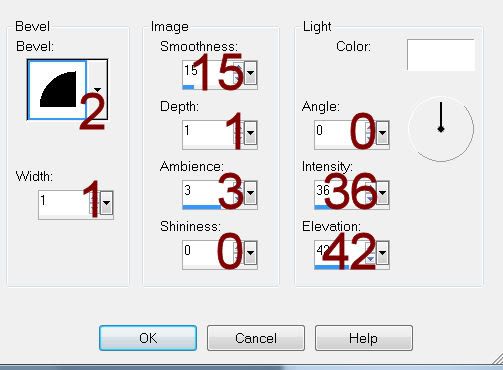
Give it a slight Inner Bevel:

Adjust/Add Remove Noise/Add Noise:
Gaussian and Monochrome checked
Noise: 43%
OK
Deselect.
Delete the template layer.
Highlight the other Pink Strip layer.
Repeat the above step.
Highlight Black Rectangle layer.
Click on it with your Magic Wand.
Copy and paste Paper 2 Into Selection.
Deselect.
Delete the template layer.
Give it the same slight Inner Bevel.
Open up Paper 4.
Make your Selection Tool active set on Rectangle.
Choose a small area of the paper.
In your Color Pallet set the foreground to pattern - look for the paper.
Highlight Large White Circle layer.
Click anywhere outside of it with your Magic Wand.
Selections/Invert
New Raster layer.
Flood fill with the pattern.
Apply the same Noise effect.
Deselect.
Delete the template layer.
Highlight Inner Circle Frame layer.
Click on it with your Magic Wand.
New Raster layer.
Copy and paste Paper 8 Into Selection.
Deselect.
Delete the template layer.
Highlight Large Pink Circle layer.
Click anywhere outside of it with your Magic Wand.
Selections/Invert
New Raster layer.
Copy and paste Paper 6 Into Selection.
Copy and paste your tube as a new layer.
Move into position within the circle.
Selections/Invert
Tap the delete key.
Deselect.
Delete the template layer.
Give it the same slight Inner Bevel.
Highlight Large Pink Rectangle layer.
Click anywhere outside of it with your Magic Wand.
Copy and paste Paper 2 as a new layer.
Resize 70%
Move into a position you like.
Tap the delete key.
Deselect.
Delete the template layer.
Highlight Bottom Circle Frame layer.
Click on it with your Magic Wand.
New Raster layer.
Copy and paste Paper 5 Into Selection.
Give it the same Noise effect.
Deselect.
Delete the template layer.
Repeat the above step with Middle and Top Circle Frame layers.
Highlight Top Circle Background layer.
Copy and paste Paper 6 as a new layer.
Resize 70%
Move the paper into position so that it covers all 3 circle backgrounds.
Duplicate the paper twice for a total of 3 layers.
Move one of the papers in your layers pallet just above the Middle Background template layer.
Move another of the papers in your layers pallet just above the Bottom Background template layer.
Highlight Top Circle Background layer.
Click anywhere outside of it with your Magic Wand.
Highlight the paper just above it.
Tap the delete key.
Deselect.
Delete the template layer.
Repeat the above step with Middle and Bottom Circle Background layers.
Highlight Bottom Circle Overlay layer.
Lower the Opacity to 38.
Repeat the above step with Middle and Top overlay layers.
Copy and paste your tube as a new layer just over the Top Circle Background paper layer.
Move this into position so that it covers all 3 circle background layers.
Once you have it in exact position duplicate it twice.
Move a tube layer just over the middle background paper layer in your layers pallet.
Move the other tube layer just over the bottom middle background paper layer in your layers pallet.
Highlight the top background paper layer.
Click anywhere outside of it with your Magic Wand.
Highlight the tube just above it.
Tap the delete key.
Deselect.
Highlight the middle and bottom background paper layers and repeat the above step.
To each tube layer apply Xerox - Porcelain:
Use default settings accept move the Blue Channel button to 0.
Add your elements. I used:
Bow: Resize 25%
Pinebranch: Resize 25% and 85%/Duplicate/Mirror/Duplicate
Ornament: Resize 25% and 50%
Bird: Resize 50%
Branch: Resize 25%/Mirror
Pinecone: Resize 25%/Duplicate/Mirror/Resize 70%
Frame 2: Resize 70%
Leaf: Resize 25% and 60%
Highlight your white background.
New Raster layer.
Select All.
Copy and paste Paper 6 Into Selection.
Deselect.
Apply the mask.
Resize 115%
Merge Group.
Add your copyrights.
Add your name:
Foreground and Background: #1d0501
Type your name.
Convert to Raster layer.
Apply Eyecandy 3.1 - Glow:
Width: 3
Opacity: 100
Opacity Drop off: Fat
Color: White
Resize all layers 80%.
I hope you enjoyed this tutorial.
I’d love to see your results.
Email me!
Hugs,
Bev

No comments:
Post a Comment