

Clicking on the image will allow you to enlarge for bigger view.
Supplies
3 tubes of choice - I used the artwork of Jennifer Janesko and can now be purchased at CDO
Font of Choice - I used Stonecross here
Divine Intentionz template 381 here
My mask 30 here
“Lucky Enough” is a FTU scrap kit created by me and can be downloaded from my blog here. I hope you will enjoy it as much as I did creating it.
This tutorial was written assuming you have a working knowledge of PSP.
Quick Note: There will be a lot of template layers that will need to be deleted. Some will be deleted during the course of the tutorial instead of all of them at the very beginning (like I normally do) as it will help you move elements into their positions.
~♥~ Let’s get started ~♥~
Open up the template.
Shift + D.
Close out the original.
Image/Canvas size
700 x 600
OK
Open up the background layer and flood fill white.
Delete the top 9 layers.
Highlight Copy of Raster 2 layer.
Merge Down.
Select All/Float/Defloat
New Raster layer.
Flood fill with #4b2a0f
Deselect.
Delete the template layer.
Highlight Rectangle layer.
Click on with your Magic Wand.
New Raster layer.
Copy and paste Paper 9 Into Selection.
Deselect.
Delete the template layer.
Highlight Oval 2 layer.
Click on it with your Magic Wand.
Copy and paste Paper 5 as a new layer.
Move into the position you want it.
Selections/Invert
Tap the delete key.
Deselect.
Delete the template layer.
Copy and paste Frame 6 as a new layer.
Resize 75%
In your layers pallet move it over the Chrome Circle layer.
Delete Chrome Circle layer and Circle layer.
Highlight Frame 6 layer.
Click inside of it with your Magic Wand.
Selections/Modify/Expand by 2.
New Raster layer below the frame.
Copy and paste Paper 10 Into Selection.
Deselect.
Copy and paste Frame 2 as a new layer.
Resize 40%
Free rotate Left 10 degrees
In your layers pallet move into position over Frame 1 layer.
Delete the following template layers:
Frame 1, Raster 2 Shadow 2, and Frame Back (the one directly below Raster 2 Shadow 2 template layer).
Paste Frame 2 again.
Resize 40%
Free rotate Right 10 degrees.
Delete all remaining template layers.
Click inside the frame with your Magic Wand.
Selections/Modify/Expand by 6.
New Raster layer below the frame.
Copy and paste Paper 6 Into Selection.
Copy and paste one of your tubes below the frame.
Move into position.
Selections/Invert
Tap the delete key.
Deselect.
Highlight the other frame.
Repeat the above step.
Copy and paste your tube as a new layer.
Center it on your canvas in front of both frames.
Add your embellishments. I used:
Ribbon 4: Resize 45%/Free rotate Left 10 degrees/Duplicate/Mirror
Dragonfly: Resize 35%/Duplicate/Mirror
Horseshoe: Resize 30%/Duplicate/Mirror
Horseshoe Wire: Resize 75%
Flower 3: Resize 80%/Duplicate/Mirror
Flower 2: Resize 70%/Duplicate/Mirror
Highlight your white background.
New Raster layer.
Select All.
Copy and paste Paper 1 Into Selection.
Deselect.
Apply the Mask.
Merge Group.
Duplicate/Change the Properties to Multiply
Add your credits.
Add your name.
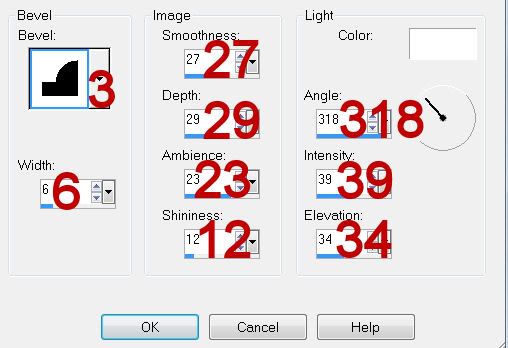
Give it a slight Inner Bevel:
Resize all layers 80%.
I hope you enjoyed this tutorial.
I’d love to see your results and show it off in my gallery.
Email me!
Hugs,
Bev
Supplies
3 tubes of choice - I used the artwork of Jennifer Janesko and can now be purchased at CDO
Font of Choice - I used Stonecross here
Divine Intentionz template 381 here
My mask 30 here
“Lucky Enough” is a FTU scrap kit created by me and can be downloaded from my blog here. I hope you will enjoy it as much as I did creating it.
This tutorial was written assuming you have a working knowledge of PSP.
Quick Note: There will be a lot of template layers that will need to be deleted. Some will be deleted during the course of the tutorial instead of all of them at the very beginning (like I normally do) as it will help you move elements into their positions.
~♥~ Let’s get started ~♥~
Open up the template.
Shift + D.
Close out the original.
Image/Canvas size
700 x 600
OK
Open up the background layer and flood fill white.
Delete the top 9 layers.
Highlight Copy of Raster 2 layer.
Merge Down.
Select All/Float/Defloat
New Raster layer.
Flood fill with #4b2a0f
Deselect.
Delete the template layer.
Highlight Rectangle layer.
Click on with your Magic Wand.
New Raster layer.
Copy and paste Paper 9 Into Selection.
Deselect.
Delete the template layer.
Highlight Oval 2 layer.
Click on it with your Magic Wand.
Copy and paste Paper 5 as a new layer.
Move into the position you want it.
Selections/Invert
Tap the delete key.
Deselect.
Delete the template layer.
Copy and paste Frame 6 as a new layer.
Resize 75%
In your layers pallet move it over the Chrome Circle layer.
Delete Chrome Circle layer and Circle layer.
Highlight Frame 6 layer.
Click inside of it with your Magic Wand.
Selections/Modify/Expand by 2.
New Raster layer below the frame.
Copy and paste Paper 10 Into Selection.
Deselect.
Copy and paste Frame 2 as a new layer.
Resize 40%
Free rotate Left 10 degrees
In your layers pallet move into position over Frame 1 layer.
Delete the following template layers:
Frame 1, Raster 2 Shadow 2, and Frame Back (the one directly below Raster 2 Shadow 2 template layer).
Paste Frame 2 again.
Resize 40%
Free rotate Right 10 degrees.
Delete all remaining template layers.
Click inside the frame with your Magic Wand.
Selections/Modify/Expand by 6.
New Raster layer below the frame.
Copy and paste Paper 6 Into Selection.
Copy and paste one of your tubes below the frame.
Move into position.
Selections/Invert
Tap the delete key.
Deselect.
Highlight the other frame.
Repeat the above step.
Copy and paste your tube as a new layer.
Center it on your canvas in front of both frames.
Add your embellishments. I used:
Ribbon 4: Resize 45%/Free rotate Left 10 degrees/Duplicate/Mirror
Dragonfly: Resize 35%/Duplicate/Mirror
Horseshoe: Resize 30%/Duplicate/Mirror
Horseshoe Wire: Resize 75%
Flower 3: Resize 80%/Duplicate/Mirror
Flower 2: Resize 70%/Duplicate/Mirror
Highlight your white background.
New Raster layer.
Select All.
Copy and paste Paper 1 Into Selection.
Deselect.
Apply the Mask.
Merge Group.
Duplicate/Change the Properties to Multiply
Add your credits.
Add your name.
Give it a slight Inner Bevel:
Resize all layers 80%.
I hope you enjoyed this tutorial.
I’d love to see your results and show it off in my gallery.
Email me!
Hugs,
Bev
No comments:
Post a Comment