

Clicking on the image will allow you to enlarge for bigger view.
Supplies
1 tube of choice - I used the artwork of Rachel Anderson and can be purchased from CDO
Font of Choice - I used JellykaCastle’s Queen here
My mask 25 here
“Lessons in Love” is a PTU scrap kit created by Jay of Bello Scarto and can be purchased from her store Heartbeatz Creationz. You can visit her blog here.
Thank you Jay for such a beautiful kit!
This tutorial was written assuming you have a working knowledge of PSP.
~♥~ Let’s get started ~♥~
Open up a 700 x 700 blank canvas.
Flood fill white.
Copy and paste Element 16 as a new layer.
Copy and paste your tube as a new layer.
Move both the heart and tube into position - positioning the tube to the left of the heart.
Duplicate your tube.
Mirror
Using the arrow key on your keyboard, move the duplicated tube into position over the heart.
In your layers pallet, move just over the heart layer.
Highlight the heart layer.
Click anywhere outside of it with your Magic Wand.
Highlight the duplicated tube layer.
Tap the delete key.
Selections/Modify/Inside Outside Feather
Both checked
Feather Amount: 26
Tap the delete key until you have a nice feathered effect.
Deselect.
Change the Properties of the duplicated tube layer to Soft light.
Duplicate.
Merge Visible the 2 duplicated tube layers and the heart layer.
Reopen all layers.
Add your embellishments. I used:
19
11
18: Resize 80%/Duplicate/Resize 70%
21: Resize 30%
Crop your image.
Highlight your white background.
New Raster layer.
Select All.
Copy and paste Paper 12 Into Selection.
Deselect.
Apply the Mask.
Merge Group.
Duplicate
Add your credits.
Add your name.
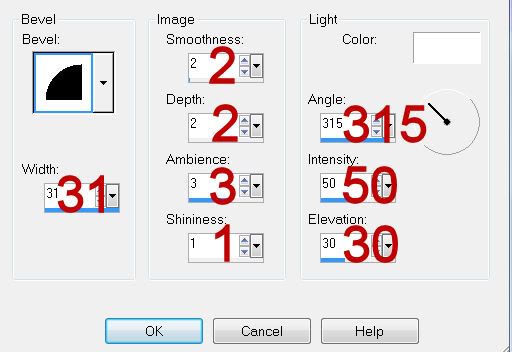
Give it a slight Inner Bevel twice:
Resize all layers 80%.
I hope you enjoyed this tutorial.
I’d love to see your results and show it off in my gallery.
Email me!
Hugs,
Bev
Supplies
1 tube of choice - I used the artwork of Rachel Anderson and can be purchased from CDO
Font of Choice - I used JellykaCastle’s Queen here
My mask 25 here
“Lessons in Love” is a PTU scrap kit created by Jay of Bello Scarto and can be purchased from her store Heartbeatz Creationz. You can visit her blog here.
Thank you Jay for such a beautiful kit!
This tutorial was written assuming you have a working knowledge of PSP.
~♥~ Let’s get started ~♥~
Open up a 700 x 700 blank canvas.
Flood fill white.
Copy and paste Element 16 as a new layer.
Copy and paste your tube as a new layer.
Move both the heart and tube into position - positioning the tube to the left of the heart.
Duplicate your tube.
Mirror
Using the arrow key on your keyboard, move the duplicated tube into position over the heart.
In your layers pallet, move just over the heart layer.
Highlight the heart layer.
Click anywhere outside of it with your Magic Wand.
Highlight the duplicated tube layer.
Tap the delete key.
Selections/Modify/Inside Outside Feather
Both checked
Feather Amount: 26
Tap the delete key until you have a nice feathered effect.
Deselect.
Change the Properties of the duplicated tube layer to Soft light.
Duplicate.
Merge Visible the 2 duplicated tube layers and the heart layer.
Reopen all layers.
Add your embellishments. I used:
19
11
18: Resize 80%/Duplicate/Resize 70%
21: Resize 30%
Crop your image.
Highlight your white background.
New Raster layer.
Select All.
Copy and paste Paper 12 Into Selection.
Deselect.
Apply the Mask.
Merge Group.
Duplicate
Add your credits.
Add your name.
Give it a slight Inner Bevel twice:
Resize all layers 80%.
I hope you enjoyed this tutorial.
I’d love to see your results and show it off in my gallery.
Email me!
Hugs,
Bev
No comments:
Post a Comment