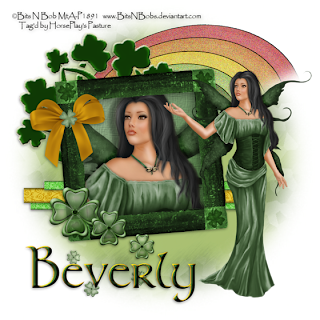
Clicking on the image will allow you to enlarge for bigger view.
Supplies
1 tube and 1 close up image of choice - I used the artwork of Bits N Bobs and can be purchased from My Tubed Art
Font of Choice - I used Stonehenge here
My mask 1 here
Brush Stroke: Sprayed Strokes
“Luck of the Irish” is a PTU scrap kit created by Mandy of Diva Designz and can be purchased from Butterfly Blush Designs. You can visit her blog here.
Thank you Mandy for a spectacular kit!
This tutorial was written assuming you have a working knowledge of PSP.
~♥~ Let’s get started ~♥~
Open up a 700 x 700 blank canvas.
Flood fill white.
Copy and paste Frame 1 as a new layer.
Resize 50%
Free rotate left 5 degrees
Move to the left of your canvas.
Click inside of it with your Magic Wand.
New Raster layer below the frame.
Flood fill with a gradient of your choice.
Deselect.
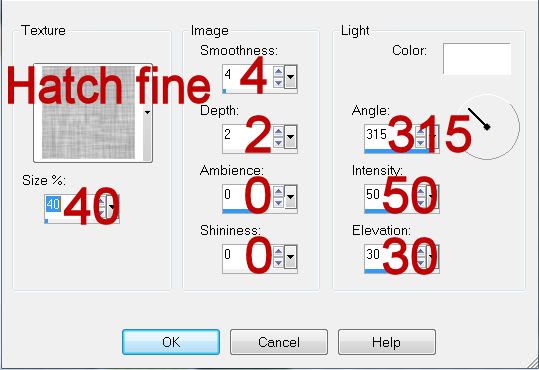
Give the gradient a texture:
Effects/Texture Effect/Texture:
Copy and paste your close up image below the frame.
Resize as needed.
Give it a slight exaggerated drop shadow.
Highlight the gradient layer.
Click anywhere outside of it with your Magic Wand.
Highlight the image.
Tap the delete key.
Deselect.
Close out your white canvas.
Merge Visible.
Reopen the merged layer.
Copy and paste your tube as a new layer.
Reposition the merged layer if you have to.
Copy and paste Pot of Gold 2 as a new layer.
Move it just above your white canvas in your layers pallet and into position - see my tag for reference.
Erase any of the pot that may be sticking out from the side of the frame.
If you’d like to feather the end of the rainbow rather than have the blunt edge….
Use your Freehand Selection Tool and circle around the rainbow but be sure the dotted line is touching the blunt edge of the rainbow.
Selections/Modify/Inside Outside Feather
Both checked
Feather Amount: 43
OK
Selections/Invert
Tap the delete key until you have the feathered effect you want.
Deselect.
Add your embellishments. I used:
Shamrock Doodle 2: Resize 60%
Bow 4: Resize 30%
Ribbon 3: Resize 60%/Duplicate
Ribbon 4: Erase the length of it you don’t want.
Clover Brad 1: Resize 50%/Duplicate/Resize 70%/Duplicate/Resize 70%/Duplciate/Resize 70%/ Duplicate twice
Highlight your white background.
New Raster layer.
Select All.
Copy and paste Paper 2 Into Selection.
Deselect.
Adjust/Blur/Gaussian Blur:
Radius: 20
OK
Apply Brush Strokes - Sprayed Strokes:
Stroke Length: 12
Spray Radius: 16
Stroke Direction: Right Diagonal
OK
Apply the Mask.
Merge Group.
Add your credits.
Add your name.
Color Pallet:
Foreground: #bf870e
Background: #294720
Stroke: 1.5
Type your name.
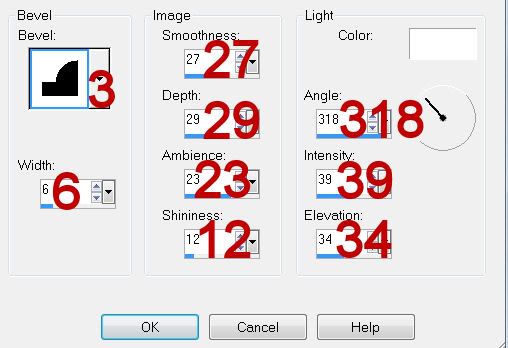
Give it a slight Inner Bevel:
Apply Eyecandy 3.1 - Glow
Width: 3
Opacity; 100
Opacity Dropoff: Fat
Color: White
Resize all layers 80%.
I hope you enjoyed this tutorial.
I’d love to see your results and show it off in my gallery.
Email me!
Hugs,
Bev
Supplies
1 tube and 1 close up image of choice - I used the artwork of Bits N Bobs and can be purchased from My Tubed Art
Font of Choice - I used Stonehenge here
My mask 1 here
Brush Stroke: Sprayed Strokes
“Luck of the Irish” is a PTU scrap kit created by Mandy of Diva Designz and can be purchased from Butterfly Blush Designs. You can visit her blog here.
Thank you Mandy for a spectacular kit!
This tutorial was written assuming you have a working knowledge of PSP.
~♥~ Let’s get started ~♥~
Open up a 700 x 700 blank canvas.
Flood fill white.
Copy and paste Frame 1 as a new layer.
Resize 50%
Free rotate left 5 degrees
Move to the left of your canvas.
Click inside of it with your Magic Wand.
New Raster layer below the frame.
Flood fill with a gradient of your choice.
Deselect.
Give the gradient a texture:
Effects/Texture Effect/Texture:

Copy and paste your close up image below the frame.
Resize as needed.
Give it a slight exaggerated drop shadow.
Highlight the gradient layer.
Click anywhere outside of it with your Magic Wand.
Highlight the image.
Tap the delete key.
Deselect.
Close out your white canvas.
Merge Visible.
Reopen the merged layer.
Copy and paste your tube as a new layer.
Reposition the merged layer if you have to.
Copy and paste Pot of Gold 2 as a new layer.
Move it just above your white canvas in your layers pallet and into position - see my tag for reference.
Erase any of the pot that may be sticking out from the side of the frame.
If you’d like to feather the end of the rainbow rather than have the blunt edge….
Use your Freehand Selection Tool and circle around the rainbow but be sure the dotted line is touching the blunt edge of the rainbow.
Selections/Modify/Inside Outside Feather
Both checked
Feather Amount: 43
OK
Selections/Invert
Tap the delete key until you have the feathered effect you want.
Deselect.
Add your embellishments. I used:
Shamrock Doodle 2: Resize 60%
Bow 4: Resize 30%
Ribbon 3: Resize 60%/Duplicate
Ribbon 4: Erase the length of it you don’t want.
Clover Brad 1: Resize 50%/Duplicate/Resize 70%/Duplicate/Resize 70%/Duplciate/Resize 70%/ Duplicate twice
Highlight your white background.
New Raster layer.
Select All.
Copy and paste Paper 2 Into Selection.
Deselect.
Adjust/Blur/Gaussian Blur:
Radius: 20
OK
Apply Brush Strokes - Sprayed Strokes:
Stroke Length: 12
Spray Radius: 16
Stroke Direction: Right Diagonal
OK
Apply the Mask.
Merge Group.
Add your credits.
Add your name.
Color Pallet:
Foreground: #bf870e
Background: #294720
Stroke: 1.5
Type your name.
Give it a slight Inner Bevel:

Apply Eyecandy 3.1 - Glow
Width: 3
Opacity; 100
Opacity Dropoff: Fat
Color: White
Resize all layers 80%.
I hope you enjoyed this tutorial.
I’d love to see your results and show it off in my gallery.
Email me!
Hugs,
Bev

Looks beautiful. I will be giving this one a try. Thank you for sharing.
ReplyDelete