

Clicking on the image will allow you to enlarge for bigger view.
Supplies
1 tube of choice - I used the artwork of Matt Busch and can be purchased at CDO
Font of Choice - I used Billy Argel here
Vix mask 429 here
Xerox - Porcelain
“Color Me Wild” is a PTU scrap kit created by Terry of Treasures by Terry and can be purchased from Butterfly Blush Designs. You can visit her blog here.
Thank you Terry for yet another spectacular kit! Love this one!!
This tutorial was written assuming you have a working knowledge of PSP.
~♥~ Let’s get started ~♥~
Open up a 700 x 700 blank canvas.
Flood fill white.
Copy and paste Frame 7 as a new layer.
Move it to the left on your canvas.
Click inside of it with your Magic Wand.
Selections/Modify/Expand by 6.
Copy and paste Paper 10 Into Selection.
Deselect.
Copy and paste your tube as a new layer.
Move into position to the right of the frame.
Duplicate/Mirror
Move the duplicate tube layer below the frame.
Use your Left arrow key to move into the exact position.
Highlight the paper layer.
Click anywhere outside of it with your Magic Wand.
Highlight the tube layer that’s below the frame.
Tap the delete key.
Deselect.
Lower the Opacity to about 59.
Apply Xerox - Porcelain:
Use Default settings accept move the Blue channel button all the way to 0.
Copy and paste Brad 2 as a new layer.
Resize 25% and 50%
Duplicate twice.
Arrange all 3 at the corner of the frame - see my tag for reference.
Merge Visible all 3 brad layers.
Move into position at the bottom left corner of the frame.
Duplicate/Mirror/Flip
Duplicate/Mirror
Don’t worry about putting them in the bottom right corner as your tube hides that corner.
Copy and paste Ribbon 2 as a new layer.
Resize 60%
Free rotate Left 90 degrees
Adjust/Sharpness/Sharpen
Copy and paste Ribbon 1 as a new layer.
Resize 50%
Adjust/Sharpness/Sharpen
Add your embellishments. I used:
Bow 7: Resize 50%
Heart 5: Resize 40%/Free rotate Left 25 degrees
Flower 6: Resize 60%/Mirror/Free rotate right 20 degrees - erase the bottom of the stem that sticks out.
Star 1: Resize 30%/Duplicate 70%/Duplicate
Paw Chain 1: Resize 60%/Duplciate/Resize 80%
Crop your image.
Highlight your white background.
New Raster layer.
Select All.
Copy and paste Paper 7 Into Selection.
Deselect.
Apply the Mask.
Move slightly to the left.
Merge Group.
Add your credits.
Add your name.
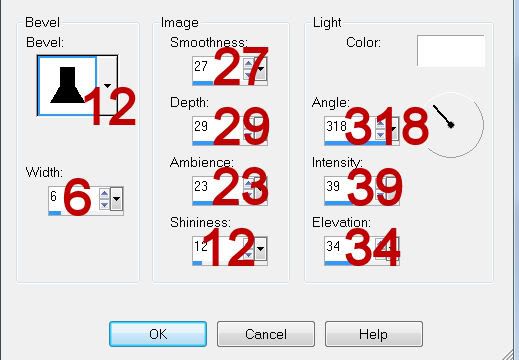
Give it a slight Inner Bevel:
Resize all layers 80%.
I hope you enjoyed this tutorial.
I’d love to see your results and show it off in my gallery.
Email me!
Hugs,
Bev
Supplies
1 tube of choice - I used the artwork of Matt Busch and can be purchased at CDO
Font of Choice - I used Billy Argel here
Vix mask 429 here
Xerox - Porcelain
“Color Me Wild” is a PTU scrap kit created by Terry of Treasures by Terry and can be purchased from Butterfly Blush Designs. You can visit her blog here.
Thank you Terry for yet another spectacular kit! Love this one!!
This tutorial was written assuming you have a working knowledge of PSP.
~♥~ Let’s get started ~♥~
Open up a 700 x 700 blank canvas.
Flood fill white.
Copy and paste Frame 7 as a new layer.
Move it to the left on your canvas.
Click inside of it with your Magic Wand.
Selections/Modify/Expand by 6.
Copy and paste Paper 10 Into Selection.
Deselect.
Copy and paste your tube as a new layer.
Move into position to the right of the frame.
Duplicate/Mirror
Move the duplicate tube layer below the frame.
Use your Left arrow key to move into the exact position.
Highlight the paper layer.
Click anywhere outside of it with your Magic Wand.
Highlight the tube layer that’s below the frame.
Tap the delete key.
Deselect.
Lower the Opacity to about 59.
Apply Xerox - Porcelain:
Use Default settings accept move the Blue channel button all the way to 0.
Copy and paste Brad 2 as a new layer.
Resize 25% and 50%
Duplicate twice.
Arrange all 3 at the corner of the frame - see my tag for reference.
Merge Visible all 3 brad layers.
Move into position at the bottom left corner of the frame.
Duplicate/Mirror/Flip
Duplicate/Mirror
Don’t worry about putting them in the bottom right corner as your tube hides that corner.
Copy and paste Ribbon 2 as a new layer.
Resize 60%
Free rotate Left 90 degrees
Adjust/Sharpness/Sharpen
Copy and paste Ribbon 1 as a new layer.
Resize 50%
Adjust/Sharpness/Sharpen
Add your embellishments. I used:
Bow 7: Resize 50%
Heart 5: Resize 40%/Free rotate Left 25 degrees
Flower 6: Resize 60%/Mirror/Free rotate right 20 degrees - erase the bottom of the stem that sticks out.
Star 1: Resize 30%/Duplicate 70%/Duplicate
Paw Chain 1: Resize 60%/Duplciate/Resize 80%
Crop your image.
Highlight your white background.
New Raster layer.
Select All.
Copy and paste Paper 7 Into Selection.
Deselect.
Apply the Mask.
Move slightly to the left.
Merge Group.
Add your credits.
Add your name.
Give it a slight Inner Bevel:
Resize all layers 80%.
I hope you enjoyed this tutorial.
I’d love to see your results and show it off in my gallery.
Email me!
Hugs,
Bev
No comments:
Post a Comment