
Supplies
1 tube of choice - I used the artwork of Michael Calandra and can now be purchased from PSP Tubes Emporium. You must have a license to use.
Font of choice - I used SNF Infinity - a pay font but Aquarelle will work just as nice here
Weescotlass Mask 161 here
Toxic Desirez Template 141 here
Plugs Ins:
Brush Strokes - Cross Hatch
Eyecandy 3.1 - Glow
Greg’s Factory Output Vol. II - Pool Shadow
“Frankensteins Love” is a scrap kit available in both tagger and full size created by Krissy of Krissy’s Scraps and can be purchased from her store Exquisite Scraps. You can visit her blog here.
Thank you Krissy for a fantastic Halloween kit!!
This tutorial was written assuming you have a working knowledge of PSP.
~♥~ Let’s get started ~♥~
Open up the template.
Shift + D.
Close out the original.
Image/Canvas Size:
700 x 500
OK
Delete the top 7 layers, Bee Br Kristen, Bee Hive, and Pixel Words.
Highlight Black Rectangle layer.
Click on it with your Magic Wand.
New Raster layer.
Copy and paste Paper 6 Into Selection.
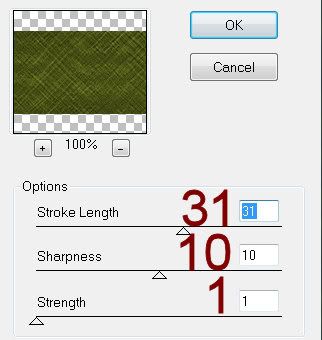
Apply Brush Strokes - Cross Hatch:
Deselect.
Delete the template layer.
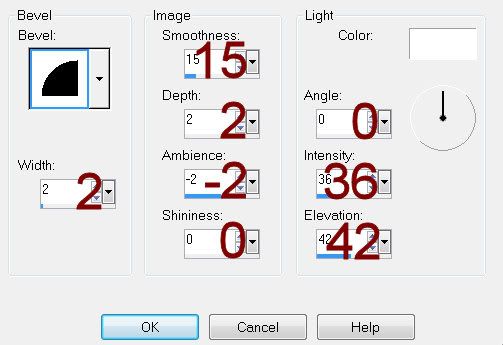
Give it a slight Inner Bevel:
Apply Greg’s Factory Output Vol. II - Pool Shadow:
Use Default Settings accept move the Intensity bar to 226
Highlight Pink Rectangle layer.
Click on it with your Magic Wand.
Copy and paste Paper 9 Into Selection.
Deselect.
Delete the template layer.
Give it the same Inner Bevel.
Highlight Circle layer.
Click on it with your Magic Wand.
New Raster layer.
Copy and paste Paper 11 Into Selection.
Apply the same Pool Shadow effect.
Deselect.
Delete the template layer.
Apply Eyecandy 3.1 - Glow:
Width: 5
Opacity: 100
Opacity Drop off: Fat
Color: #6d7a22
OK
Color Pallet:
Change the foreground to #788425
Highlight Frame Back 1 layer.
Make your Target Tool active and change the color of this template layer using the foreground color.
Highlight Frame 1 layer.
Select All/Float/Defloat
New Raster layer.
Copy and paste Paper 11 Into Selection.
Deselect.
Delete the template layer.
Adjust/Add Remove Noise/Add Noise:
Monochrome and Gaussian checked.
Noise: 65%
OK
Highlight Frame 2 layer.
Repeat the above step.
Highlight Frame Back 2 layer.
Click anywhere outside of it with your Magic Wand.
Selections/Invert
New Raster layer.
Copy and paste Paper 2 Into Selection.
Copy and paste your tube as a new layer above the paper.
Selections/Invert
Tap the delete key.
Deselect.
Delete the template layer.
Add your embellishments. I used:
Button 3: Resize 25% and 40%/Duplicate 3x’s
Bunting 1: Resize 67%/Apply Pool Shadow Effect/Use Pick Tool to pull in just a little to fit nicely between the buttons.
Bat 1: Resize 30%
Realistic Flower 2: Resize 135%
Feather 1: Resize 60%/Duplicate/Duplicate/Free rotate Right 45 degrees
Staple 1: Resize 25% and 80%/Free rotate Left 45 degrees/Duplicate 3x’s
Skull 1: Resize 35%/Mirror
Spider 1: Resize 25%/Duplicate/Resize 70%/Mirror
Highlight your white canvas.
New Raster layer.
Select All.
Copy and paste Paper 8 Into Selection.
Deselect.
Apply the mask.
Resize 130%
Merge Group.
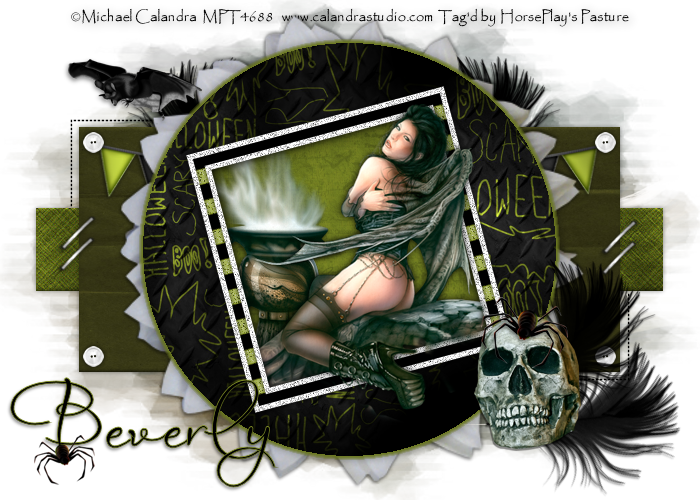
Add your copyrights.
Add your name.
Resize all layers 80%.
I hope you enjoyed this tutorial.
I’d love to see your results.
Email me!
Hugs,
Bev
No comments:
Post a Comment