Supplies
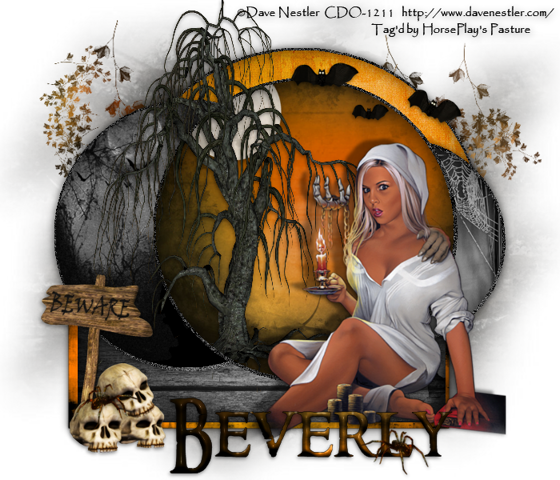
1 tube of choice - I used the artwork of Dave Nestler which can be purchased from CDO. You must have a license to use.
Font of choice - I used Ringerbearer Medium here
Dee’s Sign Post mask 1 here
Divine Intentionz Template 358 here
“Get Spooked” is a tagger size scrap kit created by Cindy of Chichi Designz can be purchased from Twilight Scraps. You can visit his blog here.
Thank you Cindy for a fantastic Halloween kit!
This tutorial was written assuming you have a working knowledge of PSP.
~♥~ Let’s get started ~♥~
Open up the template
Shift + D.
Close out the original.
Delete top 2 layers, Heart 1, Heart 2, and Heart 3 layers.
Resize all layers 85%
Image/Canvas Size
700 x 700
OK
Open up Raster 1 layer.
Flood fill white.
Highlight Glitter Circle 1 layer.
Click anywhere outside of it with your Magic Wand.
Selections/Invert
New Raster layer.
Copy and paste Paper 7 Into Selection.
Deselect.
Delete the template layer.
Adjust/Add Remove Noise/Add Noise:
Gaussian and Monochrome checked
Noise: 53%
OK
Repeat the above step with:
Glitter Circle Left
Glitter Circle Right
Glitter Circle Center
Highlight Circle 1 layer.
Click on it with your Magic Wand.
New Raster layer.
Copy and paste Paper 10 Into Selection.
Deselect.
Delete the template layer.
Highlight Rectangle 1 layer.
Select All/Float/Defloat
New Raster layer.
Copy and paste Paper 3 Into Selection.
Deselect.
Delete the template layer.
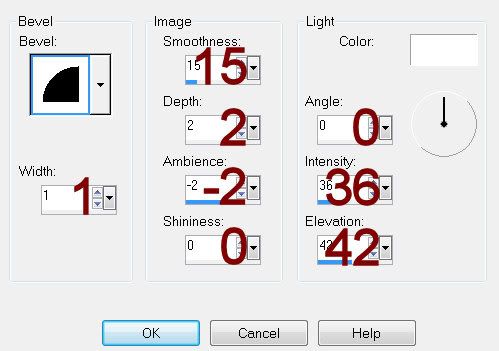
Give it a slight Inner Bevel:

Highlight Rectangle 2 layer.
Click anywhere outside of it with your Magic Wand.
Copy and paste Paper 7 as a new layer.
Resize 60%
Selections/Invert
Tap the delete key.
Delete the template layer.
Give it the same slight Inner Bevel.
Highlight Circle Left layer.
Click on it with your Magic Wand.
New Raster layer.
Copy and paste Paper 13 Into Selection.
Deselect.
Delete the template layer.
Highlight Circle Right Layer.
Click anywhere outside of it with your Magic Wand.
Copy and paste Paper 2 as a new layer.
Resize 40%
Move into position over the template layer.
Tap the delete key.
Deselect.
Delete the template layer.
Highlight Circle Center layer.
Click anywhere outside of it with your Magic Wand.
Copy and paste Paper 5 as a new layer.
Resize 55%
Move into position over the template layer.
Tap the delete key.
Deselect.
Delete the template layer.
Copy and paste the following elements and move into position in front of the circle paper - see my tag for reference. Don’t worry about what overhangs the paper. We’ll clean that mess up in a bit.
Tree 1
Moon: Resize 25%
Highlight the circle paper that’s just below the elements.
Click anywhere outside of it with your Magic Wand.
Highlight the moon layer
Tap the delete key.
Use your Eraser Tool and erase the base roots at the bottom of the tree.
Deselect.
Copy and paste your tube as a new layer.
Give it an exaggerated drop shadow.
Add your elements. I used:
Bats: Resize 40%
Leaves: Resize 90%
Beware Sign: Resize 40%
Skulls: Resize 30%
Spider: Resize 25% and 80%
Highlight your white canvas.
New Raster layer.
Select All.
Copy and paste Paper 9 Into Selection.
Deselect.
Apply the mask.
Resize 120%
Merge Group.
Add your copyrights.
Add your name.
Color Pallet:
Foreground: #000000
Background: Pattern/Paper 5
Stroke: .5
Type your name.
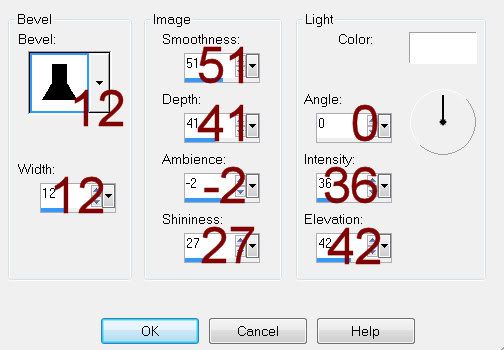
Give it a slight Inner Bevel:

Resize all layers 80%.
I hope you enjoyed this tutorial.
I’d love to see your results and show it off in my gallery.
Email me!
Hugs,
Bev

No comments:
Post a Comment