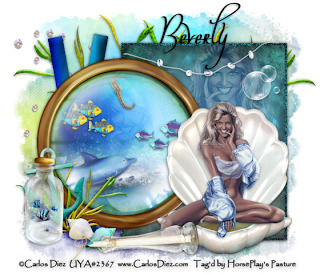
Supplies
1 tube of choice - I used the gorgeous artwork of Carlos Diez which can be purchased from Up Your Art. You must have a license to use.
Font of choice - I used Oh Lara - a pay font
Becky Mask 22 here
Creative by Nature Template 39 here
“Sea Secrets” is a tagger size scrap kit created by Conchi of Dnscraps can be purchased from Aussie Scrap Designs. You can visit her blog here.
Thank you Conchi for such an amazing summer themed kit!!
This tutorial was written assuming you have a working knowledge of PSP.
~♥~ Let’s get started ~♥~
Open up the template.
Shift + D.
Close out the original.
Delete the top 4 layers and Raster 6 layer.
Image/Canvas Size:
700 X 600
OK
Open up Raster 1 layer and flood fill white.
Highlight Raster 2 layer.
Click anywhere outside of it with your Magic Wand.
Selections/Invert
New Raster layer.
Copy and paste Paper 8 Into Selections.
Adjust/Add Remove Noise/Add Noise:
Gaussian and Monochrome checked
Noise: 58%
OK
Deselect.
Delete the template layer.
Highlight Raster 5 layer.
Click on it with your Magic Wand.
New Raster layer.
Copy and paste Paper 13 Into Selection.
Deselect.
Delete the template layer.
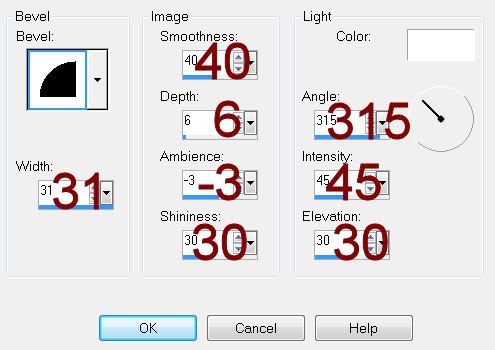
Give it a slight Inner Bevel:

Highlight Copy of Vector 1 layer.
Click on it with your Magic Wand.
New Raster layer.
Flip Paper 13/Copy
Make your working canvas active.
Paste Into Selection.
Deselect.
Delete the template layer.
Give it the same slight Inner Bevel.
Highlight Copy of Vector 1 layer (the big pink square layer).
Click on it with your Magic Wand.
New Raster layer.
Copy and paste Paper 5 Into Selection.
Copy and paste your tube as a new layer above the paper.
Move into position.
Selections/Invert
Tap the delete key.
Deselect.
Change the Properties to Soft Light.
Highlight Raster 3 layer.
Click anywhere outside of it with your Magic Wand.
Selections/Invert
New Raster layer.
Copy and paste Paper 4 Into Selection.
Copy and paste Seasecrettimon2 Into Selection.
Close this layer out for now.
Deselect.
Delete the template layer.
Add the following embellishments just above the paper layer:
Seahorse: Resize 25% and 50%
Fish 4: Resize 25% and 60%
Fish 4 again: Resize 25% and 50%/Duplicate/Resize 60%
Fish 3: Resize 25% and 60%/Duplicate/Resize 60%/Duplicate
Delphin: Resize 30%
Copy and paste your tube as a new layer just above the round circle paper layer.
Click anywhere outside of the paper layer with your Magic Wand.
Highlight the tube layer.
Tap the delete key.
Deselect.
Change the Properties to Soft Light.
Lower the Opacity to around 35 or so.
Reopen Seasecrettimon2 layer.
To give it a drop shadow (and any other drop shadows you don’t want the shadow to show through the element) do the following:
Give the element a drop shadow on it’s own layer.
Highlight the element layer.
Click anywhere outside of the embellishment with your Magic Wand.
Selections/Invert
Selections/Modify/Contract by 1
Highlight the drop shadow layer.
Tap the delete key.
Deselect.
Copy and paste Seasecretshelbed as a new layer.
Resize 60%
Move into position.
Copy and paste your tube as a new layer.
Add your embellishments. I used:
Anchor: Resize 30%/Free rotate Left 10 degrees
String 3: Resize 55%/Free rotate Left 10 degrees
Bubbles: Resize 25% and 50%
Algae: Resize 70%/Position just above your white canvas/Duplicate/Mirror
Algae again: Resize 40%
Pearls 2: Erase whatever pearls you don’t want
Bottle 2: Resize 30%
Conch & Conch 2: Resize 25% and 50%
Bottle 4: Resize 40%
Highlight your white canvas.
New Raster layer.
Select All.
Copy and paste Paper 2 Into Selection.
Deselect.
Apply the mask.
Merge Group.
Duplicate
Add your copyrights.
Add your name.
Resize all layers 80%.
I hope you enjoyed this tutorial.
I’d love to see your results and show it off in my gallery.
Email me!
Hugs,
Bev

No comments:
Post a Comment