Supplies
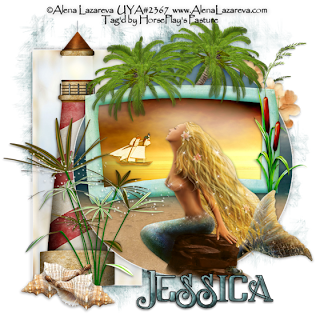
1 tube of choice - I used the beautiful artwork of Alena Lazareva and can be purchased from Up Your Art. You must have a license to use.
Font of choice - I used Sucker Font here
Weescotlass Mask 297 here
Eyecandy 3.1 - Glow
“Catch A Wave” is a tagger size scrap kit created by Jessica of Gothic Inspirations and can be purchased from Stargazer Scraps. You can visit her blog here.
Thank you Jessica for another wonderful summer themed kit!
This tutorial was written assuming you have a working knowledge of PSP.
~♥~ Let’s get started ~♥~
Open up a 700 x 700 blank canvas.
Flood fill white.
Make your Selection Tool active set to Circle.
Make a circle approximately 475 pixels.
New Raster layer.
Copy and paste Paper 1 Into Selection.
Deselect.
Apply Eyecandy 3.1 - Glow:
Width: 3
Opacity: 100
Opacity Drop off: Fat
Color: white
OK
Don’t worry about placement yet.
Make your Selection Tool active again set on Rectangle.
Make a rectangle approximately 250 x 525 pixels.
New Rater layer.
Copy and paste Paper 9 Into Selection.
Deselect.
Apply Eyecandy 3.1 - Glow:
Use same settings
Copy and paste Frame 1 as a new layer.
Resize 60%
Move all layers into position - see my tag for reference.
Highlight the frame layer.
Click inside of it with your Magic Wand.
Selections/Modify/Expand by 4.
New Raster layer below the frame.
Copy and paste Paper 5 Into Selection.
Deselect.
Copy and paste Ship as a new layer.
Resize 25% and 70%
Position over the paper.
Change the Properties to Hard Light.
Copy and paste your tube as a new layer.
Add your embellishments. I used:
Cattails: Resize 40%
Lighthouse: Resize 80%
Flowers: Erase the long stem if it stick out at the bottom of the circle
Sea Grass: Resize 40%
Palm Tree I: Resize 50%/Duplicate/Mirror
Greenery: Resize 60%
Shell I: Resize 30%/Duplicate/Mirror
Highlight your white canvas.
New Raster layer.
Select All.
Copy and paste Paper 2 Into Selection.
Deselect.
Apply the mask.
Merge Group.
Add your copyrights.
Add your name.
Color Pallet:
Foreground: Black
Background: Pattern/Paper 2
Stroke: 1
Type your name.
Convert to Raster layer.
Select All/Float/Defloat
Selections/Modify/Contract by 1
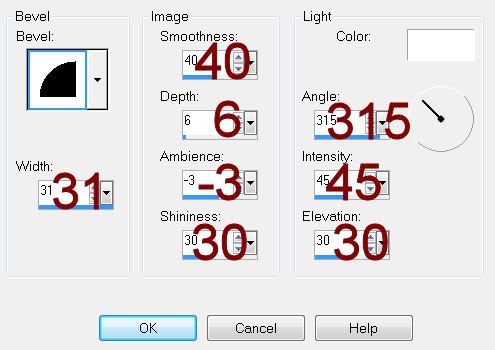
Give it a slight Inner Bevel:

Deselect.
Resize all layers 80%.
I hope you enjoyed this tutorial.
I’d love to see your results and show it off in my gallery.
Email me!
Hugs,
Bev

No comments:
Post a Comment