

Supplies
1 tube of choice - I used the artwork of Rachel Anderson and can be purchased from CDO. You must have a license to use.
Font of choice - I used CAC Shishoni Brush here
Mask here. I’ve had it for many years and never knew who it belonged to. Please email me if you know who created it so I can give proper credit.
Plug Ins:
Eyecandy 3.1 - glow
DSB Flux - Bright Noise
“Midnight Escape” is a tagger size scrap kit created by Jen of Jen’s Sweet Tempations and can be purchased from Lollipops n Gumdrops. You can visit her blog here.
Thank you Jen for a magical midnight kit!
This tutorial was written assuming you have a working knowledge of PSP.
~♥~ Let’s get started ~♥~
Open up a 700 x 700 blank canvas.
Flood fill white.
Make your Selection Tool active set on Rectangle and make a rectangle approximately 300 x 375 Pixels.
New Raster layer.
Copy and paste Paper 7 Into Selection.
Deselect.
Apply Eyecandy 3.1 - Glow:
Width: 5
Opacity: 100
Opacity Dropoff: Fat
Color: White
OK
Free rotate Left 5 degrees
Make your Selection Tool active again and make a rectangle approximately 525 x 375 pixels.
Copy and paste Paper 11 as a new layer.
Resize 70%
Position within the marching rectangle ants.
Selections/Invert
Tap the delete key.
Deselect.
Apply the same glow effect.
Move both rectangle into position -
See my tag for reference.
Copy and paste your tube as a new layer.
Copy and paste Décor 3 as a new layer.
Resize 120%
Position it behind both rectangles so that just the grass stick up - erase the part of the element that you don’t want sticking out from behind and duplicating the element as many times as you like.
See my tag for reference.
Add your embellishments. I used:
Bfly 2
Wing: Resize 60%/Mirror
Flower 1: Place behind the rectangles/Duplicate/Mirror
Flower 1 again: Resize 40%
Crop your image.
Highlight your white canvas.
New Raster layer.
Select All.
Copy and paste Paper 12 Into Selection.
Deselect.
Apply the mask.
Merge Group.
Add your copyrights.
Add your name.
Color Pallet:
Foreground: Black
Background: Pattern/Set to Paper 7/Scale 100
Stroke: 1
Type your name.
Convert to Raster layer.
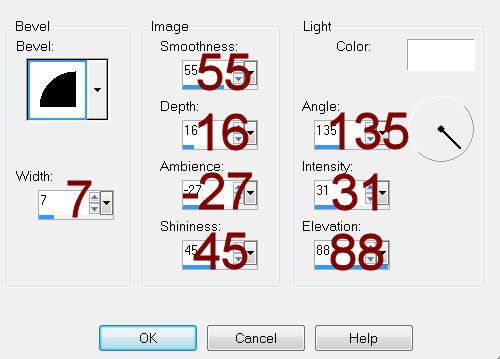
Give it a slight Inner Bevel:
Deselect.
Apply DSB Flux - Bright Noise:
Intensity: 34%
Mix checked
OK
Resize all layers 80%.
I hope you enjoyed this tutorial.
I’d love to see your results and show it off in my gallery.
Email me!
Hugs,
Bev
No comments:
Post a Comment