

Supplies
1 tube of choice - I used the artwork of Rachel Anderson which can be purchased from CDO. You must have a license to use.
Font of choice - I used Al Sandra here
Becky Mask 22 here
Divine Intentionz template 268 here
Eyecandy 3.1 - Glow
Greg’s Factory Output Vol. II - Pool Shadow
“Blue Bubbly World” is a tagger size scrap kit created by Stef of Stef’s Scrap Kits and can be purchased from Lollipops n Gumdrops. You can visit her blog here.
This tutorial was written assuming you have a working knowledge of PSP.
~♥~ Let’s get started ~♥~
Open up the template.
Shift + D.
Close out the original.
Delete the top 2 layers.
Image/Canvas Size:
700 x 500
OK
Open up the background layer and flood fill white.
Highlight Square Shape layer.
Click on it with your Magic Wand.
New Raster layer.
Copy and paste Paper 7 Into Selection.
Deselect.
Delete the template layer.
Highlight Glittered Square Shape layer.
Click anywhere outside of it with your Magic Wand.
Selections/Invert
New Raster layer.
Copy and paste Paper 1 Into Selection.
Adjust/Add Remove Noise/Add Noise:
Gaussian and Monochrome checked
Noise: 15%
OK
Deselect.
Delete the template layer.
Highlight Oval Half 2 layer.
Merge down.
Both oval halves should be on one layer.
Use your Magic Wand and click on the blue side.
Use your Magic Wand and click on the pink side.
The ants should be all one big oval.
New Raster layer.
Copy and paste Paper 12 Into Selection.
Deselect.
Delete the template layer.
Apply Eyecandy 3.1 - Glow:
Width: 3
Opacity: 100
Opacity Dropoff: Fat
Color: White
OK
Highlight Thin Rectangle 2 layer.
Merge Down.
Both rectangle layers should be on one layer.
Use your Magic Wand and click on the pink side.
Use your Magic Wand and click on the blue side.
The marching ants should now be one thin rectangle.
New Raster layer.
Copy and paste Paper 6 Into Selection.
Deselect.
Delete the template layer.
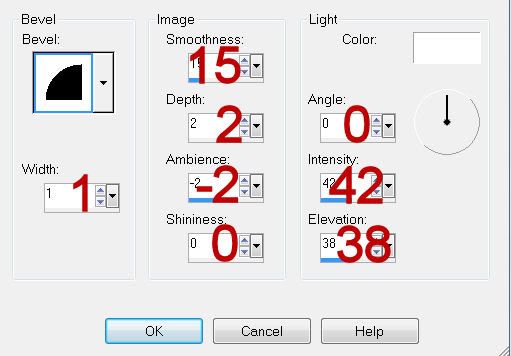
Give it a slight Inner Bevel:
Highlight Rectangle 1 layer.
Click on it with your Magic Wand.
New Raster layer.
Copy and paste Paper 13 Into Selection.
Copy and paste your tube as a new layer above the paper.
Move into position.
Selections/Invert
Tap the delete key.
Deselect.
Delete the template layer.
Change the Properties of the tube layer to Soft Light.
Highlight Rectangle 2 layer.
Click on it with your Magic Wand.
New Raster layer.
Copy and paste Paper 13 Into Selection.
Deselect.
Delete the template layer.
Highlight Circle template layer.
Click on it with your Magic Wand.
New Raster layer.
Copy and paste Paper 9 Into Selection.
Apply Greg’s Factory Output Vol. II - Pool Shadow:
Use Default Settings accept lower the Intensity bar to about 67.
Copy and paste your tube as a new layer.
Add your embellishments. I used:
2: Resize 40%/Duplicate/Duplicate/Mirror
4: Resize 30%/Duplicate/Mirror
3: Resize 40%/Duplicate/Mirror
8: Resize 40%
51: Each word - Remember & Heaven: Resize 40%/Lower the Opacity to about 6
35: Resize 25% and 25%/Duplicate/Resize 70%/Duplicate/Resize 70%/Duplicate/Resize 70%
Highlight your white canvas.
New Raster layer.
Select All.
Copy and paste Paper 10 Into Selection.
Deselect.
Apply the mask.
Merge Group.
Add your copyrights.
Add your name.
Give it a glow.
Resize all layers 80%.
I hope you enjoyed this tutorial.
I’d love to see your results and show it off in my gallery.
Email me!
Hugs,
Bev
me gustaria intentarlo, pero yo en PSP no se trabajar, lo mio es el Adope Photoshop, asi que no me salen las cosas hermosas como las suyas;
ReplyDeletemuy bonito!
Thank you for such kind words♥
ReplyDeletePerhaps if you could look at the tag and try to imitate the tag the best you can, put your own ideas into it. You just may come out with something spectacular!
Hugs
Bev