

Supplies
1 tube of choice - I used the artwork of Zindy S.D. Nielsen here
Font of choice - I used Anglo Saxon here
Weescotlass Mask 149 here
Greg’s Factory Output Vol. II - Pool Shadow
“Shot Through the Heart” is a tagger size scrap kit created by Jen of Sleek n Sassy Designz and can be purchased from Lollipops n Gumdrops. You can visit her blog here. Thank you Jen for such an awesome kit!
This tutorial was written assuming you have a working knowledge of PSP.
~♥~ Let’s get started ~♥~
Open a 700 x 700 blank canvas.
Flood fill white.
Copy and paste Frame 4 as a new layer.
Resize 75%
Free rotate Right 5 degrees
Use your Magic Wand and click inside the frame.
Selections/Modify/Expand by 4.
New Raster layer below the frame.
Copy and paste Paper 7 Into Selection.
Copy and paste your tube as a new layer above the paper.
Selections/Invert
Tap the delete key.
Deselect.
Copy and paste Crow as a new layer.
Resize 40%
Use your Magic Wand and click anywhere outside of the bird.
Selections/Invert
Apply Greg’s Factory Output Vol. II - Pool Shadow:
Use Default Settings.
OK
Deselect.
Add your embellishments. I used:
Flower: Resize 30%/Duplicate/Resize 70%
Steampunk 4: Resize 50%
Candle: Resize 50%
Feather
Doodle: Resize 80%/Duplicate/Resize 70%
Crop your image.
Highlight your white canvas.
New Raster layer.
Select All.
Copy and paste Paper 2 Into Selection.
Deselect.
Apply the mask.
Resize 110%
Merge Group.
Add your copyrights.
Add your name.
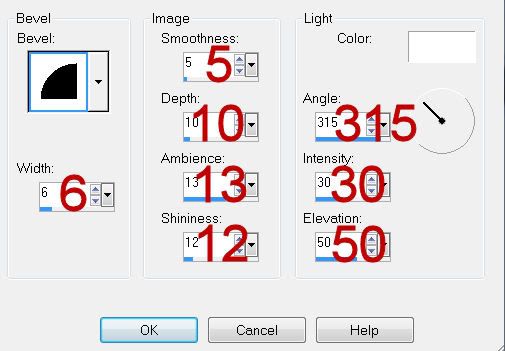
Give it a slight Inner Bevel:
Effects/Edge Effect/Enhance More
Resize all layers 80%.
I hope you enjoyed this tutorial.
I’d love to see your results and show it off in my gallery.
Email me!
Hugs,
Bev
No comments:
Post a Comment