

Supplies
1 tube of choice - I used the artwork of Camilla Drakenborg which can be purchased from Up Your Art. You must have a license to use.
Font of choice - I used Cardinal here
Blissfully Beth Template 143 here
My Mask 1 here
“Creamery” is a tagger size scrap kit created by Jo of A Taggers Scrap and can be purchased from Stargazer Scraps. You can visit her blog here.
Thank you Jo for a truly beautiful kit!
This tutorial was written assuming you have a working knowledge of PSP.
~♥~ Let’s get started ~♥~
Open up the template.
Shift + D.
Close out the original.
New Raster layer.
Flood fill white
Send to Bottom.
Delete the top 2 layers and Raster 1.
Highlight White Rect layer.
Click on it with your Magic Wand.
New Raster layer.
Copy and paste Paper 4 Into Selection.
Deselect.
Delete the template layer.
Highlight Black Rect Frame layer.
Click on it with your Magic Wand.
New Raster layer
Copy and paste Paper 10 Into Selection.
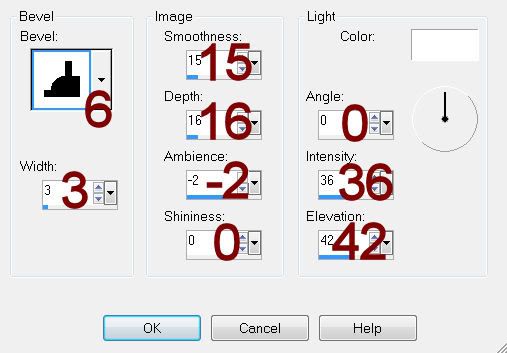
Give it a slight Inner Bevel:
INSERT PIC HERE
Adjust/Add Remove Noise/Add Noise:
Monochrome and Gaussian checked
Noise: 40%
OK
Deselect.
Delete the template layer.
Repeat the above step with Lg Round Blue Circle, Top Black Circle Frame, and Bottom Black Circle Frame.
Highlight Lg Black Circle.
Click on it with your Magic Wand.
New Raster layer.
Copy and paste Paper 6 Into Selection.
Copy and paste Leaf Scatter 2 as a new layer below the frame.
Move into position.
Selection/Invert
Tap the delete key.
Copy and paste Bird House as a new layer below the frame.
Resize 80%
Tap the delete key.
Copy and paste Fence as a new layer below the frame.
Resize 70%
Tap the delete key.
Deselect
Delete the template layer.
Highlight Top Blue Circle.
Click on it with your Magic Wand.
New Raster layer.
Copy and paste Paper 8 Into Selection.
Copy and paste your tube as a new layer.
Move into position over the circle paper.
Selections/Invert
Tap the delete key.
Deselect.
Delete the template layer.
Change the Properties to Multiply and lower the Opacity to about 44.
Repeat the above step with Bottom Blue Circle but choose a different area of the tube to position over the paper.
Copy and paste your tube as a new layer.
Add your embellishments. I used:
Button 1: Resize 25% and 30%/Duplicate twice and place at each corner of the frame.
Pot
Flower 2: Duplicate
Cross and Key: Resize 40%/Mirror
Leaves 5: Resize 60%/Free rotate Left 45 degrees
Leaves 5 again: Resize 60%/Mirror/Free rotate Left 45 degrees
Butterfly 1 & 5: Resize 25%/Free rotate 25 degrees
Highlight your white canvas.
Select All
New Raster layer.
Copy and paste Paper 20 Into Selection.
Deselect.
Apply the mask.
Resize 110%
Merge Group.
Add your copyrights.
Add your name.
Open up the pot embellishment.
Use your Selection Tool set on Rectangle and section out an area of it.
Foreground: Gradient/Metal Steel
Angle: 66
Repeats: 0
Linear
Background: Pattern/Look for the area of the pot
Type your name
Give it a slight Inner Bevel:
Resize all layers 80%.
I hope you enjoyed this tutorial.
I’d love to see your results and show it off in my gallery.
Email me!
Hugs,
Bev
Love your tutorials but can you please explain how to feather the legs and lower body parts if the tube has cropped legs please.. thanks so much
ReplyDelete