Supplies
2 tubes of choice - I used the artwork of Jennifer Janesko which can now be purchased from CDO. You must have a license to use.
Font of choice - I used Aquarelle here
Weescotlass Mask 249 here
Divine Intentionz Template 368 here
Greg’s Factory Output Vol. II - Pool Shadow
“Rusty Romance” is a full size scrap kit created by Heppy of HF Projekte and can be purchased from his store Inspirations of Scrap Friends . You can visit his bog here.
Thank you Heppy for yet another gorgeous kit!
This tutorial was written assuming you have a working knowledge of PSP.
~♥~ Let’s get started ~♥~
Open up the template.
Shift + D.
Close out the original.
Delete the top 3 layers.
Resize all layers 85%
Image/Canvas Size
700 x 500
OK
Open up the background layer.
Flood fill white.
Highlight Large Circle layer.
Click on it with your Magic Wand.
New Raster layer.
Copy and paste Paper 4 Into Selection.
Deselect.
Delete the template layer.
Copy and paste 23 as a new layer.
Resize 40%
Move into position over the paper layer.
Use your Selection Tool set on Rectangle and section off the lower half of the frame.
Tap the delete key.
Deselect.
Duplicate/Flip
Move this into place over the lower half of the circle paper.
Merge Visible both frame layers.
Highlight Circle 1 layer.
Click on it with your Magic Wand.
New Raster layer.
Copy and paste Paper 5 Into Selection.
Deselect.
Delete the template layer.
Copy and paste 23 again.
Resize 25% and 90%
Position over the paper layer.
Highlight Center Rectangle layer.
Click on it with your Magic Wand.
New Raster layer.
Copy and paste Paper 10 Into Selection.
Copy and paste 29 as a new layer.
Resize 25%
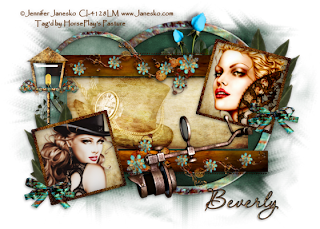
Move into position - see my tag for reference.
Selections/Invert
Tap the delete key.
Deselect.
Change the Properties to Overlay.
Duplicate
Lower the Opacity to about 40.
Highlight Thin Rectangle 2 layer.
Move it down in your layers pallet so that it’s just above Thin Rectangle 1 layer.
Merge Down.
Both rectangle should be on one layer.
Use your Magic Wand and click on both rectangles.
New Raster layer.
Copy and paste Paper 7 Into Selection.
Apply Greg’s Factory Output Vol. II - Pool Shadow:
Default Settings
Deselect.
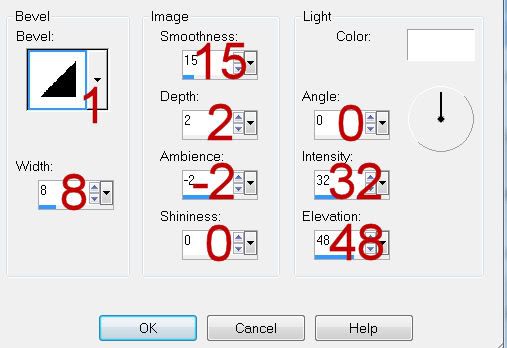
Give it a slight Inner Bevel:

Highlight Dotted Line layer.
Select All/Float/Defloat
New Raster layer.
Paste paper 7 Into Selection.
Deselect.
Delete the template layer.
Highlight Frame Left layer.
Click on it with your Magic Wand.
New Raster layer.
Paste Paper 7 Into Selection.
Give it a slight Inner Bevel - same settings.
Adjust/Add Remove Noise/Add Noise:
Monochrome and Gaussian checked
Noise: 43%
OK
Deselect.
Highlight Frame Right layer.
Repeat the above step.
Highlight Frame Back layer.
Click on it with your Magic Wand.
New Raster layer.
Copy and paste Paper 10 Into Selection.
Copy and paste your tube as a new layer.
Selections/Invert
Tap the delete key.
Deselect.
Repeat the above step with the other Frame back layer using a different tube.
Add your embellishments. I used:
39: Resize 25% and 85%/Free rotate Right 5 degrees/Duplicate/Mirror
15: Resize 25%/Free rotate Right 45 degrees/Duplicate/Mirror/Flip
30: Resize 25%
17: Resize 25% and 35%/Duplicate/Mirror
40: Resize 25%/Duplicate/Mirror/Resize 70% - give exaggerated drop shadow
7: Resize 25%/Tip: When giving it a drop shadow be sure the drop shadow is on a layers of its own. Use your Freehand Selection Tool to outline the glass, be sure you’re on the drop shadow layer and tap the delete key. Deselect.
Highlight your white canvas.
New Raster layer.
Select All.
Copy and paste Paper 10 Into Selection.
Deselect.
Apply the mask.
Resize 110%
Use your Pick Tool to pull the sides out just a little.
Merge Group.
Add your copyrights.
Add your name.
Foreground: #522400
Background: Pattern/Paper 10
Stroke: 1
Type your name.
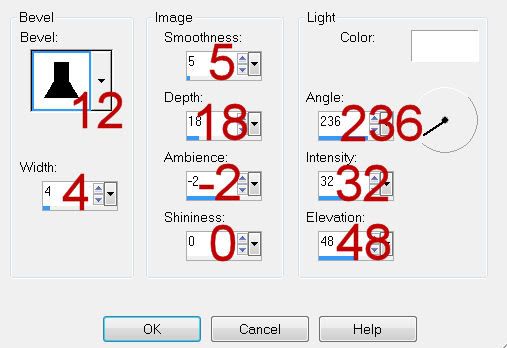
Give it a slight Inner Bevel:

Resize all layers 80%.
I hope you enjoyed this tutorial.
I’d love to see your results and show it off in my gallery.
Email me!
Hugs,
Bev

Well done class
ReplyDeleteThank you Edda!
ReplyDelete