

Supplies
1 tube of choice - I used the artwork of Half Pints which can be purchased from MPT. You must have a license to use.
Font of choice - I used Childish here
Becky mask 22 here
“Things for Kids ” is a full size scrap kit created by Lori of P4DSDesigns and can be purchased from Lollipops n Gumdrops. You can visit her blog here. Thank you Lori for a super fun kit!
This tutorial was written assuming you have a working knowledge of PSP.
~♥~ Let’s get started ~♥~
Open a 700 x 700 blank canvas.
Flood fill white.
Copy and paste Red Paint Frame as a new layer.
Resize 25% and 60%
Free rotate Left 10 degrees.
Duplicate/Mirror
Copy and paste your tube as a new layer.
Move the frames and tube into their positions - see my tag for reference.
Highlight the top frame.
Click inside of it with your Magic Wand.
Selections/Modify/Expand by 4.
New Raster layer below the frame.
Copy and paste Paper 13 Into Selection.
Copy and paste Smile Face as a new layer above the paper.
Resize 25% and 605
Move into position.
Selections/Invert
Tap the delete key.
Deselect.
Highlight the bottom frame.
Click inside of it with your magic Wand.
Selections/Modify/Expand by 4.
New Raster layer below the frame.
Copy and paste Paper 13 into Selection.
Duplicate your tube.
Move beneath the frame in your layers pallet.
Selections/Invert
Tap the delete key.
Deselect.
Change the Properties to Soft Light.
Add your embellishments. I used:
Ric Rac 4: Resize 25% and 30%/Duplicate 3 times
Airplane: Resize 25% and 30%
Color blot Purple: Resize 25% and 40%
Balloons 3: Resize 25%
Each of the crayons: Resize 25% and 25%
Highlight your white canvas.
New Raster layer.
Select All.
Copy and paste Paper 10 Into Selection.
Deselect.
Apply the mask.
Merge Group.
Copy and paste Banner Flag as a new layer.
Resize 25%
Move into position just above the mask in your layers pallet.
Highlight the mask layer.
Select All/Float/Defloat
Selections/Invert
Highlight the Flag layer.
Tap the delete key.
Deselect.
Duplicate/Change the Properties to Multiply.
Add your copyrights.
Add your name.
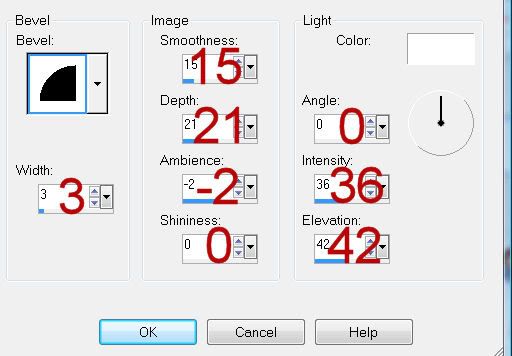
Give it a slight Inner Bevel:
Resize all layers 80%.
I hope you enjoyed this tutorial.
I’d love to see your results and show it off in my gallery.
Email me!
Hugs,
Bev
No comments:
Post a Comment